User Guide AX1500/AX1750/AX1800 Wi-Fi 6 Range Extender RE505X/RE603X/RE605X 1910012830 REV1.2.
Contents About This Guide . . . . . . . . . . . . . . . . . . . . . . . . . . . . . . . . . . . . . . . . . . . . . . . . . . . . . 1 Chapter 1. Get to Know About Your Extender . . . . . . . . . . . . . . . . . . . . . . . . 2 1. 1. 1. 2. Product Overview . . . . . . . . . . . . . . . . . . . . . . . . . . . . . . . . . . . . . . . . . . . . . . . . . . . . . . . . . . . . 3 Appearance . . . . . . . . . . . . . . . . . . . . . . . . . . . . . . . . . . . . . . . . . . . . . . . . . . . . . . . . . . . .
6. 3. 6. 4. 6. 5. 6. 6. 6. 7. Set Power Schedule . . . . . . . . . . . . . . . . . . . . . . . . . . . . . . . . . . . . . . . . . . . . . . . . . . . . . . . . 33 Upgrade the Firmware . . . . . . . . . . . . . . . . . . . . . . . . . . . . . . . . . . . . . . . . . . . . . . . . . . . . . . 34 Backup and Restore Configuration Settings . . . . . . . . . . . . . . . . . . . . . . . . . . . . . . . . 35 Change Login Password . . . . . . . . . . . . . . . . . . . . . . . . . . . . . . . . . . . . . . . .
About This Guide This guide is a complement to Quick Installation Guide. The Quick Installation Guide provides instructions for quick internet setup, while this guide contains details of each function and demonstrates how to configure them. Note: Features available in this range extender may vary by model and software version. Range extender availability may also vary by region or ISP.
Chapter 1 Get to Know About Your Extender This chapter introduces what the extender can do and its appearance.
Chapter 1 1. 1. Get to Know About Your Extender Product Overview Bring Dead Zones Back to Life Tired of Wi-Fi “dead zones”? The TP-Link extender is connected to your router wirelessly, strengthening its signal and expanding its coverage into areas that could not otherwise be reached. Easy Installation & Quick Position The extender works with any standard wireless router.
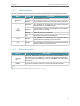
Chapter 1 1. 2. 1. Get to Know About Your Extender LED Explanation You can check the extender’s working status by following the LED Explanation table. Name (Power) (Signal) Status On/Off The extender is on or off. Solid blue The extender is connected to your router’s wireless network and is in a suitable location. Solid red The extender is receiving a weak signal. Try relocating it closer to your host router. Blinking Blinking Off 2.4G On/Off 5G On/Off 1. 2. 2.
Chapter 2 Set Up Internet Connection This chapter introduces how to boost your host wireless coverage. Please follow the step-by-step instructions to set up the internet connection.
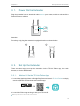
Chapter 2 2. 1. Set Up Internet Connection Power On the Extender Plug the extender into an electrical outlet next to your router, and then wait until the Power LED turns solid on. Solid On Attention: For safety, only plug the extender in upright direction as shown below. 2. 2. Set Up the Extender 2. 2. 1. Method 1: Via the TP-Link Tether App There are three ways to set up the extender: via the TP-Link Tether app, via a web browser, or via the WPS button. 1.
Chapter 2 Set Up Internet Connection 3. Tap the + icon on the upper-right corner and select Range Extender. 4. Follow app instructions to set up your extender. 5. (Optional) If your host router supports OneMesh, you can enable Join Onemesh to copy the router’s wireless settings for seamless roaming. For more information about Onemesh, refer to OneMeshTM with Seamless Roaming. 6. Relocate your extender to optimize Wi-Fi coverage and performance, and enjoy the extended network.
Chapter 2 Set Up Internet Connection Tip: For more intuitive location assistance, access extender settings via Tether and go to Tools > Location Assistant. You can also manage your extender via Tether, such as controlling LEDs, sharing passwords of your networks and blocking devices. 2. 2. 2. Method 2: Via a Web Browser 1. Connect your computer to the extender wirelessly as follows: • For Windows Users 1 ) Unplug the Ethernet cable from your computer (if any).
Chapter 2 Set Up Internet Connection Note: If the login window does not appear, please refer to FAQ. 2 ) Select your host router’s 2.4GHz SSID (network name), enter its password (NOT the password you just created for management), and click Next. 3 ) Select your host router’s 5GHz SSID (network name), enter its password (NOT the password you just created for management), and click Next. Note: If your host router does not support 5GHz wireless network, please click Skip to continue.
Chapter 2 Set Up Internet Connection 5 ) Either keep the default SSIDs (network names) or customize them for the extended networks, and then click Next. Tip: If you connect the extender to a TP-Link OneMesh router, the extender will automatically join the router’s OneMesh network and copy the router’s wireless settings. For more information, refer to OneMeshTM with Seamless Roaming. 6 ) Follow web instructions to relocate your extender for optimal Wi-Fi coverage and performance, and then click Done.
Chapter 2 Set Up Internet Connection 7 ) Enjoy! Connect to the extended network and enjoy the internet. 2. 2. 3. Method 3: Via the WPS Button Use this way if your router has a WPS button. The button might look like one of these: . 1. Press the WPS button on your host router, and then press the WPS button on the extender for 1 second within 2 minutes.
Chapter 2 Set Up Internet Connection Note: For more information about using WPS button on your host router, please refer to the router manufacturer’s user guide. 2. Wait until the Signal LED changes from blinking to solid on, which indicates that the WPS connection is successful. Note: If the LED does not turn solid on, try again or refer to Method 1: Via the TP-Link Tether App or Method 2: Via a Web Browser. 3.
Chapter 2 Set Up Internet Connection Suitable location Too far from router No connection Router Halfway Devices Tip: To minimize signal interference, please choose a location which is far away from Bluetooth devices and other household electronic devices, such as cordless phones, microwave ovens and baby monitors. 6. Enjoy! Connect to the extended network and enjoy the internet.
Chapter 3 OneMeshTM with Seamless Roaming This chapter introduces the TP-Link OneMeshTM feature.
Chapter 3 3. 1. OneMeshTM with Seamless Roaming What‘s a OneMeshTM Network TP-Link OneMeshTM router and TP-Link OneMeshTM extenders work together to form one unified Wi-Fi network. Walk through your home and stay connected with the fastest possible speeds thanks to OneMesh’s seamless coverage. Unified Wi-Fi Network Router and extenders share the same wireless settings, including network name, password, access control settings and more.
Chapter 3 3. 2. OneMeshTM with Seamless Roaming How to Set Up a OneMeshTM Network Once the extender is connected to a TP-Link OneMeshTM router via any method, the extender will automatically join the router’s OneMeshTM network and copy the router’s wireless settings. You can manage all mesh devices in the OneMeshTM network all on your router’s web page. If you want to remove the extender from the OneMeshTM network, follow the steps below: 1. Visit http://tplinkrepeater.
Chapter 4 TP-Link Cloud Service TP-Link Cloud service provides a better way to manage your cloud devices. Log in to your cloud device with a TP-Link ID, and you can easily monitor and manage your home network when you are out and about via the Tether app on your smartphone or tablet. To ensure that your cloud device stays new and gets better over time, the TP-Link Cloud will notify you when an important firmware upgrade is avaliable.
Chapter 4 4. 1. TP-Link Cloud Service Register a TP-Link ID When you log in after initial setup, the web page will ask whether you need TP-Link Cloud service. You can also access the TP-Link Cloud settings as follows: 1. Visit http://tplinkrepeater.net, and log in with the password you set for the extender. 2. Go to Settings > TP-Link Cloud. 3. Click Register Now and follow the instructions to register a TP-Link ID. 4. After activating your TP-Link ID, come back to the TP-Link Cloud page to log in.
Chapter 4 • TP-Link Cloud Service To change your password: 1. Click behind the Password. 4. 3. Manage the User TP-Link IDs 2. Enter the current password, then a new password twice. And click Save. The TP-Link ID used to log in to the extender for the first time will be automatically bound as the Admin account. An admin account can add or remove other TP-Link IDs to or from the same extender as Users.
Chapter 4 TP-Link Cloud Service • Add/remove other TP-Link IDs to/from the extender. 4. 3. 1. Add TP-Link ID to Manage the Extender 1. Visit http://tplinkrepeater.net, and log in with your TP-Link ID. 2. Go to Settings > TP-Link Cloud, and focus on the Bound Accounts section. 3. Click , enter another TP-Link ID as needed and click Save. Note: If you need another TP-Link ID, please register a new one via the Tether app.
Chapter 4 4. 4. TP-Link Cloud Service Manage the Extender via the TP-Link Tether App The Tether app runs on iOS and Android devices, such as smartphones and tablets. 1. Launch the Apple App Store or Google Play store and search “TP-Link Tether” or simply scan the QR code to download and install the app. OR 2. Launch the Tether app and log in with your TP-Link ID. Note: If you don’t have a TP-Link ID, create one first. 3. Connect your device to the extender’s or host router’s wireless network. 4.
Chapter 5 Customize Your Network This chapter guides you on how to configure network settings that are available for this extender.
Chapter 5 5. 1. Customize Your Network Check Internet Status You can view the internet status of your extender to check whether you have successfully set up the extended network(s). 1. Visit http://tplinkrepeater.net, and log in with your TP-Link ID or the password you set for the extender. 2. Go to Settings > Status to view the internet status of your extender. • The extender runs normally. • The extender fails to connect to the host networks.
Chapter 5 5. 2. Customize Your Network Configure Wireless Network If you want to extend another host network after Quick Setup, you can refer to this section. Moreover, you can change the wireless settings for your extended networks. Tip: If the extender is in your router’s OneMesh network, it will automatically copy wireless settings from your router. No wireless settings is needed for the extender. Visit http://tplinkrepeater.
Chapter 5 Customize Your Network 5. Click Save. • To enable or disable the extended network: 1. Go to Settings > Wireless > Extended Network. 2. Extended networks are enabled by default. If you want to disable the wireless function of a certain band, just clear the Enable checkbox. In this case, all the wireless settings of this band will be invalid. 3. Click Save. • To change the wireless network name (SSID): 1. Go to Settings > Wireless > Extended Network. 2. Create a new SSID in Extended 2.
Chapter 5 5. 3. Customize Your Network Change LAN Settings The extender is preset with a default LAN IP 192.168.0.254, with which you can log in to the web management page. The LAN IP address, together with the Subnet Mask, also defines the subnet that the connected devices are on. If the IP address conflicts with another device on your local network or your network requires a specific IP subnet, you can change it. 1. Visit http://tplinkrepeater.
Chapter 5 Customize Your Network 4. Click Save. 5. 5. Set Access Control Access Control allows you to permit or block specific devices from accessing the internet for a specific period. Tip: If the extender is in your router’s OneMesh network, it will automatically copy access control settings from your router. No access control settings is needed for the extender. 1. Visit http://tplinkrepeater.net and log in with your TP-Link ID or the password you set for the extender. 2.
Chapter 5 Customize Your Network 2. Select the device to be blocked in the Online Devices table by ticking the corresponding checkbox. 3. Click Block and the selected device(s) will be added to the Devices in Blacklist table. 4. Click in the Devices in Blacklist table to set the Effective Time for a certain entry as needed. 5. Click Save. • To permit specific device(s): 1. Select Whitelist and click Save.
Chapter 5 Customize Your Network 2. Click Add in the Devices in Whitelist table. Enter the Device Name and MAC Address. And you can set the Effective Time for a certain entry as needed. 3. Click Save. 5. 6. Set High Speed Mode The High Speed feature switches off one of the wireless bands to leave one highperformance, super-fast network, ideal for HD streaming and gaming applications.
Chapter 5 Customize Your Network 4. Select the Auto mode. The extender will decide which band the high-speed network will work on based on its wireless connection to your host router. The other band will be disabled. 5. Click Save.
Chapter 6 Manage Your Extender This chapter presents how to manage and maintain your extender.
Chapter 6 6. 1. Manage Your Extender Set System Time The System Time of the extender will be used for time-based function such as the Power Schedule function. If you have enabled the Daylight Saving Time feature, the system time will be sychronized with the daylight saving time you configure. 1. Visit http://tplinkrepeater.net, and log in with your TP-Link ID or the password you set for the extender. 2. Go to Settings > System Tools > Time Settings. • To get system time: 1.
Chapter 6 Manage Your Extender 1. Visit http://tplinkrepeater.net, and log in with your TP-Link ID or the password you set for the extender. 2. Go to Settings > System Tools > LED Control. • To turn off the LEDs: • To specify a time period when LEDs are off: Disable LED Status. 1. Select Night Mode. 2. Specify the LED off time period. Note: The effective time schedule for Night Mode is based on the system time of the extender. Refer to Set System Time to get the correct system time. 3.
Chapter 6 Manage Your Extender Note: The effective time schedule for Power Schedule is based on the system time of the extender. Refer to Set System Time to get the correct system time. 3. Click Save. 6. 4. Upgrade the Firmware TP-Link is committed to improving product features, giving you a better network experience. We will inform you through the web management page if there’s any update firmware available for your extender.