
User Guide
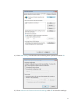
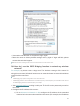
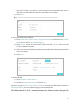
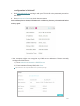

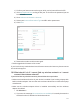
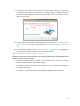
Table Of Contents
- About This Guide
- Get to Know About Your Router
- Connect the Hardware
- Log In to Your Router
- Set Up Internet Connection
- TP-Link Cloud Service
- Guest Network
- USB Settings
- Parental Controls
- QoS
- Network Security
- NAT Forwarding
- VPN Server
- Customize Your Network Settings
- Manage the Router
- 14. 1. Set Up System Time
- 14. 2. Control LEDs
- 14. 3. Test the Network Connectivity
- 14. 4. Upgrade the Firmware
- 14. 5. Backup and Restore Configuration Settings
- 14. 6. Change the Administrator Account
- 14. 7. Password Recovery
- 14. 8. Local Management
- 14. 9. Remote Management
- 14. 10. System Log
- 14. 11. Monitor the Internet Traffic Statistics
- FAQ

103
1 ) Confirm your internet connection type, which can be learned from the ISP.
2 ) Visit http://tplinkwifi.net, and log in with your TP-Link ID or the password you set
for the router.
3 ) Go to Advanced > Network > Internet.
4 ) Select your Internet Connection Type and fill in other parameters.
5 ) Click Save.
6 ) Restart the modem and the router again.
• Please upgrade the firmware of the router.
If you’ve tried every method above but still cannot access the internet, please contact
the technical support.
Q6. What should I do if I cannot find my wireless network or I cannot
connect the wireless network?
If you fail to find any wireless network, please follow the steps below:
• Make sure the wireless function of your device is enabled if you’re using a laptop with
built-in wireless adapter. You can refer to the relevant document or contact the laptop
manufacturer.
• Make sure the wireless adapter driver is installed successfully and the wireless
adapter is enabled.
• On Windows 7
1 ) If you see the message No connections are available, it is usually because the
wireless function is disabled or blocked somehow.