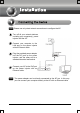
Note Please use only wired network connections to configure the AP. Turn off all your network devices, including your computer(s), power injector and the AP. Connect your computer to the LAN port on the power injector with an Ethernet cable. Plug the provided power adapter into the DC jack on the power injector, and the other end to a standard electrical wall socket. Connect your AP to the PoE port on the power injector with an Ethernet cable.
Turn on all your network devices and then check to see if the LEDs on the AP display normally as the diagram below describes. Solid light Flashing Solid light or flashing Flashing if the Wireless Radio function is enabled Note If the LEDs display abnormally, please check to see if all the cable connectors (power adapter and Ethernet cable) are well connected to your device. Note You will need to assign your computer a Static IP address within the same range as the AP’s IP address.
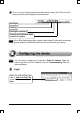
A dialog box will prompt you for the User name and Password. Enter the default values and click OK. User name: admin Password: admin Click OK Note If the dialog box does not pop up, please refer to T3 in the Troubleshooting guide. T2 will give you some help if you forget the password. The web management page will display after successfully logging in. Click Quick Setup Operation Mode Setting This page will then display.
Note The AP supports three operation mode types: AP Client Router, AP Router 2 and AP. a) If you want to connect to your WISP, please choose AP Client Router mode and proceed to AǗ b) If you want to configure a point to point connection, please skip to B; c) If you want to configure a repeater, please skip to C. A. Configuration for WISP Client (CPE) After choosing the AP Client Router mode on the above page, this page will then display. Choose your WAN Connection Type provided by your WISP.
B. Configuration for Point to Point Connection Note Two TL-WA5110G Access Points are needed for this application. 1) The AP Setting Select AP Click Next Enter a unique name for your wireless network; however, choose a name that is easily remembered by network users. Here we enter TP-LINK_88346E as the SSID for example Select your region from the drop-down list Click Next Click Finish to exit the Quick Setup wizard and wait until the AP completes rebooting automatically.
Click Network Enter 192.168.1.2 in the IP Address field Click Save Note The AP will begin rebooting automatically after clicking Save. Click Wireless > Wireless Mode Select Client Enter TP-LINK_88346E, the SSID of the first AP you configured Click Save at the bottom of this page. C.
This page will then display. Find the BSSID of the remote AP that you want to repeat, and then write it down or copy it. Here we copy the BSSID of ‘TP-LINK’ that is 00-19-E0-94-51-F4 Enter or paste the BSSID of the remote AP into the box under Repeater Note The BSSID is the same as the MAC address. Then click Save at the bottom of this page.
T1. How do I restore my Router’s configuration to its factory default settings? With the AP powered on, press and hold the RESET button on the rear panel for 8 to 10 seconds before releasing it. Hold it in for 8 to 10 seconds Note Once the AP is reset, the current configuration settings will be lost and you will need to reconfigure the router. T2. What can I do if I forget my password? 1) Restore the AP’s configuration to its factory default settings.
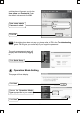
For Windows XP OS Go to Start > Control Panel, you will then see the following page.
Double-click Internet Protocol (TCP/IP) Select Use the following IP address Enter the 192.168.1.100 into the IP address field, 255.255.255.
For Windows Vista / Windows 7 OS Go to Start > Settings > Control Panel, and then you will see the following page.
Double-click Internet Protocol Version 4 (TCP/IPv4) Select Use the following IP address Enter the 192.168.1.100 into the IP address field, 255.255.255.
2) Configure your IE browser. Open your IE browser, click Tools tab and you will see the following screen. Click Internet Options Select Never dial a connection Click OK Now, try to log on to the Web-based configuration page again after the above settings have been configured. If you still cannot access the configuration page, please restore your AP’s factory default settings and reconfigure your AP following the instructions of this QIG.
Technical Support For more troubleshooting help, go to: www.tp-link.com/support/faq.asp To download the latest Firmware, Driver, Utility and User Guide, go to: www.tp-link.com/support/download.asp For all other technical support, please contact us by using the following details: Global Tel: +86 755 26504400 E-mail : support@tp-link.com Service time:24hrs, 7days a week Singapore Tel: +65 62840493 E-mail: support.sg@tp-link.