
Installation Guide


Title:
Access Management
Keypad Installation Guide
PN:
xxxxxx
Page:
10 of 14
Author:
Christopher R. Boltë
VER:
2.4
Date:
May, 2019
Access Management Keypad
Installation Guide
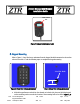
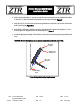
Notch for Split
Loom
Figure 5: Keypad Notch and Channel
f. With the keypad secured, rout the 3 foot keypad harness so it can be connected to the M7
patch cable
g. Connect the keypad harness and patch cable
h. Insert the Access Control harness** between the M7 and the main machine harness it is
connected to
i. Connect the Keypad patch harness to the Access Control harness connection reserved for the
keypad patch harness
**IMPORTANT NOTE: The keypad must be protected from the power source using a current and
voltage rating of 3A & 80V fuse to ensure safety in the event of a short circuit fault. ZTR can
provide an Access Control harness that has built-in fuse protection if the machine does not
already provide the proper fuse protection. It is the responsibility of the customer to ensure the
appropriate fuse protection is in place either on the machine power source circuit already, or via
the use of the specified Access Control harness.
6. Keypad Testing
Execute the following steps to confirm connectivity of the Keypad:
a. When the harness connection is made, observe the LED’s on the keypad
b. Yellow LED will initially light up to indicate the keypad is connected