
Installation Guide


Title:
Access Management
Keypad Installation Guide
PN:
xxxxxx
Page:
9 of 14
Author:
Christopher R. Boltë
VER:
2.4
Date:
May, 2019
Access Management Keypad
Installation Guide
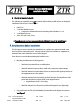
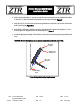
b. Mark a center point about 1 inch up from the bottom mounting hole as the landmark for where
to drill the 1 in. dia. hole that the keypad harness must pass through (Figure 3)
c. Wrap the 3/8 in. dia. split loom around the keypad harness and slide it up into the notch at the
back of the keypad (Figure 4, 5)
d. With all holes drilled and split loom in place, slide the keypad’s harness through the 1 in. dia.
hole and place the keypad flush to the mounting holes (Figure 4)
e. Install the appropriate length of #8 machine screws and secure the keypad using #8 nylon lock
nuts
CAUTION: Do not over tighten. Do not exceed torque limit of 23 In-lb or 2.6 N.m.
#8 Nylon Lock
Nut & Screw
3/8 In. Dia.
Split Loom
25 to 90 Degree
Angle
Mounting
Surface
Figure 4: Keypad Mounting Requirements