***ATTENTION*** PLEASE REMOVE THE RIGHT SIDE BAFFLE FILTER TO LOCATE YOUR NEW REMOTE CONTROL.
Revised 6/11/18 Copyright © 2018 Trade-Wind Manufacturing, LLC Proverbs 22:29 Page 2
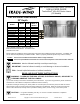
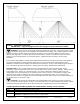
INSTALLATION INSTRUCTIONS & USE & CARE GUIDE Trade-Wind® VSL 400 Series Liners (22 Models) VSL 400 Series Liner Models 22” Depth Model VSL436-0-22-BF VSL442-0-22-BF VSL448-0-22-BF VSL454-0-22-BF VSL460-0-22-BF VSL436622RC VSL442622RC VSL448622RC VSL4421222RC VSL4481222RC VSL4541222RC VSL4601222RC Width CFM Type of Motor & Blower 3 * * * * * 600 600 600 1200 1200 1200 1200 Remote Remote Remote Remote Remote Internal Internal Internal Internal Internal Internal Internal 34 /8‖ 3 40 /8‖ 3 46 /8‖ 3 52 /
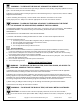
WARNING – TO REDUCE THE RISK OF A RANGE TOP GREASE FIRE: a) Never leave surface units unattended at high settings. Boilovers cause smoking and greasy spillovers that may ignite. Heat oils slowly on low or medium settings. b) Always turn hood ON when cooking at high heat or when flambeing food (i.e. Crepes Suzette, Cherries Jubilee, Peppercorn Beef Flambe’). c) Clean ventilating fans frequently. Grease should not be allowed to accumulate on fan or filter. d) Use proper pan size.
CAUTION – To reduce the risk of fire and electric shock, install this (range hood) only with Remote Blower models rated maximum 5 amps. CONTENTS: Part 1 - Planning the Installation Part 3 - Use & Care PART 1 Part 2 - Securing the Liner Part 4 - Electrical Connection (Give copy of these 2 pages to electrician.) Planning the Installation ® Trade-Wind Designer Series Liners are designed for installation inside custom hood canopies.
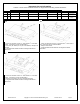
Important Cut-out Information Cabinet or hood cutouts should be at least 1/8‖ larger that the following outside dimensions Pic CFM A - B 600 C 1200 34 3/ 8” 40 3/ 8” Models Available (by Width) 3/ 3/ 46 8” 52 8” 8” Sones Control VSL460-0-22-BF N/A Variable In-Line or Remote Mount Blower VSL448622RC - - 7.5 3-Speed Internal Motor VSL4481222RC VSL4541222RC VSL4601222RC 8.
PART 2 Securing the Liner TILE BACKSPLASHES IMPORTANT: Liners installed immediately above the top edge of tile backsplashes thicker than 3 / 4‖ should be installed slightly forward—not flush with the back wall. The back filter bracket of the liner is 1inch deep and tile installations thicker than this will prevent the filters from being removable. MOUNTING HOLES NOTE: DRILLING THROUGH STAINLESS STEEL REQUIRES A TITANIUM BIT.
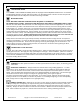
CARE & CLEANING: Proper cleaning is necessary to maintain performance and appearance, while also ensuring safe operation. The frequency of cleaning should be according to the type and amount of cooking. Best results will be achieved by cleaning soiled components as soon as possible. Filters must be cleaned regularly. Using the aluminum knob, lightly pull the filter toward the front of the liner while pulling the backside downwards. Replacing the filter is just as easy as taking it out.
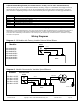
PART 4 Electrical Connection IMPORTANT: Copy this page and the next 2 pages to your electrical installer. WARNING! Ensure that the power supply is disconnected before proceeding. Verify that the power supply matches the ratings found on the appliance data label before proceeding. The complete appliance must be properly grounded at all times when electrical power is applied. Do not ground the appliance with the neutral (white) house supply wire. A separate ground wire must be utilized.
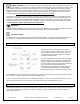
3-Speed Switch Wiring Details (for remote blowers, usually “roof or wall” mounted blowers) When connecting the liner to a 3-speed remote blower, the wiring ―rough-in‖ to the blower must include 5 wires (4 ® conductor wires and 1 ground wire). This can be accomplished by using either two 2-strand Romex type wires (one must have a separate ground) or one 4-strand conductor plus one ground wire. The wire gage should be 14.
WARRANTY Kitchen Ventilation Products What IS Covered: ® ® Trade-Wind Manufacturing, LLC warrants its Trade-Wind Kitchen Ventilation Products to the original user, to be free of defects in materials and workmanship for three (3) years from the date of purchase. ® Trade-Wind Manufacturing, LLC at its option, will repair or replace the complete unit or any defective component without charge. This warranty may be voided if any unauthorized service, alterations, or repairs are made to the product.
Best Practices Venting Installation Instructions for Range Hoods and Wood Hood Liners (All Models) —Addendum to Installation Instructions— IMPORTANT: Problems caused by improper installations are not covered by the manufacturer’s warranty. IMPORTANT: Undersized and improperly installed duct pipe and/or other ventilation components will cause excessive static pressure (air resistance), that may result in rattling, vibration and air buffeting noises, as well as inadequate ventilation. 1.
b. No portion of the ducting should be run so that the exhaust air flows downward. Since exhaust heat rises, forcing the air to flow downward will cause increased static pressure. As previously mentioned, improperly installed duct pipe will cause excessive static pressure (air resistance), that may result in rattling, vibration and air buffeting noises, as well as inadequate ventilation. c.
In-line Damper (for ventilation systems utilizing a roof cap or wall cap without a built-in damper) In cold weather areas, installing an “in-line” damper may be the preferred type of installation. This is because in-line dampers installed just above the perimeter of the heated space (the ceiling) will reduce the amount of cold air traveling down the duct into the heated space and into the kitchen through the ventilator.