
Installation Guide

Revised 6/11/18 Copyright © 2018 Trade-Wind Manufacturing, LLC Proverbs 22:29 Page 5
CAUTION – To reduce the risk of fire and electric shock, install this (range hood) only with
Remote Blower models rated maximum 5 amps.
CONTENTS:
Part 1 - Planning the Installation Part 2 - Securing the Liner
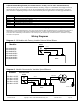
Part 3 - Use & Care Part 4 - Electrical Connection (Give copy of these 2 pages to electrician.)
PART 1 Planning the Installation
Trade-Wind
®
Designer Series Liners are designed for installation inside custom hood canopies. Proper installation
of the liner is directly related to the material from which the custom canopy is constructed. A qualified person must
complete the installation of this unit. Because of the large size and weight of this hood / liner, two installers are
recommended. Plan the installation so that all minimum clearances are met or exceeded. Dimensions shown
provide minimum clearances, unless otherwise specified. Important: You must provide structural framing and tight
backing in the areas in which you are securing the liner inside your custom canopy. Failure to do so could distort
and damage the liner and void the warranty.
For best and quietest performance with In-Line Blower installations, the blower should be installed in the attic, near
or slightly beyond the mid-point of the duct system. In installations requiring the blower be in a chase or wood-type
hood over the range (e.g., no attic above the kitchen), the duct silencer will not be as effective in absorbing motor
noise. In addition, there will likely be motor sound transmitted through the walls of the chase, bypassing the duct
silencer.
Given the high performance of Trade-Wind
®
In-Line Blowers, it is highly recommended that the blower NOT
be attached directly to the liner or in a chase immediately above the liner unless a Trade-Wind
®
brand duct
silencer is installed between the blower and liner and neoprene lined FC Clamps are used. FC Clamps are
available from Trade-Wind
®
through your Trade-Wind
®
supplier. Ask for model numbers FC6 (6‖), FC8 (8‖) or
FC10 (10‖), 2 per box.
In-Line & Remote Ventilators, Duct Silencers, Dampers and Ducting
Trade-Wind
®
VSL Liners (non-internal motor models) are also designed for use with ―in-line‖ and ―remote-mount‖
ventilators. When planning for installations using these products, please refer to the Installation Instructions
provided with the ventilator. Trade-Wind
®
Duct Silencers are available from your local Trade-Wind
®
dealer. When
planning for installation using a duct silencer, please refer to the Installation Instructions provided with the duct
silencer.
Given that most installations are different, a back-draft damper is not provided with this unit. Trade-Wind
®
back
draft dampers are also available from your local Trade-Wind
®
dealer. Always install ventilation products with an
approved wall or roof cap. Duct performance is improved by using round, smooth metal duct work instead of
rectangular. If multiple elbows must be used, ensure that there is a minimum of 24‖ of straight duct between any
two elbows. Avoid ―S‖ or back to back configurations caused by adjacent elbows. Do not rely on duct tape alone to
seal duct joints. Use sheet metal screws as required to support the duct.
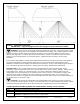
WARNING! For maximum ventilation performance, the bottom of the hood or liner should be 30 - 36
inches (76.2 - 91.4 cm) above the cooking surface (minimum is 24”). This would typically result in the
bottom of the hood being 66 - 72 inches (167.6 - 182.9 cm) above the floor. These dimensions provide for
safe and efficient operation of the hood. Always observe local building codes.