P.O. Box 776 Old Saybrook, CT 06475-0776 Place Postage Here. Or for additional security enclose in a envelope.
In-Line Muzzleloader Owner’s Manual INCLUDES: LIGHTNING SERIES E-BOLT 209 TRACKER 209 IMPORTANT! Thoroughly read and understand all of the instructions and warnings in this manual before using your Traditions firearm. Traditions Performance Firearms 1375 Boston Post Road P.O. Box 776 Old Saybrook, CT 06475 www.traditionsfirearms.com email: info@traditionsfirearms.
TRADITIONS’ WARRANTY PROTECTION INCLUDED WITH YOUR NEW GUN Quality, pride and old world craftsmanship has gone into your new Traditions muzzleloader. We work hard to provide the best value and performance possible, we back it up with a limited lifetime mechanical warranty. Should you ever experience mechanical difficulty with your new Traditions firearm, be assured that we are staffed and equipped to correct it quickly. Your satisfaction with your firearm is very important to us.
LIMITED LIFETIME MECHANICAL WARRANTY Traditions will warrant this muzzleloading firearm (or parts in a kit to be built) to be free of mechanical defects in materials or craftmanship for the life of the firearm, while in the possession of the original owner except wooden stocks. Traditions will repair or replace, at its own option, product or parts which are returned at owner’s expense to the Traditions Customer Service Department. A full explanation of the specific problem must accompany the returned item.
TABLE OF CONTENTS YOUR NEW TRADITIONS MUZZLELOADER . . . . . . . . . . . . . 1 TODAY’S MUZZLELOADING SPORT . . . . . . . . . . . . . . . . . . . . . . . 2 MUZZLELOADING ‘MUSTS’ FOR MUZZLELOADING SUCCESS . . . . . . . . . . . . . . . . . . . . . . . . 3 BEFORE YOU USE YOUR MUZZLELOADER . . . . . . . . . . . . . . . . 9 THUMB SAFETY . . . . . . . . . . . . . . . . . . . . . . . . . . . . . . . . . . . . . . . . . . 9 DISASSEMBLY FOR IN-LINE MUZZLELOADERS . . . . . . . . . . .
YOUR MUZZLELOADING RIFLE Congratulations on your purchase of a Traditions muzzleloader. You have selected a muzzleloading firearm designed and engineered to give today’s shooters the highest performance and optimum accuracy. When given the respect and care that any firearm demands, you can expect many years of reliable service and enjoyable hunting from your new Traditions muzzleloader. A person using any firearm has elected to take on an enormous responsibility.
THE SPORT OF MUZZLELOADING More and more sportsmen have discovered the challenges and enjoyment of muzzleloading in recent years. For both hunting and target shooting, muzzleloading guns have helped a modern generation recapture and enjoy an important aspect of our nation’s sporting past. Traditions In-Line Muzzleloaders are firearms which represent the latest developments in this unique part of the shooting sports. They are manufactured to modern standards for safe and enjoyable shooting.
MUZZLELOADING ‘MUSTS’ FOR MUZZLELOADING SUCCESS 1. Read completely, fully understand and be willing to follow all instructions and warranty limitations outlined in this booklet before loading or attempting to shoot your new Traditions muzzleloader. 2. Always treat any firearm as if it is loaded. 3. Always wear proper eye and ear protection when loading or firing any firearm. 4. Don’t shoot until you are absolutely sure of your target and what is beyond it.
14. Always be mindful of where the safety lever is set and routinely verify its setting. Never solely rely on any rifle’s safety. It is prudent to always treat every gun as if it were loaded and ready to fire. A firearm’s safety is a mechanical device which can fail. 15. Always disable your muzzleloader by carefully removing the percussion cap or primer and unloading the barrel when immediate shooting is not planned. 16. Never install a percussion cap or primer on the nipple before the gun is loaded.
Tracker 209 In-Line Rifle DESCRIPTION A Stock (Aw Composite Eco) B Barrel Assembly (Finished) (Length 22”) .50 cal. Perc. Blued (twist 1-28”) .50 cal. Perc.
E-Bolt 209 Rifle DESCRIPTION Description A Stock (Aw Composite Eco) B Barrel Assembly (Finished) .50 cal. Perc. Blued (twist 1-28”) .50 cal. Perc.
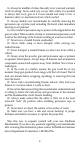
Lightning Bolt-Action Rifle DESCRIPTION BB Ramrod Thimble CC Ramrod Thimble Screw DD Barrel Locking Screw EE Plug Screw (4) FF Bedding Block GG Bedding Block Screw (Allen Head) HH Ramrod Retaining Spring Screw II Ramrod Retaining Spring JJ Lock Washers (2) KK Trigger Assembly Mount Screw (2) LL Sling Swivel Stud- Front Nut MM Sling Swivel Stud- Front OO Ramrod (Blackened) PP Ramrod Tip RR Bolt Assembly SS Ramrod Assembly UU 209 Cap Nipple Spring VV 209 Cap Nipple WW Percussion Nipple XX 209 Cap Nipple Wren
Lightning Bolt-Action Rifle-with Muzzlebrake DESCRIPTION A Stock (Aw Composite ) B Barrel Assembly (Finished) .50 cal Perc.
MAKE SURE THAT THE MUZZLELOADER IS UNLOADED BEFORE PROCEEDING. To check if the muzzleloader is unloaded, remove the ramrod and place it down the barrel. The ramrod should be flush with the muzzle. If it is not, you will need to disassemble the muzzleloader and remove the obstruction before proceeding. Refer to the disassemble section. BEFORE YOU USE YOUR MUZZLELOADER, CLEAN & LUBRICATE IT! These are brief instructions on what to do before you use your muzzleloader for the first time.
gun’s trigger block mechanism. This mechanical device is designed to place your gun in a safer status. No guarantee can be made that the gun absolutely will not fire even if the safety is set on the “Safe” (S) position. Like any mechanical device, a “Safety” can sometimes fail. It can be jarred or inadvertently manipulated into an unsafe condition. Never test the safety while your rifle is loaded or at any time while it is pointed in an unsafe position.
DISASSEMBLY FOR IN-LINE MUZZLELOADERS: (Tracker 209 , Buckhunter’s & other variations) Before proceeding with disassembly and maintenance of your rifle, make certain the gun is unloaded and that the cap, or primer has been removed from the nipple. 1. Remove ramrod and make sure the muzzleloader is unloaded. 2. With safety in “fire” or “off” postion, hold trigger in and push bolt handle and bolt to the forward position. Place bolt in full Fig.
DISASSEMBLY FOR BOLT ACTION MUZZLELOADERS: (Lightning Mag, E-Bolt 209 models) Removal of Bolt from the Receiver Before proceeding with disassembly and maintenance of your rifle, make certain the gun is unloaded and that the percussion cap or primer has been removed from the nipple. a. New, out of the box, the muzzleloader comes without the bolt in the receiver. b.
familiarize yourself with the bolt and its’ parts before attempting to disassemble it. 1. Using a 2mm (metric) hex wrench, loosen and halfway unscrew the small set-screw located in the bolt head. It is located Fig. 4 underneath and at the rear of the bolt. 2. Using the 209 Depriming tool or a wide blade flat-headed screwdriver, unscrew the striker counterclockwise, located at the front Fig. 5 of the bolt and remove it from the bolt body.
Installing the Bolt Into the Receiver Note: Before installing the bolt into the receiver, you must first install the breech plug and the nipple first. See Installation instructions for both items. 1. Inspect breech area for obstructions or debris. Clean out if necessary. 2. Move safety in “Fire” (F) position. 3. Pull trigger to rear and hold. 4. While holding in trigger, slide the bolt into the rear of the receiver.
Removal of the Breech Plug: 1. Insert the larger end of the wrench into the receiver (while squeezing the trigger) and position it onto the breech plug. 2. Insert the rod handle into the wrench. 3. Turn the wrench counter-clockwise and unscrew the breech plug and withdraw the wrench and plug from the receiver. It may require some extra force to free up the breech plug after shooting. Tips for stuck Breech Plugs: Always make sure to lubricate the breech plug threads liberally before using your muzzleloader.
2. Place the nipple on the end of the wrench and insert it through the receiver (while squeezing the trigger) to thread it into the breech plug. 3. Snug the nipple into the breech plug. Take care not to overtighten. ADJUSTABLE TRIGGER Your rifle has an adjustable trigger that has been preset at the factory for optimum hunting performance. The adjustment screws have been fixed at the factory with a thread locking sealant.
4. Pyrodex is intended to be used on a volume-to-volume basis. It burns cleaner and produces less fouling build up than black powder. PROPELLANT RECOMMENDATIONS • Cannons or very large-caliber rifles: 1f/fg (coarsest granulation) black powder or Pyrodex CTG (not commonly found today). Not recommended for use in Traditions Bolt Action & In-Line Muzzleloading Rifles. • .45 to .
Note: The ramrod could be slightly higher or lower. You should hear a metallic sound as the brass loading or cleaning jag makes contact with the breech plug. c. Remove the ramrod and lay it along the outside of the barrel, aligning the reference mark with the muzzle. If the gun is unloaded, the loading end of the ramrod should be within 11/2” of the nipple. d. If the distance between the loading end of the ramrod and the nipple is greater than 1 1/2”, the barrel may be either obstructed or loaded.
LOADING THE POWDER. Use only Black Powder or Pyrodex loose or pelletized powder or Triple 7. Follow the Powder Manufacturer’s Instructions when handling any type of powder. When loading loose powder: a. Adjust your Traditions powder measure to the desired charge. b. Pour powder from your Traditions flask into the measure until full. Pour powder down the barrel. Fig. 16 Fig. 17 Warning: Never load powder into a gun directly from a can, powder horn or flask.
3. Start the projectile with your thumb. 4. Using a ball starter, place the short shaft on top of the bullet and drive it downward until the starter hits the top of the muzzle. 5. Push the projectile deeper into the bore using the longer shaft of the ball starter until it hits the muzzle. 6. Use a loading jag on your ramrod and position it on top of the bullet inside the bore. 7. Holding the ramrod no further up than 6” over the bore apply firm pressure downward until the bullet is on top of the powder.
4. Using a ball starter, place the short shaft on top of the ball and drive the ball downward until the starter hits the top of the muzzle. If there is excess patch material after you seat the ball with the short shaft you can cut it away with a sharp knife. This will be unnecessary if you used a pre-cut patch. 5. Push the ball deeper into the barrel using the longer shaft of the ball starter. 6. Screw the loading jag on the ramrod and grasp the rod no more than 6” above the muzzle.
in-line muzzleloaders in the 1990’s because of its’ hotter ignition. The 209 shotgun primer is very popular because of its’ features and benefits for superior ignition. The 209 shotgun primer is exactly as it is named, a shotgun primer, the same primer used in a shotgun shell. The 209 primer has three main benefits over the #11 cap and the musket cap. First, the 209 primer is water-resistant which keeps water and moisture out of the powder for a sure-fire ignition when conditions are damp or rainy.
IF YOUR GUN FAILS TO FIRE: Anyone involved with muzzleloading firearms will experience a hangfire or misfire. The following are a few simple procedures that will help you to effectively manage such occurrences. Hangfire A hangfire is a delayed ignition. The percussion cap fires when the trigger is pulled and the main charge fires a brief moment later. There are many reasons that hangfires occur.
If the the percussion cap did not fire: 1. Check to make certain that a cap was installed and is still securely positioned on the nipple. 2. Verify that the bolt striker cup face is free of debris. 3. Try a new cap. If the percussion cap fires but the main charge does not: 1. Using a cleaning pick, verify that the hole in the nipple is clear of any obstruction. 2. Tap the butt pad of the rifle with your hand to direct powder into the ignition channel. Recap, verify your target, and fire again. 3.
Method 2 1. Open the bolt or plunger and carefully remove the percussion cap from the nipple. 2. Using a range/bench ramrod, with a ball puller screw in one end, insert the screw end into the muzzle until the screw makes contact with the projectile. 3. Apply pressure to the end of the ramrod while at the same time turning it, allowing the ball puller screw to bite into the projectile. 4. Continue turning the ramrod until you can determine that the ball puller screw is well anchored into the projectile. 5.
SCOPE MOUNTING: All Traditions In-Line muzzleloaders are drilled & tapped for mounting a scope. To sight in your scope, please follow the scope manufacturer’s directions. RECOMMENDED LOADS: Traditions recommends that your begin your shooting with a charge between 80-90 grains of Black powder, Pyrodex loose or Pelletized Powder to lessen the recoil & let yourself get acquainted with your muzzleloader. (ex. Pyrodex Pellets). The bullet that you need is dependent upon the game that you are hunting.
4. When target shooting or sighting in, develop a habit of consistently wiping the bore with Traditions Wonder Lube 1000 after each shot. Depending upon the Fig. 30 specific load, temperature, and humidity, a short series of shots with black powder or Pyrodex can be fired before it becomes necessary to wipe the bore with Traditions Easy Clean or Traditions Wonder Lube in order to remove fouling build-up.
trigger assembly. If the trigger assembly is affected, it will be necessary to remove the barreled-action, dry the trigger assembly and treat it with gun oil. NOTE: Regardless of the cleaning method, you must remove and thoroughly clean the percussion nipple, the breech plug and the threads and breech area of the receiver during each cleaning. Be certain to lightly lubricate the threads of the nipple and breech plug with Traditions Wonder Lube 1000 before reinstalling.
NOTE: An extra long bench/range ramrod is necessary for this cleaning method given that it must be as long as the barrel and receiver. Visit your Traditions retailer for this type of rod. NOTE: Store your rifle in a cool, dry, secured area. Storage in a gun case is discouraged, as it may hasten condensation and corrosion. During long periods of storage, periodically check for signs of pitting or rusting on the surface and in the barrel bore.
ramrod, between shots is the single most effective thing you can do to optimize accuracy between shots. This not only cleans away the bulk of the fouling, but at the same time lubricates the rifling for ease of loading and reduces the friction of the sabot as it exits the barrel. HELPFUL MUZZLELOADING ACCESSORIES In order to participate fully in the sport, you will probably want to consider the purchase of the various Traditions accessories mentioned in this manual.
6. Gun Oil (Traditions A1232) - Outstanding gun oil. Neutralizes fingerprints and prevents rust. Convenient spray bottle. 7. Bore Brush (Traditions A1278) - A sturdy bronze brush for thorough cleaning of the bore. Fits all brands of threaded ramrods with 10/32 threads. 8. Flush Hose and Nipple Kit (Traditions A1363) - Easy convenient method to clean the bore and ignition channel of muzzleloaders. 9. Ramrod Accessories Pack (Traditions A1205, .50 Cal.; A1342, .54 Cal.
PREFERRED CUSTOMER WARRANTY REGISTRATION CARD Referencing the label on the end of the carton, please write in the last 5 digits located on the right half of the UPC code into the boxes below.