OWNER’S MANUAL BBQPIG RESIDENTIAL PELLET GRILL-SMOKER FOR OUTDOOR USE ONLY! WARNING! DO NOT STORE OR USE COMBUSTIBLE MATERIALS NEAR THIS APPLIANCE! USE ONLY TRAEGER BRAND HARDWOOD BBQ PELLETS IN THE OPERATION OF THIS UNIT.
INTRODUCTION Congratulations on your purchase of this Traeger Wood Pellet Grill, Model BBQPIG. NOTE: NUMBERS FOLLOWING PART NAMES REFER TO THE COMPONENT DIAGRAM FOUND NEAR THE END OF THIS MANUAL. After removing the box from the Grill, remove all parts from inside the Grill. Remove any remaining packaging material from inside the Grill as well.
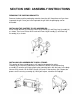
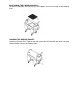
SECTION ONE: ASSEMBLY INSTRUCTIONS REMOVING THE SHIPPING BRACKETS: Remove the box and the packaging materials from the grill. Keep them until you have inspected the grill. Once you have inspected the grill then the packaging can be discarded. INSTALLING THE CASTERS TO LEG ASSEMBLIES: Insert Caster W/Lock (27) onto the Front Leg Assembly (5) and Rear Leg Assembly (6) as shown. Then insert Caster W/O Lock onto Front Leg Assembly (5) and Rear Leg Assembly (6) as shown.
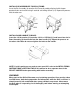
INSTALL EAR ASSEMBLIES TO GRILL FRAME: Insert the Ear Assembly (9) onto the Grill Frame Assembly aligning it with the prepunched holes and secure using 2 each #8 self drilling Screws (14). Repeat the process with the other ear. INSTALL DOOR HANDLE TO DOOR: Insert the 1/4 flat washer (12) onto the 1/4-20 x .375 Bolt (11) and insert into slot in Door Assembly (2) then thread into the door handle (10). Repeat the process on the other side. Note do not over tighten the bolts to the handle.
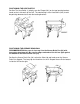
POSITIONING THE HEAT BAFFLE: Position The Heat Baffle (1) directly over the Firepot (101) on the two locating brackets found on the inside walls of the Grill. The notched legs of the Heat Baffle (146) should be pointing downward to fit onto the locating brackets. POSITIONING THE GREASE DRAIN PAN: RECOMMENDATION for ease of clean-up: Line the Grease Drain Pan (34) with heavy-duty aluminum foil. Be sure the edges and ends of the foil are tight against the bottom of the Grease Drain Pan (34).
POSITIONING THE PORCELAIN GRILL: Position the Porcelain Grill (35) on the Grill Supports that run the length of the cooking area. HANGING THE GREASE BUCKET: Locate the Grease Drain Tube on the right end of the Grill beneath the head. Hang the Grease Bucket (38) on the Bucket Hook.
SECTION TWO: INITIAL FIRING INSTRUCTIONS (To be used on initial firing or anytime the Grill runs out of Pellets) In order to ensure proper operation of the Grill, you must first allow the Auger Tube to be “charged” with Pellets. 1) Open the Door and remove the Porcelain Grill, Grease Drain Pan and Heat Baffle from inside the Grill. 2) Make sure the Switch is in the OFF (o) position. Plug the Power Cord into an appropriate, grounded electrical outlet. 3) Open the Pellet Hopper Lid and locate the Auger.
SECTION THREE: SUBSEQUENT START-UP With the Door open, turn the Switch ON (--) and the Temperature/Dial to SMOKE. In approximately 2 minutes you will notice whitish-gray smoke coming out of the Grill as the Pellets ignite. After assuring the Pellets have ignited, close the Door and set the Temperature/Dial to any cooking setting desired. The Grill should be allowed to pre-heat for approximately 10 minutes with the Door closed before placing food in the Grill.
Grill due to potential hazardous contaminants and additives that may be present. 3) Remove the Porcelain Grill, Grease Drain Pan and Heat Baffle to expose the Firepot In the bottom of the Grill. 4) Pour 1/2 cup of TRAEGER BBQ PELLETS into the Firepot. 5) Squirt 2 tablespoons of Alcohol Gel fire lighter into the Firepot on top of the Pellets. DANGER! Never use gasoline, gasoline-type lantern fuel, kerosene, charcoal lighter fluid or similar liquids to start or “freshen up” a fire in this Grill.
SECTION FOUR: OPERATING TIPS 1) The Temperature Dial can be changed at any time to increase or decrease the cooking temperature of the Grill. The HIGH/HIGHER Temperature settings are for Grilling. The MED/MID RANGE Temperature settings are for Slow Cooking. The SMOKE setting is for Smoking and adding Smoke Flavor to foods being cooked. The SMOKE setting can also be used to “hold” foods at approximately 180 to 200 degrees F. 2) Your TRAEGER PELLET GRILL should never be moved while it is hot.
SECTION FIVE: MAINTAINING YOUR NEW GRILL 1) Change the aluminum foil on the Grease Drain Pan frequently. Periodically, clean the grease out of the V-shaped Grease Drain and Grease Drain Tube and off of the interior surfaces of the Grill. Empty the Grease Bucket occasionally and line with aluminum foil for easy clean-up. It is easier to clean off accumulated grease when the Grill is warm. BE CAREFUL NOT TO BURN YOURSELF.
SECTION SIX: FREQUENTLY ASKED QUESTIONS WHY WON’T MY GRILL IGNITE? 1) Verify power at the electrical outlet. a) If Power Cord is connected to a GFI (Ground Fault Interrupter), check and reset if necessary. b) Initiate startup. Still no ignition – Proceed to step 2. 2) Disconnect Power Cord from electrical outlet. a) Remove the Control and check the fuse on back. Replace the fuse if blown.
4) If the Auger Drive Motor is not operating but the Draft Inducer Fan is operating, the problem is in the Auger system, which will need to be checked. a) With the Switch/Dial OFF, locate the small fan blade on the back of the Auger Drive Motor. b) While watching the fan blade, turn the Switch/Dial to ON. If the fan blade does not turn, turn the Switch/Dial to OFF. This indicates a defective Auger Drive Motor and it will need to be replaced.
WITH THE TRAEGER DIGITAL CONTROL, WHAT DIAL SETTING IS RECOMMENDED FOR STARTING THE GRILL? The auto-start procedure is the same for all Grill Controls. With the Door open, turn the Switch/Dial ON and Temperature Dial to SMOKE. In approximately 2 minutes you will notice whitish-gray smoke coming out of the Grill as the Pellets ignite. After assuring the Pellets have ignited, close the Door and set the Temperature Dial to any cooking setting desired.
SECTION SEVEN: TRAEGER SUPPORT Parts are identified by number on the following COMPONENT DIAGRAM PAGE. To order parts: Call, E-mail or write to your Traeger Dealer or Traeger Pellet Grills. Please provide your name, phone number, address, Model and Serial Number of the Grill (located on a label inside the Hopper Lid), along with the part identification number from the Component Diagram. TRAEGER PELLET GRILLS, LLC.
BBQPIG COMPONENTS
BBQPIG PARTS LIST Item 1 2 3 4 5 6 7 8 9 10 11 12 13 14 15 16 17 18 19 20 Qty 1 1 1 1 1 1 1 1 2 1 2 2 4 18 1 1 1 1 1 1 Description Grill Frame Assembly Door Assembly Pig Left Door Hinge Assembly Right Door Hinge Assembly Front Leg Assembly Rear Leg Assembly Auger Assembly Pig 7 Hole Firepot Assembly Ear Assembly Door Handle 24” Bolt 1/4-20 x .375 Hex Zinc Washer 1/4 Flat Screw 8-32 x .5 PPHD Screw #8 x .50 Hex SD 7” RTD Hot Rod (Ignitor) Screw 6-32 x .