
Use and Care Manual


INTRODUCTION
Congratulations on your purchase of this Traeger Wood Pellet Grill, Model BBQ07E.
With proper set-up, operation and maintenance, the Grill will provide you with delicious food
and years of cooking enjoyment.
NOTE: NUMBERS FOLLOWING PART NAMES REFER TO THE COMPONENT
DIAGRAM FOUND NEAR THE END OF THIS MANUAL.
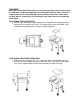
When you un-box the Grill, remove all parts from the box and inside the Grill. Remove
any remaining packaging material from inside the Grill as well. Make sure you have, and
can identify all of the following parts:
Qty Item Description Component Diagram Reference Number
(1) Grill Frame Assembly------------------------------------------ 2
(1) Hopper / Burner Assembly------------------------------------ 20
(2) Caster Leg Assemblies---------------------------------------- 99
(2) Wheel Leg Assemblies---------------------------------------- 104
(1) Porcelain Grill---------------------------------------------------- 147
(1) Grease Drain Pan----------------------------------------------- 141
(1) Heat Baffle-------------------------------------------------------- 140
(1) Flue Pipe---------------------------------------------------------- 113
(1) Chimney Cap Assembly--------------------------------------- 119
(1) Chrome Door Handle------------------------------------------- 143
(1) Grease Bucket---------------------------------------------------- 112
(1) Hardware Kit------------------------------------------------------ NA
You will need to complete the assembly which includes:
1) Mounting the Caster Leg Assemblies (99) and the Wheel Leg Assemblies (104) to the
Grill.
2) Attaching the Chrome Door Handle (143) to the Door (80).
3) Attaching the Flue Pipe (113) to the Grill Frame Assembly (2).
4) Mounting the Chimney Cap Assembly (119).
5) Positioning the Heat Baffle (140) over the Hopper assembly (20).
6) Positioning the Grease Drain Pan (141) over the Heat Baffle (140).
7) Positioning the Porcelain Grill (147) on the Grill Supports.
8) Hanging the Grease Bucket (112).
TOOLS ARE SUPPLIED FOR ASSEMBLY
(2) Open end wrenches (I)
(1) Hex key (Allen Wrench) H
Follow these step-by-step instructions and you’ll be cooking in no time!
Record your date of purchase here:_____________________________________________
Record your serial number here:_____________________________________________