
Installation Guide
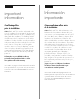


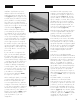

Installation should start in a corner
and proceed from the wall with the
under-edge facing out away from the
wall (Figure 1). Allow a gap of 1/8"
minimum (3mm) for subfloor movement,
which should be covered by molding.
Trim off the top over-edge facing the
wall (the entire length of the first row as
well as the over-edge on the short side
of the first plank) (Figure 2).
When securing two planks together,
you should angle (45 degrees) the
second plank into the corresponding
edge. The over-edge always placed
on top of the under-edge. Starting at
one end of the plank, use one hand to
hold the plank and the other hand to
roll the edge into place for a tight fit.
Be careful to keep the seams tight. You
can push the plank slightly against the
adjoining plank to create a tight seam,
if necessary after the connection has
been made.
If your seam does not appear to be
tight, you can immediately pull apart
the planks and reapply it. Slowly
separate the top plank away from the
bottom plank and simply reapply them
—repeating Step #3. Be careful not to
pull the planks apart too fast as you
could rip or damage the GripStrip
™
.
You have approx. 10 to 15 minutes of
“open time" in which you can re-work
the seams before any damage occurs
to the adhesive on the GripStrip.
The less pressure applied to allure,
the longer this “open time".
When installing the plank, it is strongly
recommended to stagger the rows so
that the short edge (6") seams are
not in a straight uniform line and have
a stagger of a minimum of 6" from row
to row. We recommend the staggered
random method (Figure 3). However
you may want to try other “patterns" of
planks to suit your taste. allure can be
installed with endless possibilities —
your only limitation is your own
imagination!
La instalación debe empezar por una
esquina y continuar desde la pared con
el borde inferior mirando en la dirección
opuesta a la pared (Figura 1). Deja un
espacio de 0,31 cm como mínimo para
que el contrapiso se mueva, dicho espacio
quedará oculto al colocar las molduras.
Corta el borde superior frente a la pared
(toda la longitud de la primera fila, así
como el exceso de borde en el lado corto
de la primera tabla) (Figura 2).
Cuando asegures dos tablas juntas, debes
colocar la segunda tabla en ángulo (45
grados) en el borde correspondiente.
El borde superior siempre debe estar
colocado encima del borde inferior.
Comenzando por un extremo de la tabla,
usa una mano para sostenerla y la otra
mano para pasar el rodillo por el borde y
que quede ajustada en su lugar. Asegúrate
de que las uniones queden bien ajustadas.
Si es necesario. después de conectarlas,
puedes empujar ligeramente una tabla
contra la adyacente para crear una
unión firme.
Si las uniones no quedan ajustadas,
puedes levantar inmediatamente las tablas
y volverlas a colocar. Separa lentamente la
tabla superior de la inferior y simplemente
vuélvelas a instalar — repitiendo el Paso
Núm. 3. Ten cuidado de no halar las
tablas muy rápidamente al separarlas ya
que podrías romper o dañar el GripStrip
™
.
Tienes al menos de 10 a 15 minutos de
«período de gracia» en el que puedes
volver a acomodar las uniones sin que se
dañe el GripStrip. Mientras menos presión
se le haga a allure, mayor es el «período
de gracia».
Al instalar la tabla, se recomienda
enfáticamente escalonar las filas de
modo que las uniones de los bordes cortos
(15,24 cm) no queden en una línea recta
y uniforme y tienen un escalonamiento de
un mínimo de 6 pulgadas de fila en fila.
Recomendamos el método de escalonado
aleatorio (Figura 3). No obstante, puedes
seguir otros “patrones” de colocación de
las tablas, según desees. allure se puede
instalar de un sinfín de maneras — ¡tu
imaginación es el único límite!
ENGLISH ESPAÑOL
10
Figure / Figura 1
Figure / Figura 2
Figure / Figura 3