
Installation Guide


ENGLISH ESPAÑOL
11
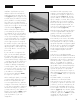
Start the second row with the plank cut
at about 2/3 length (2 feet). Measure
and mark the plank, then using a
straight edge and utility knife, simply
score the plank and snap.
The over-edge butts up to the first row.
Again, get one corner of the plank
started tightly against the other, and on
a 45 degree angle, roll the plank tightly
into place. The remaining 1/3 piece
can be used on the far wall, if the lay-
out of the room permits (Figure 4).
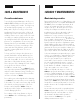
Start the third row with the plank cut at
1/3 of a length (1 foot). Again, the
leftover piece can be used at the oppo-
site end of the row, if the layout of the
room permits. Continue this pattern for
the remainder of the rows to be in-
stalled. Always place the cut end of the
first plank against the wall (Figure 5).
Fitting around irregular objects is no
problem. Simply make a pattern out of
heavy paper to fit around pipes or ir-
regular objects. Place the pattern upon
the plank and trace. Cut along trace
lines using a utility knife or heavy duty
scissors, and lay plank. The sheets of
paper in between planks inside the
carton make an excellent template.
Undercutting Door Casings:
To ensure allure will fit underneath
the door casing and not expose a
1/8" to 1/4" expansion space, re-
move the under-edge of a plank. Place
a handsaw on the plank and cut the
door casing to the height of the plank.
After installation is completed, we
recommend rolling the seams with a
floor roller in both directions to ensure
bonding of both adhesive edges. You
can rent a floor roller from your local
Home Depot tool rental center.
Comienza la segunda fila con la tabla
cortada cerca de 2/3 del largo (60,96
cm). Mide y marca la tabla, luego con
una regla y un cuchillo multiuso, simple-
mente marca la tabla y corta de un
golpe.
El borde superior encaja contra la
primera fila. Nuevamente, pega una
esquina de la tabla firmemente contra la
otra, y en un ángulo de 45 grados,
pasa el rodillo para fijarla en su lugar.
El tercio restante de la tabla puede
usarse en la pared opuesta, si la
distribución lo permite (Figura 4).
Comienza la tercera fila con la tabla
cortada a 1/3 de su largo (30,48 cm).
Una vez más, lo que sobre de la tabla
puede usarse en el extremo opuesto de
la fila si la distribución así lo permite.
Continúa con este patrón para el resto
de las filas que instalarás. Siempre
coloca contra la pared el extremo cor-
tado de la primera tabla (Figura 5).
La instalación alrededor de objetos
irregulares no constituye un problema.
Sencillamente coloca un patrón de
papel grueso alrededor de tuberías u ob-
jetos con forma irregular. Coloca el pa-
trón sobre la tabla y marca. Corta
siguiendo las líneas trazadas, con la
ayuda de un cuchillo multiuso o tijeras
resistentes, y coloca la tabla. Las hojas
de papel entre las tablas dentro de
la caja son excelentes para usarse
como plantillas.
Subvaloración de los marcos:
Para asegurar de suelo allure cabe
debajo de la cubierta de la puerta y no
exponer a un 1/8 "a 1/4 ' espacio de
expansión, quitar el borde inferior de
una tabla. Coloque un serrucho en la
tabla y cortar la cubierta de la puerta
a la altura de la tabla.
Después de que hayas terminado la
instalación, recomendamos pasar un
rodillo para pisos sobre las juntas en
ambas direcciones para asegurar la
unión de ambos bordes adhesivos.
Puedes rentar un rodillo para pisos en
el centro de Alquiler de herramientas
de tu tienda local de Home Depot.
Figure / Figura 4
Figure / Figura 5