
Installation Guide


H
EL
P
F
UL
H
I
NT
#
3
:
Be
f
or
e
l
a
ying
ou
t
t
he
f
l
oor
,
che
ck
t
he
wa
l
l
you
a
r
e
st
a
r
t
ing
f
r
om
a
nd
m
a
k
e
su
r
e
it
is
sq
u
a
r
e
t
o
t
he
op
p
osit
e
wa
l
l
.
S
im
p
l
y
m
e
a
su
r
e
t
he
r
oom
f
r
om
op
p
osit
e
e
nd
s
of
t
he
wa
l
l
t
o
t
he
f
a
r
wa
l
l
.
I
f
t
he
m
e
a
su
r
e
m
e
nt
s
a
r
e
d
iff
e
r
e
nt
,
you
ca
n
m
a
k
e
a
d
ju
st
m
e
nt
s
on
t
he
f
ir
st
r
ow
of
a
l
l
u
r
e
b
y
scr
ib
-
ing
t
he
p
l
a
nk
.
1
.
L
a
y
a
ro
w
o
f
l
o
o
s
e
p
l
a
n
k
s
w
it
h
o
u
t
s
ec
u
rin
g
t
h
em
t
o
ea
ch
o
t
h
er
f
irs
t
t
o
d
et
er
min
e
if
y
o
u
n
eed
t
o
a
d
ju
s
t
t
h
e
l
en
gt
h
o
f
t
h
e
f
irs
t
p
l
a
n
k
t
o
a
v
o
id
a
s
ma
l
l
p
iec
e
of
l
es
s
t
h
an
12”
on
t
h
e
oppos
it
e
wall
from
wh
ere
you
s
t
art
ed.
O
r,
meas
ure
t
h
e
l
en
gt
h
of
t
h
e
room
an
d
div
ide
by
48”
(l
en
gt
h
of
on
e
pl
an
k).
If
t
h
e
re
-
main
der
is
l
es
s
t
h
an
12”
,
c
al
c
ul
at
e
½
of
t
h
e
re
-
main
der
an
d
t
rim
t
h
is
amoun
t
off
t
h
e
firs
t
pl
an
k.
Th
e
l
as
t
pl
an
k
s
h
oul
d
be
t
h
e
s
ame
l
en
gt
h
as
t
h
e
firs
t
on
e.
To
c
ut
a
pl
an
k,
s
impl
y
meas
ure
an
d
mark
t
h
e
pl
an
k,
t
h
en
us
in
g
a
s
t
raigh
t
edge
an
d
ut
il
it
y
kn
ife,
s
impl
y
s
c
ore
t
h
e
pl
an
k
an
d
s
n
ap.
2.
In
s
t
al
l
at
ion
s
h
oul
d
s
t
art
in
a
c
orn
er
(l
eft
h
an
d)
an
d
proc
eed
from
t
h
e
wal
l
w
it
h
t
h
e
t
on
gue
fac
in
g
t
h
e
wal
l
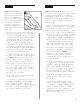
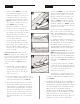
(F
igure
1)
.
Al
l
ow
a
min
imum
gap
of
1/8”
(3mm)
for
s
ubfl
oor
mov
emen
t
or
product
expan
-
s
ion
,
w
h
ic
h
s
h
oul
d
be
cov
ered
by
mol
din
g.
3.
Wh
en
l
ayin
g
t
h
e
firs
t
row
in
a
s
t
raigh
t
l
in
e
in
t
er
-
l
ock
t
h
e
s
h
ort
en
ds
by
in
s
ert
in
g
t
h
e
t
on
gue
in
t
o
t
h
e
groov
es
at
an
an
gl
e
of
approx.
10
t
o
20
degrees
.
In
s
t
al
l
eac
h
s
equen
t
ial
pl
an
k
on
t
h
e
s
h
ort
en
d
(7
.5
”) and be sure to line up evenly
. This is very
important for a good installation.
4. Be sure to keep the seams tight. There should be
no gap visible between planks.
If y
our seam does not appear to be tight, you can
immediately
pull apart the planks and reapply
them
. Slowly lift the top plank away
from the
bottom
plank and reapply it — repeating Step #3.
Be careful not to pull the planks apart too fast or
you could rip or damage the Locking Strip.
CONSEJO ÚTIL NÚM. 3: Antes de colocar el
piso, verifica que la pared de inicio está a escuadra
con relación a la pared opuesta. Sencillamente,
mide la habitación desde extremos opuestos desde
una pared hasta la otra. Si las medidas son distintas,
puedes hacer ajustes en la primera fila de allure,
marcando la tabla.
1. Primero coloca una fila de tablas sueltas, sin ajus-
tarlas entre sí, para determinar si necesitas ajustar
el largo de la primera tabla, de modo que la
tabla en la pared opuesta a la de inicio, no mida
menos de 12”; o mide el largo de la habitación y
divide por 48” (el largo de una tabla). Si queda
menos de 12”, calcula ? del sobrante y corta esa
medida de la primera tabla. La última tabla de-
bería tener el mismo largo que la primera. Para
cortar una tabla, simplemente mide y marca la
tabla, y usa una escuadra y un cuchillo multiuso
para marcar y partir de un golpe. ¡Así de fácil!
2. La instalación debe empezar por una esquina
(lado izquierdo) y continuar desde la pared con
la lengüeta frente a la pared (Figura 1). Deja un
espacio mínimo de 1/8" (3mm) para que el
contrapiso se mueva o para que el producto
se expanda; dicho espacio quedará oculto al
colocar las molduras.
3. Al colocar la primera fila en línea recta, encaja
los extremos cortos, insertando la lengüeta en las
ranuras en un ángulo aproximado de 10 a 20
grados. Instala cada tabla en secuencia, en el ex-
tremo corto (7.5”) y asegúrate de que estén uni-
formemente alineadas. Lo anterior es muy
importante para lograr una instalación adecuada.
4. Asegúrate de que las uniones queden bien
ajustadas. No debe haber espacios visibles
entre las tablas.
Si las uniones no quedan ajustadas, puedes
levantar inmediatamente las tablas y volverlas a
colocar. Separa con cuidado la tabla superior de
la inferior y simplemente vuelve a colocarla —
según el paso núm. 3. Ten cuidado de no halar
las tablas al separarlas ya que podrías romper o
dañar el listón de ajuste.
E
NGLISH
E
SPAÑOL
6