
Installation Guide


5
.
Wh
en
in
s
t
a
l
l
in
g
a
llu
re
,
it
is
s
t
ro
n
gl
y
rec
o
mmen
d
ed
t
o
s
t
a
gger
t
h
e
ro
w
s
s
o
t
h
a
t
t
h
e
s
h
o
r
t
ed
ge
(
7
.
5
”
)
s
ea
ms
a
re
n
o
t
in
a
s
t
ra
igh
t
u
n
if
o
r
m
l
in
e.
We
rec
o
m-
men
d
t
h
e
s
t
a
ggered
ra
n
d
o
m
met
h
o
d
(F
i
g
ur
e 2
).
H
o
w
ev
er
y
o
u
ma
y
w
a
n
t
t
o
t
r
y
o
t
h
er
“
p
a
t
t
er
n
s
”
o
f
p
l
a
n
k
s
t
o
s
u
it
y
o
u
r
t
a
s
t
e.
a
llu
re
c
a
n
b
e
in
s
t
a
l
l
ed
w
it
h
en
d
l
es
s
p
o
s
s
ib
il
it
ies
—
y
o
u
r
o
n
l
y
l
imit
a
t
io
n
is
y
o
u
r
o
w
n
ima
gin
a
t
io
n
!
6
.
To
s
t
a
r
t
t
h
e
s
ec
o
n
d
ro
w
w
it
h
t
h
e
p
l
a
n
k
c
u
t
a
t
a
b
o
u
t
2
/3
l
en
gt
h
(
3
2
")
,
mea
s
u
re
a
n
d
ma
rk
t
h
e
p
l
a
n
k
.
Th
en
u
s
in
g
a
s
t
raigh
t
edge
an
d
ut
il
it
y
kn
ife
or
s
h
ears
,
s
c
ore
t
h
e
pl
an
k
an
d
s
n
ap.
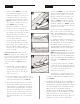
7.
In
t
erl
oc
k
t
h
e
pl
an
k
t
igh
t
l
y
again
s
t
t
h
e
firs
t
row
(l
on
g
s
ide)
again
at
a
10-20
degree
an
gl
e.
Th
e
n
ext
pl
an
k,
in
t
erl
oc
k
t
h
e
s
h
ort
s
ide
firs
t
,
l
eav
in
g
it
s
l
igh
t
l
y
aw
ay
from
t
h
e
l
on
g
s
ide
an
d
t
h
en
s
l
ide
in
t
o
t
h
e
l
on
g
s
ide.
HEL
P
FUL
HINT
#4:
Wh
en
c
ut
t
in
g
allure
for
l
en
gt
h
,
be
s
ure
t
o
al
w
ays
c
ut
t
h
e
s
h
ort
s
ide
of
t
h
e
pl
an
k
w
it
h
t
h
e
t
on
gue
edge.
Th
e
remain
in
g
piece
can
t
h
en
be
us
ed
on
t
h
e
oppos
it
e
s
ide
of
t
h
e
room,
at
t
h
e
en
d
of
t
h
at
row
(F
igure
3)
if
l
ayout
permit
s
.
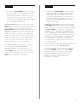
8.
St
art
t
h
e
t
h
ird
row
w
it
h
t
h
e
pl
an
k
c
ut
at
1/3
of
a
l
en
gt
h
(16”
).
Again
t
h
e
remaining piece can be used at the
opposite end of the row, if the layout
of the room
permits.
9. Continue this pattern for the rem
ainder of the
rows to be installed. Alway
s place the cut end
of the first plank against the wall
(Figure 4)
.
1
0. Fitting around irregular objects is no problem
.
Sim
ply m
ak
e a pattern out of heavy
paper to
fit around pipes or irregular objects. Place the
pattern upon the plank and trace. Cut along
trace lines using a utility knife or heavy duty
shears or tin snips, and lay plank. Be sure to
leave a minimum of 1/8” expansion space
around all fixed objects, floor vents and door
frames.
5. Al instalar allure, se recomienda enfáti-
camente escalonar las filas de modo que
las uniones de los bordes cortos (7.5”) no
queden en una línea recta y uniforme. Re-
comendamos el método de escalonado
aleatorio (Figura 2). No obstante, puedes
seguir otros “patrones” de colocación de
las tablas, según desees. allure se puede
instalar de un sinfín de maneras—¡tu imagi-
nación es el único límite!
6. Para comenzar la segunda fila con la
tabla, corta cerca de 2/3 del largo (32”).
Mide y marca la tabla, luego con una
regla y un cuchillo multiuso, marca la tabla
y corta de un golpe.
7. Ajusta bien la tabla contra la primera
fila (lado largo), de nuevo, en un ángulo de
10 a 20 grados. Al colocar la siguiente
tabla, ajusta el lado corto primero y
sepárala ligeramente del lado largo; luego
deslízala hasta encajar en el lado largo.
CONSEJO ÚTIL NÚM. 4: Al cortar
allure al largo pertinente, siempre corta el
lado corto de la tabla que tiene el borde
ranurado. Lo que sobre de la tabla puede
usarse en el lado opuesto de la habitación,
al final de esa fila, (Figura 3) si la distribución
lo permite.
8. Comienza la tercera fila con la tabla
cortada a 1/3 de su largo (16”). Una vez
más, lo que sobre de la tabla puede usarse
en el extremo opuesto de la fila si la
distribución así lo permite.
9. Continúa con este patrón para el resto
de las filas que instalarás. Siempre coloca
el extremo cortado de la primera tabla contra la
pared (Figura 4).
10. Instalación alrededor de objetos irregulares: no
hay problema. Sencillamente coloca un patrón
de papel grueso alrededor de tuberías u objetos
con forma irregular. Coloca el patrón sobre la
tabla y marca. Corta siguiendo las líneas
trazadas, con la ayuda de un cuchillo multiuso o
tijeras resistentes, y coloca la tabla. No olvides
dejar un mínimo de 1/8” de espacio de
expansión alrededor de objetos fijos, ductos de
ventilación en el piso y marcos de puertas.
E
NGLISH
E
SPAÑOL
7