
Installation Guide


RECLAIMED OAK 7MM | FOLD DOWN
MODEL #45107
3/4
Room Preparation
WALL BASE/TRIM
□ Removal of the existing wall base/trim is optional. If the existing
wall base/trim is not removed, leave the required expansion
space in front of the existing wall base/trim.
□ Install wall base or trim after the flooring installation is complete
to cover the expansion space around the perimeter of the room.
□ Always nail/adhere the wall base and trim to the wall. Never nail/
adhere it to the laminate flooring.
DOORS/DOOR JAMBS
□ Undercut door jambs so that the laminate floor can be installed
under them. To do this, use a laminate flooring off-cut and a
small piece of underlay to support a hand saw blade at the
correct height for undercutting.
□ Check the door clearances and make any necessary height
adjustments before installing laminate floors.
□ Leave the correct expansion spacing under the door jamb.
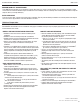
WALL IRREGULARITIES
Walls are not always perfectly straight. TrafficMASTER laminate
floors need to be cut so as to fit within the irregularities of your
walls. Complete these steps:
1. Install the first row of laminate floors (following the Installation
section) and ensure that all long edges of the laminate flooring
planks are aligned.
2. Slide the whole row against the wall. You will now notice any
irregularities (areas where the wall is not straight).
3. Trace the contour of the wall onto the row of laminate flooring
with a pencil or marker.
4. Once traced, uninstall the planks carefully so as not to damage
the locking system and cut along the traced line.
5. Re-install the plank, leaving the necessary 3/8 in. (10 mm)
expansion space.
Preparing for Installation
Before you begin the steps in the Installation section, ensure you have
completed the following:
□ Sort planks before installation to avoid plank repetition and to
achieve the most natural and varied results.
□ Inspect every plank for damage before installing it.
□ The first and last row of the installation should be wider than 3.5
in. (9 cm):
□ Measure the width of the room and divide it by the width of the
planks you are installing.
□ If the remainder is less than 3.5 in. (9 cm), cut 3.5 in. (9 cm)
from the width of the first row. If this is not possible, ensure that
both edge planks are as even in width as possible.
□ The first and last plank in a row should be a minimum of 16 in.
(40 cm) long.
□ Stagger the planks from row to row by a minimum of 16 in. (40
cm).
□ Use spacers to maintain the 3/8 in. (10 mm) expansion space
between the planks and walls/vertical objects.
□ Select a starting corner of the room and work from left to right.
TIP: It is often easiest to start at the door of the room so that the first
plank can be easily slid under the door jamb.
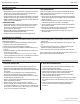
Installation
1 INSTALLING THE FIRST ROW 2 INSTALLING THE REMAINING ROWS
□ Lay the first plank with the long edge tongue facing the wall.
□ Position the short edge tongue of the second plank so that it
overlaps the short edge groove of the first plank by half the width
of the plank.
□ Press down on the second plank so as to engage the locking
mechanism and physically connect it to the first plank.
□ The two planks should lock together tightly and there should be
no height differences between them.
□ Slide the second plank horizontally towards the wall until the two
planks’ long edges are aligned.
□ Continue in this manner until the first row is complete.
□ Use the remainder of the last plank of the first row to start the
second row provided that it is a minimum of 16 in. (40 cm) long. If
the cut piece is shorter than 16 in. (40 cm) long, cut a new plank
in half and use it to begin the second row.
□ Install the first plank of the second row by installing its long
edge to the previous row’s groove.
□ Install the long edge of the plank to the previous row.
□ Before lowering the plank, make sure its short end tongue
overlaps with the previous plank’s short end groove.
□ Lower the plank slowly (a short oscillating or up and down
motion may help lower the plank).
□ Apply pressure to the short edge of the planks so as to activate
the locking mechanism. You will typically hear an audible click
sound.
□ When you are finished installing all rows, remove all wall
spacers and install wall base and applicable moldings/
transitions.
HOMEDEPOT.COM/TRAFFICMASTER
Please contact 1-888-864-4520 for further assistance.