
Installation Guide


ENGLISH ESPAÑOL
11
S
t
a
r
t
t
h
e
s
e
c
o
n
d ro
w wi
t
h
t
h
e
p
lan
k
c
ut
at
abo
ut
2
/3
le
n
g
t
h
(
2
f
e
e
t
)
.
M
e
a
s
ure
an
d
mark
t
h
e
plan
k
,
t
h
e
n
us
i
n
g
a
s
t
ra
i
g
h
t
e
dg
e
an
d ut
i
li
t
y
k
n
i
f
e
, s
i
mp
ly
s
c
o
re
t
h
e
p
la
n
k
a
n
d s
n
ap
.
T
he
o
ver
-
ed
ge
b
u
tts
u
p
to
the
fir
st
r
o
w
.
A
ga
in,
get
o
ne
c
or
ner
o
f
the
p
l
a
nk
sta
r
ted
tightl
y
a
ga
inst
the
o
ther,
a
nd
o
n
a
4
5
d
egr
ee
a
ngl
e,
r
o
l
l
the
p
l
a
nk
tightl
y
into
p
l
a
c
e.
T
he
r
em
a
ining
1
/
3
p
iec
e
c
a
n
b
e
u
sed
on
the
fa
r
w
a
l
l
,
if
the
l
a
yo
u
t
o
f
the
r
o
o
m
p
er
m
its
(
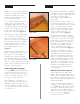
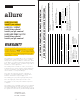
Fi
g
ure
4
)
.
S
t
ar
t
t
h
e
t
h
i
rd ro
w wi
t
h
t
h
e
plan
k
cut
a
t
1/
3
of
a
l
en
gt
h
(
1
f
oot
)
.
A
ga
in
,
t
h
e
l
ef
tov
er
p
iece
ca
n
b
e
used
a
t
t
h
e
op
p
osit
e
en
d
of
t
h
e
row,
if
th
e
l
a
y
out
of
t
h
e
room
p
erm
it
s.
C
on
t
in
ue
t
h
is
p
a
t
t
ern
f
or
t
h
e
rem
a
in
d
er
of
t
h
e
row
s
t
o
b
e
in
st
a
l
led
.
A
l
w
a
y
s
p
l
a
ce
th
e
cut
en
d
of
th
e
f
irst
p
l
a
n
k
a
ga
in
st
t
h
e
w
a
l
l
(Fig
ur
e
5)
.
Fitting aro
und irregular o
bjec
ts is no
pro
blem. Simply make a patter
n o
ut o
f
heavy paper to
fit aro
und pipes o
r
irregular o
bjec
ts. Plac
e the patter
n
upo
n the plank and trac
e. Cut alo
ng
trac
e lines using a utility knife o
r heavy
duty sc
isso
rs, and lay plank. T
he sheets o
f
paper in between planks inside the c
ar
to
n
make an exc
ellent template.
Un
dercu
ttin
g Door C
asin
gs:
To ensure
allur
e
®
w
ill f
it unde
rne
ath the
door casing and not e
xpose
a 1
/4
"
expansion space, place
a hand saw
on
the
back
of
a plank
and cut the
door
casing to the
he
ight of
a plank
.
A
fte
r installation is com
ple
te
d, w
e
re
com
m
e
nd rolling the
se
am
s w
ith a 7
5
-
1
0
0
lb f
loor rolle
r in both directions to
e
nsure
bonding of
both adhe
siv
e
e
dges.
You can rent a floor roller from your local
tool rental center.
C
o
m
ie
n
z
a
l
a
se
gun
d
a
f
il
a
c
o
n
l
a
ta
b
l
a
c
o
r
ta
d
a
c
e
rc
a
d
e
2
/3
d
e
l
l
a
rgo
(
6
0
,
9
6
c
m
)
.
M
id
e
y
m
a
rc
a
l
a
ta
b
l
a
,
l
ue
go
c
o
n
un
a
re
gl
a
y
un
c
uc
h
il
l
o
m
ul
tiuso
,
sim
p
l
e
m
e
n
te
m
a
rc
a
l
a
ta
b
l
a
y
c
o
r
ta
d
e
un
go
l
p
e
.
E
l
b
o
rd
e
sup
e
rio
r
e
n
c
a
ja
c
o
n
tra
l
a
p
rim
e
ra
f
il
a
.
N
ue
v
a
m
e
n
te
,
p
e
ga
un
a
e
sq
uin
a
d
e
l
a
ta
b
l
a
f
ir
m
e
m
e
n
te
c
o
n
tra
l
a
o
tra
,
y
e
n
un
á
n
gul
o
d
e
4
5
gra
d
o
s,
p
a
sa
e
l
ro
d
il
l
o
p
a
ra
f
ija
rl
a
e
n
su
l
uga
r.
E
l
te
rc
io
re
sta
n
te
d
e
l
a
ta
b
l
a
p
ue
d
e
usa
rse
e
n
l
a
p
a
re
d
o
p
ue
sta
,
si
l
a
d
istrib
uc
ió
n
l
o
p
e
r
m
ite
(
F
i
g
u
ra
4
)
.
C
o
m
ie
n
z
a
l
a
te
rc
e
ra
f
il
a
c
o
n
l
a
ta
b
l
a
cortada a 1
/3
de
su largo (
3
0
,4
8
cm
)
.
Un
a v
e
z m
ás, lo que
sobre
de
la tabla
pue
de
usarse
e
n
e
l e
xtre
m
o opue
sto de
la f
ila si la distribución
así lo pe
rm
ite
.
C
on
tin
úa con
e
ste
patrón para e
l re
sto
de
las f
ilas que
in
stalarás. S
ie
m
pre
coloca contra la pare
d e
l e
xtre
m
o
cortado de
la prim
e
ra tabla
(Fig
ura
5)
.
La in
stalación
alre
de
dor de
obje
tos
irre
gulare
s n
o constituye
un
proble
m
a.
S
e
ncillam
e
nte
coloca un
patrón
de
pape
l grue
so alre
de
dor de
tube
rías u
obje
tos con
f
orm
a irre
gular. C
oloca e
l
patrón sobre
la tabla y m
arca. C
orta
siguie
ndo las líne
as trazadas, con la
ayuda de
un cuchillo m
ultiuso o tije
ras
re
siste
nte
s, y coloca la tabla. Las hojas
de
pape
l e
ntre
las tablas de
ntro de
la caja son e
xce
le
nte
s para usarse
com
o plantillas.
Subvaloración de los marcos:
Para asegurar de suelo allure cabe
debajo de la cubierta de la puerta y no
exponer a un 1/4 pulg. (6mm) espacio
de expansión, coloque un serrucho en la
tabla y cortar la cubierta de la puerta a
la altura de la tabla.
Después de que hayas terminado la
instalación, recomendamos pasar un
75 a 100 libras rodillo para pisos sobre
las juntas en ambas direcciones para
asegurar la unión de ambos bordes
adhesivos. Puedes rentar un rodillo para
pisos en el centro de alquiler de
herramientas de tu tienda local.
Figure / Figura 4
Figure / Figura 5