
Installation Guide

©2020 Swiss Krono LLC.
∙ May 2020
Distributed by HOME DEPOT USA, INC. ∙ Distribuido por HOME DEPOT USA, INC.
2455 Paces Ferry Road, Atlanta, GA 30339 ∙ 866-334-9923 ∙ www.homedepot.com/homedecorators
WR Installation - WR Instalación
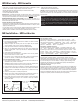
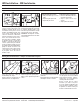
Remove the tongue side (see Figure 1 below)
on only the planks in the first row that face
the wall to allow room for spacers.
Retire la lengüeta de los paneles en la
primera fila que da a la pared para dejar
espacio para los espaciadores.
Figure 1 - Figura 1
Before cutting, select your beginning
wall and plan your installation. Lay
planks tongue side facing the wall for
the first 2 rows on the floor close to the
wall. Each plank should be at least 12”
long.
Antes de cortar, seleccione su pared
inicial y planifique su instalación.
Coloque tablones para las primeras 2
filas en el piso cerca de la pared. Cada
tabla debe tener al menos 12” de largo.
Lock in panel lengthwise. Allow a 12”
minimum end-joint stagger row to row.
Install first and second row at the same
time to help ensure end-joints are
perfectly square.
Bloquee el panel a lo largo. Permita
una hilera de escalonamiento mínimo
de junta final de 12” para remar. Instale
la primera y la segunda fila al mismo
tiempo para ayudar a asegurar que las
uniones finales sean perfectamente
cuadradas.
Always allow for 5/16” min to 3/8” max
expansion at walls and around fixed objects.
Siempre permita una expansión máxima de
5/16” min a 3/8” en las paredes y alrededor
de objetos fijos.
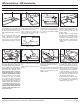
Use a 4”-6” piece at an angle to hold
the tongue and the groove on the same
plane, limit end-joint damage and ensure
planks engage square. Tap end-joints
with multiple taps, striking the tapping
block evenly until end-joints close.
NOTE: Tapping too hard or striking the
tapping block unevenly can result in
installation-related damage or peaking.
Utilice un pedazo de 4”- 6” para sujetar
la lengüeta y la ranura en el mismo
avión, limitar los daños de la Junta
de extremo y asegurarse de tablones
encajen cuadrado. Toque final juntas con
múltiples golpes ligeros, golpeando el
Polín uniformemente hasta cerrar juntas
extremo. NOTA: Golpeando muy duro o
golpeando el Polín irregularmente puede
resultar en daños relacionados con la
instalación o un pico.
Fit the last panel in the row using a pull
bar.
Ajuste el último panel en fila con una
palanca.
6
max 3/8 in.
3
2
4
1
5
GROOVE - RANURA
TONGUE - LENGÜETA
Repeat steps 4 through 6 until you reach
the last row. Cut last row to size (2-1/2”
minimum width).
Repita los pasos del 4 al 6 hasta llegar
a la ultima fila. Corte la última fila al
tamaño (2-1/2” pulgadas de ancho,
mínimo (3,8 cm)).
After installing planks and before
installing trim, remove all spacers.
Create a water tight seal by applying
flexible 100% silicone sealant along the
entire perimeter of room and around
fixed objects. Do not use acrylic sealant.
To limit the amount of sealant to be
used, first fill all expansion spaces with
3/8” compressible PE foam backer rod
and cover with silicone sealant.
Después de instalar los tablones y antes
de instalar los internos, pase silicona
por el perímetro de la habitación y
alrededor de los objetos fijos.
87
Installation instructions - Instrucciones de instalación