
Manual


5
3. With the front axle supported, unbolt the lower
front control arm from the front axle mounts.
4. Using a chisel, remove the alignment plates
from the factory mounts.
5. Reinstall the front lower control arms to the axle
mounts using the supplied alignment cams. Ro-
tate the cams so that the large lobe is facing to-
ward the front of the vehicle. Torque to 95 ft./
lbs.
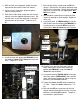
6. Install the front coil spacer (82-TM30003) using
the supplied 12mm-1.75 X 35mm bolt and hard-
ware. Torque to 87 ft./lbs.
7. Reinstall the factory isolator onto the OE coil
springs. Reinstall the coil spring and bump stop
spacer at the same time. Secure the bump stop
extension using the 3/8” self tapping bolt. DO
NOT over tighten.
8. Now would be a good time to inspect the front
shocks for damage or fluid leakage. Replace if
necessary.
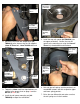
9. If you purchased kit TM3330-40010 ,install the
front shock extension bracket (82-TM20005) us-
ing the previously removed OE bolt and hard-
ware and the 8mm X 20mm bolt and hardware.
10. Carefully raise the front axle and install the
lower shock mount to the shock extension
bracket (82-TM20005) using the 12mm X
75mm bolt and hardware.
11. If you purchased kit TM3330-40013 Install your
new front shocks (TM73265005) and install the
lower shock mount to the axle mount using the
previously removed OE hardware.
12. Torque the 12mm and OE shock hardware to
87 ft./lbs. Torque the 8mm hardware to 17 ft./
lbs.
13. Reinstall the OE front sway bar end link into
original mounting bracket on the axle using the
previously removed OE hardware. Torque to
manufacturers specifications.
82-TM30003 Front
Coil Spring Spacer
OE Coil Spring
Isolator
OE Coil
Spring
8mm X
20mm bolt
OE bolt
12mm X
75mm bolt
Front
Shock
82-TM20005
Front Shock
Extension
35-TM20012
Alignment
Plate