
User Manual


6
18. 2011-2013 models only: Install the front brake
line brackets (35-TM20030 drvr and 35-
TM20031 pass) to the front spring pads and se-
cure using the provided 1/4” X 1” bolts and
hardware.
19. Secure the OE brake line brackets to the drop
brackets using the previously removed OE hard-
ware.
20. Remove the retaining clips that retain the ABS
wire to the OE brackets. Wrap the OE ABS
lines with the provided protective sleeves (90-
4337) and secure with the supplied zip ties
(10999).
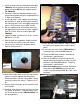
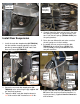
21. Install the new pitman arm (TM3340-50020) to
the sector shaft.
22. Reinstall the Pitman arm retaining nut to the
sector shaft and torque to 185 ft./lbs.
23. Reinstall the steering drag link to the pitman arm
using the previously removed castellated nut.
Torque the drag link nut to 60 ft./lbs. Insert new
cotter pin.
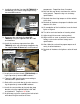
24. Reinstall the front track bar to the front track bar
bracket using the supplied 14mm cam bolt (90-
3718), notched cam (90-3245) and hardware.
25. Reattach the transfer case skid plate using the
previously removed hardware. Torque the hard-
ware to 87 ft./lbs.
26. Reinstall the wheels and lower the vehicle to the
ground. Torque the lug nuts to OE specifica-
tions.
27. Torque all bolts to factory specifications. Re-
torque all bolts after 500 miles.
Prepare to Install Rear
Suspension
1. Jack the rear of the vehicle with the floor jack
under the differential and place jack stands un-
der the frame just in front of the lower control
arm frame mounts. Leave the jack stands high
enough to let the floor jack down and still have
the rear tires suspended in the air. Keep the
floor jack under the differential with slight pres-
sure for support.
2. Remove the rear wheels.
3. Unbolt and remove the rear track bar from the
vehicle. Save the hardware for reuse.
4. Unbolt and remove the rear shocks from the ve-
hicle. Save the hardware for reuse.
5. Unbolt and remove the rear sway bar end links
from the vehicle.
6. Unbolt the brake line bracket from the frame.
Save the hardware for reuse.
7. Unclip the ABS line from the axle.
8. Lower the rear differential so that the springs
come loose. Remove the OE coil springs and
the OE isolators. Label the springs as to which
side they were removed, Left and Right so that
they are reinstalled in the side in which they
were removed.
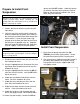
TM3340-50020
Pitman Arm
NOTE
Whether re-using the existing pitman arm retain-
ing nut or replacing with a new nut, thread lock-
ing compound must be used.
NOTE
The threads of the sector shaft and the Pitman
arm retaining nut MUST
be cleaned using brake
cleaner or another suitable method to remove
the previously applied oil.