
Instructions / Assembly

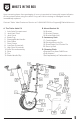
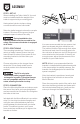


Assembly
6
STEP 1: SET UP
When installing the Trailer Valet 5X, the unit
must be installed while the weight of the
trailer is supported by an existing jack.
Having wheel chocks in place during
connection will insure a safe install.
Raise the trailer tongue to where the coupler
is about 16 inches o the ground to give
adequate space to attach the dolly.
During installation, the
Steering Handle must be secured to the
safety clip to ensure the brake is engaged
at all times.
STEP 2: POSITIONING
The mounting bracket has 7 holes to t a
variety of trailer frames. Be sure that you
have at least 8 inches of free space for the
mounting bracket to be tted onto your
trailer frame.
Choose a location on the tongue frame
where the 5X can freely rotate from its
vertical position to its horizontal stow
position.
The 5X is only to be
installed on trailer tongues that are
rectangular in prole. Cylindrical frames
are not compatible with the 5X as it will
rotate, allowing the trailer to drop.
STEP 3: CONNECTION
Place the Mounting Bracket and clamps onto
the area of the frame you have designated
and secure with the four bolts. Do not tighten
the bolts at this time.
Included with the Mount Bracket is a cushion
strip. Cut the strip into desired lengths and
using the one-sided adhesive, place the
strips between the bracket and your trailer
frame. This will both protect your frame
from scratches and allow you to tighten the
bracket on further.
It is now recommended that you ensure that
there is adequate height to install the unit.
The trailer should be high enough that, when
the frame is level, there is enough space for
the unit to be at least one inch o the ground
once attached to the bracket. If there is not
enough space, adjust the placement of the
bracket on your trailer frame.
NOTE: While it is recommended that the
bracket is installed with the attachment point
in the low position for stability reasons, the
bracket can be ipped prior to install if the
space is required.
After the bracket is positioned, evenly and
rmly tighten the four bolts to secure the
Mount Bracket.
Place the connection point of the unit’s Jack
tube into the Mount bracket and fasten with
the included stow/Clevis pin. Lastly, set the
cotter pin through the Stow/Clevis pin.