
Installation and Maintenance Manual


12 VRF-SVX31A-EN
Installation
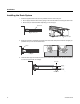
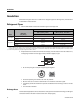
3. Attach the yoke to the flaring bar, centering the conical part over the end of the pipe that is
extending above the flaring bar.
4. Tighten the yoke securely to flare the end of the pipe.
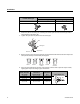
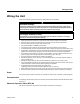
5. Remove the pipe. The end of the pipe that you flared sh
ould lo
ok like the end of a trumpet. See
examples of correctly and incorrectly flared pipes.
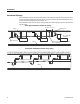
6. Align the pipes and tighten the flare nuts manually and then with a spanner torque wrench,
applying the torque according to pipe dimensions:
R-410A clutch type
Conventional flare tool
Clutch type Wing nut type
0–0.020 in. 0.04–0.06 in. 0.06–0.08 in.
Outer diameter
(in. [mm])
Connection
torque (ft·lb)
Flare
dimension
(in.)
Flare shape (in.)
1/4 (6.35) 10.3–13.3 ft·lb 0.34–0.36
3/8 (9.52) 25.1–31.0 ft·lb 0.50–0.52
1/2 (12.70) 36.1–45.0 ft·lb 0.64–0.65
5/8 (15.88) 50.2–60.5 ft·lb 0.76–0.78
Yoke
Flaring bar
Copper pipe
Flare nut
Inclined
Damaged
surface
Uneven
thickness
Correct
Cracked
R.016–.031
45°±2°
90°±2°