
Installation and Maintenance Manual

VRF-SVX31A-EN 21
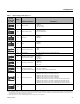
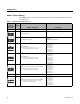
Configuration
Configuration
All VRF indoor units are factory configured. If modifications are required, one of the following
control devices can be used:
• VRF Wireless Remote Control (instructions follow)
• VRF Wired Remote Control
• VRF Enterprise Management Software
• VRF Auto-Commissioning Tool
• VRF System Controller
Note: In
door unit options are configured at the factory; c
hanges are not required for typical
installations.
Using the VRF Wireless Remote Control
To change configurations of the VRF system using the VRF Wireless Remote Control, follow this
procedure:
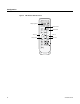
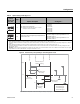
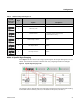
1. Remove the batteries from the remote control, and re-insert them while pressing the Temp+ and
Temp- buttons simultaneously (refer to Figure 3).
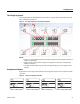
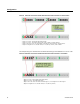
The first 2-digit segment of a 24-digit sequence will appear on the wireless remote control
display, as shown:
2. To advance to the next 2-digit segment, press the Mode button (Figure 3). Continue pressing
the Mode
button until the two-digit segment appears that corresponds to the option setting or
address setting you want to view or change.
Each 2-digit segment is differentiated from the ot
hers
by a combination of operation mode
(Auto/Cool/Dry...) and ON/OFF icons, as shown below. (See “The 2-Digit Segments,” for more
detailed information.)
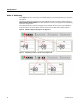
3. To change the value of the left digit on the
di
splay, press the Fan down button.
To change the value of the right digit on the display, press the Fan up button.
Note: Value
s and their corresponding settings are listed in the following pages of this section
of the manual.
4. To save the setting, press the Power button twice.
5. To restore the wireless remote control to norma
l oper
ating mode, remove the batteries from
the remote control. Then re-insert them.
Digits 2 and 3 Digits 4 and 5
Digits 6 and 8
...and so on,
through digits 23
and 24.
Note: Digits 1, 7, 13, and 19 do not appear and are not used for configuration.