
Installation and Maintenance Manual


VAV-SVX07A-EN 45
Tracer™ UC400 Controller Operations
To eliminate just a few items from a predefined category, first transfer all of the items to the
Selected Data box using the double arrow and then eliminate any items from the Selected Data
box by transferring them back to Available Data using the single left arrow button or by pressing
Ctrl and making selections with your mouse.
Note: If you make no selections, all data points generated by the controller are captured at the
interval you previously specified on the Sampling Rate spin box.
7. Click Save to save the session data log definition.
Note: Note You must save the configuration before you can start data logging.
8. Click Start session logging to start the session log immediately if it has not been scheduled with
a start time.
If a scheduled start time has been entered, the data logging begins when the start time matches
the current time in the device and ends when the stop time mas the current time in the device. The
data log is periodically and automatically saved to your hard drive.
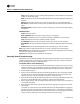
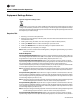
Controller Settings Button
On Controller Settings button, you can:
• View points;
• Enable and setup points;
• Set the Tracer UC400 controller date and time, including format and time zone;
• Set the Tracer UC400 controller units (SI or IP);
• Set the protocol parameters; and
• Soft-set the BACnet Device ID.
Analog, Binary, and Multistate Tabs
Use the Analog, Binary, and Multistate tabs to create, edit, or delete the currently configured inputs,
outputs, and values residing on the equipment controller. This is the same as the Analog Status
tab in layout except now we have a screen design around editing.
Note: To create new points to utilize the spare I/O and/or software only points see the Tracer UC
400 programmable controller IOM.
Important: The following field descriptions apply to the Inputs, Outputs, and Values grid column
areas of the screen.
Actions (drop-down menu)
Copy: Use this option to copy an existing point configuration under a different name and then
modify it to avoid extra typing.
Edit: Use this option to edit an existing point configuration. The appropriate Properties dialog
box appears.
Delete: Use this option to delete one or more point configurations.
Add New button: Click this button to configure a new point. The appropriate Properties dialog
box appears.
Figure 29. The controller settings button