
User's Manual


Getting Started
Trango Broadband Wireless — ATLAS4900 page 5
Chapter 2 Getting Started
It is recommended that you first provision and test your the radios on the bench before deploying them in the field. This is a
particularly useful exercise for the novice user.
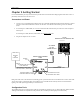
Connections and Power
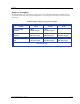
• Connect a Cat-5 (straight through) Ethernet cable (we recommend shielded twisted pair) between the ODU (out door
unit) port of the J-box and the RJ-45 connector on the radio. Note that this cable will carry power-over-Ethernet
(PoE).
• If connecting to a COMPUTER, use a Cross-Over
Ethernet cable from the NET port of the J-box to the computer’s
Ethernet port.
If connecting to a HUB, SWITCH, or ROUTER, use a Straight-Thru
cable.
• Plug the AC adapter into an AC outlet.
C
A
T
-
5
S
T
RA
I
GH
T-
TH
R
U
C
A
BL
E
20 VDC
POWER SUPPLY
AC POWER
ATLAS
MASTER UNIT OR REMOTE UNI
T
POWER-OVER-E
T
HERNE
T
J-BOX
I
N
D
IC
ATE
S
P
O
W
E
R
T
O
R
ADIO
I
N
D
IC
AT
E
S
P
O
W
E
R
T
O
J-BOX
C
A
T
-
5
N
E
T
W
O
R
K
O
R
C
O
M
P
U
TE
R
GROUND
LUG
VOLTMETER TEST LEADS
VOLTMETER TEST LEADS
USE STRAIGHT-THRU CABLE
IF TO HUB, SWITCH, OR ROUTE
R
USE CROSS-OVER CABLE
IF TO COMPUTER
Both green LEDs on the J-box should be lit, indicating power is present at the Power-over-Ethernet box as well as at the radio.
You are now ready to configure the radio via the Ethernet port. The Radio Power LED may take several seconds before
lighting. The radio requires approximately 45 seconds to boot.
Configuration Tools
ATLAS4900 radios can be configured using either the Command Line Interface (CLI), or the Web Browser (HTTP) interface.
Although both methods are comprehensive and powerful, the CLI method provides slightly more functionality.