
User's Manual


Copyright © 1999 Trango Systems, Inc. All rights reserved.
7
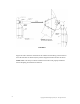
VTX5900 Transmitter Inputs & Controls:
1. POWER INPUT
Accepts a 6-12 Vdc power source such as the standard 7 Vdc adapter (Trango part
number PT07800-1), or an optional battery. The nominal current draw is 200
milliamperes. If using an adapter from a third party, use a well-regulated 300 mA
minimum output supply. Do not use the PT07800-1 to power a camera or video
distortion may occur.
2. ALARM INPUTS
These inputs are used to send alarm signals to the receiver. They sense an open or
closed state and reflect that state to the receiver whenever it changes. The alarm
inputs operate independently of each other. The transmitter is capable of sending
either alarms or stereo audio, selectable via the Stereo/Alarm switch.
3/4. RIGHT & LEFT AUDIO INPUTS
Designed to mate to standard RCA connectors, each input accepts 1 Vpp audio input
and is terminated with 600Ω unbalanced configuration. It is designed to interface to
“lineout” audio sources. A preamplifier must be used to connect a microphone to this
input.
5. STEREO/ALARM SWITCH
When this switch is in the “R Audio On” position, stereo audio transmission is
enabled. This permits the transmission of stereo audio with no data or alarms. When
it is in the “Alm/Data Mode On” position, R audio is disabled. In its place, either
alarms or user data (Data Pass-Through mode) are transmitted.
6. DATA INTERFACE
When connected to a personal computer via the optional CBLDAT-1 interface cable,
this input accepts serial commands that control settings in the transmitters not
available on the front panel. See the TrangoLink software section and program help
for more information. This is also the input for the RS-232 user data to be sent in
Data Pass-Through mode.
7. VIDEO INPUT
Designed to mate to a standard BNC male connector, this input accepts 1Vpp video
in both NTSC and PAL formats. This input is terminated with 75Ω. RCA-BNC
adapters are available for use with some cameras and VCRs.
8. TOGGLE/STANDBY
Depressing this switch momentarily changes the transmitter channel. Remember to
change the receiver channel as well, since it is not automatically changed when the
transmitter channel is changed. Holding the button down for 2 seconds places the
transmitter in Standby mode.