jet® 1500 Spare Parts Guide 20-06371 Rev J Nov-07
Revision J Rev A Rev C Rev D Rev E Rev F Rev G Rev H Rev J Initial Release.
Revision J Monday through Friday, 8 A.M. to 8 P.M. Eastern Standard Time (excluding holidays). To obtain Technical Support, call: TransAct at (607) 257-8901, or (877) 7-ITHACA. TransAct Technologies Incorporated has a full service organization to meet your printer service and repair requirements. If your printer needs service, you can directly contact TransAct at (607) 257-8901 or (877) 7-ITHACA for a return authorization. International customers should contact their distributor for services.
Revision J # $ % www.transact-tech.com TransAct Technologies Inc. maintains an Internet web site with content devoted to product support. Within the Technical Support section you can find the most current versions of the Operator’s Guide and Programmer’s Guide. 1. Upon entering our web site, you will be brought to the “Welcome to TransAct” screen. This intro page has the Ithaca Brand listed at the top right. Click on the Ithaca logo. 2.
Revision J " Contact TransAct for information about the POSjet® 1500 Printer and how it works with your system. For information on international distribution, visit our web site at www.transact-tech.com. Contact the TransAct’s Sales and Technical Support Departments at the following address and telephone or fax numbers. Receive technical support, order documentation, request additional information, or send in a printer for service.
Revision J " ( % # &&&&&&&&&&&&&&&&&&&&&&&&&&&&&&&&&&&&&&&&&&&&&&&&&&&&&&&&&&&&&&&& &&&&&&&&&&&&&&&&&&&&&&&&&&&&&&&&&&&&&&&&&&&&&&&&&&&&& &&&&&&&&&&&&&&&&&&&&&&&&&&&&&&&& &&&&&&&&&&&&&&&&&&&&&&&&&&&&&&&& &&&&&&&&&&&&&&&&&&&&& ' Standard Features............................................................................................................................................................................................................... 6 Optional Features ..................................
Revision J ' POSjet® 1500 Features and Specifications % • • • • • • • • • • • • • • • • • • • • Print Speed: 12 lps. at 10 char. per line Print Resolution: Max. 208 dpi. Horizontal, 96 dpi.
Revision J 1 " 2 # The POSjet® 1500 will be supported by various PC based tools. These tools include but are not limited to the following: 32 PJColor is a program that will allow images and picture to be processed so they can work with the printer. 3 PJTerminal is a test application that is used to verify communications to the printer. 34 PJBootload is a program that is used to replace or update the printer’s firmware.
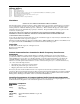
Revision J 9 + Figure 1 Printer Dimensions Width Depth Height Without Knife 6.75" (172 mm) 9.75" (248 mm) 5.92" (151 mm) With Knife 6.75" (172 mm) 9.75" (248 mm) 6.44" (164 mm) Weight: Shipping: approx. 6 lbs. (2.7 kg) approx. 8 lbs. (3.6 kg) Interface Serial RS-232C Parallel IEEE1284 USB Bi-directional- Ready/Busy or XON/XOFF (9-pin D-shell or 25-pin D-shell) Bi-directional- transmit/receive/ground (25-pin D-shell or 36-pin Centronics) Version 1.
Revision J . " 2 The POSjet® 1500 is designed to be placed on point-of-sale terminals, counter tops, or any other flat, stable surface that can support the weight of the printer (about 6 lbs. or 2.7 kg). Be aware that the environmental conditions of the location where you place the printer will have an effect on the printer’s performance and longevity. The printer will run its best when stored and operated in an environment that meets the following temperature and humidity conditions.
Revision J # Printing method: Cartridge arrangement: Printing directions: Paper feed pitch: Validation Type: # Validation lines: Receipt print zone (maximum): Validation print zone: Thermal ink jet 12 nozzle Bi-directional, logic seeking Default - 0.125" (1/8" or 3.175 mm) Independent Max. 9 lines (1.53") @ 6 lpi. 12 lines @ 8 lpi. 2.5" (63.5 mm) Refer to “Validation Form Requirements” on page 11. 6 = 2 > A receipt auto-cutter is an optional feature with all POSjet® 1500 Printers.
Revision J # : $ 6 ? /? 2 Print Cartridge Specification Cartridge arrangement Vertical dot pitch Cartridge life Cartridge Colors 7 = 6 * Paper width: Paper roll diameter: Paper thickness: Roll paper core outside Dia. Roll paper core inside Dia. Roll footage: < % 7; Form thickness-single part: Form Size (Min): Form Size (Max): # Validation lines: Check Basis weight: 1 HP C6602A 12 vertical nozzles 0.264 mm (0.0104") or 96dpi. ~7.0 M Characters @ 16 dots per Character. Black, Red, Blue, Green > 3.
Revision J ( General Maintenance Procedures 2 ? Failure to perform periodic checks will eventually create printing inconsistencies and lead to more serious problems. Refer to the following information for a check list of cleanable items.
Revision J 0 2 4 The POSjet® 1500 uses a drive belt that is adjustable by simply loosening the phillips head screw on the belt tensioner. An improperly adjusted belt tensioner may cause pre-mature belt wear and/or produce inconsistent printing. To adjust the belt tensioner: Figure 3 Adjusting the Belt Tensioner 1. Open both the front and rear top covers. 2. Locate the phillip’s head screw on the tensioner and partially loosen until the spring tension returns the belt to correct position.
Revision J , Assembly and Disassembly # + )* Before disassembling any part of the printer, be sure the power is turned off. Disconnect the AC power cord, the communication cable, and the cash drawer cables. Controller board and keypad PC board can be damaged by static electricity. Observe ESD precautions. Wear a grounded wrist strap, and use a static mat or other protected work surface. Do not place the printed circuit boards directly on the printer or floor.
Revision J +/ $ 2 The printer must be grounded through the three-prong power connector. Do not use a ground defeating adapter. 1. Be sure the power switch is turned off. 2. Disconnect the external AC power source and the power cord from the power socket located on the back of the printer. Figure 4 Disconnecting the Power Cord + 2 2 ) Depending on the interface your system uses, disconnect either the serial or parallel communication cable from the connector on the back of the printer.
Revision J ' 2 ) Figure 6 Disconnecting the Communication Cable-Parallel 1. Turn the printer and the host system or PC off. 2. Disconnect the 25-pin parallel cable from the connector on the back of the printer. + 2 + $ 2 ) 1. Turn the printer off. 2. Disconnect the cash drawer cable to the connectors on the back of the printer.
Revision J 1 7 " ) *= # >=# 2 ) 4 > The Printer Assembly is held to the cabinet base by 4 phillips head screws located at the front and rear sections of the Printer Assembly. 1. Press the 2 < 7 Button to release the rear paper cover from the console. 2. Open the front cover. 3. Slowly remove the 4 phillips head screws that hold the mid-frame to the printer’s base. 4. Disconnect the knife harness, and separate the printer assembly (mid-frame) from the cabinet base. 5.
Revision J 9 7 " A # )* The Knife Assembly is attached to the Rear Paper Cover of the printer. 1. 2. 3. Disconnect the knife harness connector and unroute the wires from the wire retention clips. Unscrew the self-tapping, “middle screw”, to release the knife assembly from the rear paper compartment cover. Unsnap the knife assembly from the the rear paper cover.
Revision J . Spare Parts List ® The following spare parts list details the available replacement parts that make up the POSjet 1500 printer. When selecting parts, be aware that some assemblies have to be purchased at a factory pre-determined breakdown level. ? 8 ) Figure 10 Packing Materials No.
Revision J ( )* Figure 11 Printer Assembly
Revision J ( No. Description (standard parts) Part Number (History) 1 Cover-Lt. Tan Paper Cover-Dk. Gray Paper Cover-Black Paper 20-02760 (20-03636, 20-00507) 20-02761 20-02762 2 Cover-Lt. Tan Autocut Paper Cover-Dk.
Revision J (( ) *= 0> Figure 12 Mechanism Assembly (stage 3) No.
Revision J 2 ) 4 )* Figure 13 Cabinet Base Assembly No. Description (optional parts) Part Number (History) 1 Rod-Roller Support 15-9797 2 Roller-Paper Supply 15-9798 3 Guide-Lower Slip 20-03163 4 Screw-6-20x.375 Phps Phd Thd-Cut 98-2052 5 Base-Cabinet (Lt. Tan) Base-Cabinet (Dk.
Revision J (, -$ )* Figure 14 Paper Low Option Assembly No. Description Part Number (History) 1 Screw-6-20X1.
Revision J ) *= (> Figure 15 Mechanism Assembly (stage 2) (
Revision J (' No. Description Part Number (History) 1 Interlock-Cover Open 12-01633 2 Spring-Compression 98-9124 3 Assy-Std. Validation Assy-Autocut Validation 20-06943L (20-06943, 20-04376, 20-03412) 20-06942L (20-06942, 20-04375, 20-03406) 4 Nut-M3 Hex w/Lockwasher 98-0621 5 Retainer-E Ring .125 Dia. 520-9800002 6 Assy-STD Drive Support Assy-Autocut Drive Support R20-03410 20-03404 7 Motor-Step 35mm 7.5° w/pinion 98-03208L (98-03208) 8 Motor-Step 7.
Revision J + " )* Figure 16 Drive Support Assembly (1
Revision J (9 No.
Revision J ) *= > Figure 17 Mechanism Assembly (stage 1) No.
Revision J 0 % )* Figure 18 Mechanism Frame Assembly No.
Revision J 2 )* Figure 19 Replacement Carriage Assembly No. Description Part Number (History) 1 Assy-Repl Carriage (2 cartridge) Assy-Repl Carriage (1 cartridge) 20-03409 20-03403 2 Belt-132 Tooth 98-01542 3 Screw-#4 Plastic Thd Forming 98-7608 4 Washer-#4 .
Revision J 0( 7 2 ) *= 2 > Figure 20 Replacement Carriage Assembly (ref. Part #20-03403) No.
Revision J $ * Figure 21 Power Supply No.
Revision J 0, Ordering Genuine Ithaca Supplies Genuine Ithaca Supplies can be ordered directly from the TransAct website (www.transact-tech.com) or by using our toll free telephone number within the US: (877) 7-ITHACA. When calling, please ask for the Consumables Sales Department. Consumable Kits Stock Number 12 rolls paper/1 Blk. Ink Cartridge (Standard Grade) 20 rolls paper/1 Blk. Ink Cartridge (Standard Grade) 12 rolls paper/1 Blk. Ink Cartridge (Premium Grade) 20 rolls paper/1 Blk.