User’s Manual SSD Firmware Update Utility Version 1.
Supported Operating Systems Supported on Windows XP/Vista/7 and Fedora Core 14 32-bit. Mac OS: Mac OS X Lion (10.7) or later, and Mac is produced after 2010 Note: 1. Microsoft AHCI driver is required and Microsoft AHCI mode must be enabled on your computer. 2. You must have Administrator privileges on your computer to run this utility. Before Use 1. Updating your device may result in data loss. Therefore, we strongly recommend you back up your data before proceeding. 2.
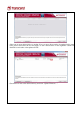
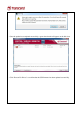
4. Select one or more desired drives to update. If two or more drives need to be updated at the same time, please ensure that the last five digits of each selected drive in the Signature column are identical to each other or the update will fail. 5.
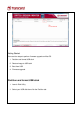
6. Select the corresponding firmware file (*.VIC), as indicated below, and click Open. Ex: 64GB: 22885_TS64GSSD720_FW5xx.vic Note : FW5xx = The latest FW version 7. A warning message window will pop up. Please ensure that all of your data stored on the drive(s) is backed up and then select “Proceed” to continue the update process. Click “Cancel” to exit the utility and back up your data if you have not already done so.
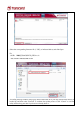
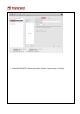
8. Once the update has completed successfully, a green check mark will appear on the disk icon. 9. Click “Rescan For Drives” to confirm that the SSD firmware has been updated successfully.
Getting Started There are four steps to perform firmware upgrade on Mac OS. 1. Partition and format USB stick 2. Restore image to USB stick 3. Boot from USB 4. Firmware upgrade Partition and format USB stick 1. Launch Disk Utility 2. Select your USB disk then click the Partition tab.
3. Select MS-DOS(FAT) format and under Partition Layout select 1 Partition.
4. Click Options and select Master Boot Record, then click OK. 5. Click Apply to partition and format the disk.
Restore image to USB stick 1. Launch Disk Utility 2. Select your USB disk then click the Restore tab 3. Right-click on the volume UNTITLED 1 then select Set as destination.
4. Click Image and select the source image file to restore.
5. Select the USB_LINUX.dmg file that you downloaded from Transcend web site and click Open. 6. Click Restore to perform the image burning process. *Mac OS may prompt you to input your admin password and scan the image file.
7. After restore is complete, the volume should now be named USB_LINUX.
Boot from USB stick 1. Long press the option key until the boot menu is shown. 2. Select the EFI Boot icon to boot from the USB stick 3. Please wait for the desktop window to be displayed. The SSD firmware upgrade tool will launch automatically.
1. The SSD Firmware Update Utility will automatically scan for all devices and list them in the main window. 2. Select one or more desired drives to update. If two or more drives need to be updated at the same time, please ensure that the last five digits of each selected drive in the Signature column are identical to each other or the update will fail.
3. Check the box next to the desired drive(s) and click Update Firmware… 4. Select the corresponding firmware file (*.VIC), as indicated below, and click Open. The firmware file is located under /tc directory. Please select the folder name that corresponds with the SSD capacity (Ex. 64GB → /tc/64GB). Ex: 64GB: 22885_TS64GSSD720_FW5xx.vic Note : FW5xx = The latest FW version A warning message window will pop up.
6. Click Rescan For Drives to confirm that the SSD firmware has been updated successfully.