StoreJet™ 35 Ultra User’s Manual (Ver1.0.
Table of Contents Introduction︱.........................................................................................................................3 Package Contents︱...............................................................................................................3 Features︱...............................................................................................................................4 System Requirements︱ .....................................................................
Introduction︱ Congratulations on purchasing Transcend’s StoreJet™ 35 Ultra. This advanced, eSATA / USB 2.0 external storage device is the perfect way to add an extra hard drive to your computer for downloading, storing, transferring and backing up your data. With both eSATA and USB 2.0 connection options, the StoreJet 35 Ultra gives you the ultimate in flexibility.
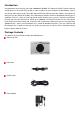
Vertical Stand Quick Installation Guide Mounting Screws x 4 Features︱ Works with all 3.5” SATA hard drives Two connection options: eSATA or USB2.0 eSATA for maximum performance up to 3000Mb/s USB2.
Safety Precautions︱ These usage and safety guidelines are IMPORTANT! Please follow them carefully. General Use • Unpack the contents of the StoreJet 35 Ultra package carefully. • Avoid exposing your StoreJet 35 Ultra to extreme temperatures above 55℃ or below 5℃ during operation. • Never drop your StoreJet 35 Ultra. • Never allow your StoreJet 35 Ultra to come in contact with water or any other liquids. • Never use a damp/wet cloth to wipe or clean the exterior case.
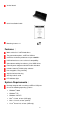
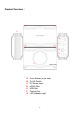
Product Overview︱ A A G B A A A A C D E F A A A B C D E F G Case Screws (4 per side) On/Off Switch DC Power Input eSATA Port USB Port Cooling Fan LED Indicator Light 6
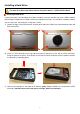
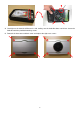
Installing a Hard Drive︱ The StoreJet 35 Ultra hard drive enclosure only works with 3.5” SATA Hard Disk Drives. Installing a Hard Drive If you purchased a Transcend StoreJet 35 Ultra hard drive enclosure that does not have a SATA hard disk drive already installed, please read this section for installation instructions. If a hard drive is already installed, you can skip to the “Connecting to a Computer” section. 1.
4. Carefully turn the StoreJet 35Ultra on its side, making sure the hard drive does not fall out. Secure the hard drive with the provided mounting screws. 5. Reattach the front cover and back cover and replace the eight case screws.
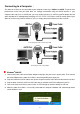
Connecting to a Computer︱ The StoreJet 35 Ultra can be connected to your computer in two ways: USB 2.0 or eSATA. To get the best performance results from your hard drive, we strongly recommend using the eSATA interface. If your computer does not have an eSATA port, you may need to purchase an SATA to eSATA adapter bracket (often included in PC motherboard packaging) or a PCI / PCI-X / PCI-Express eSATA card to connect your StoreJet 35 Ultra using eSATA.
6. If you installed an existing hard drive into the StoreJet 35 Ultra that was previously used with a Windows® 2000/XP/Vista™ computer, a new Local Disk with a newly assigned drive letter representing the StoreJet 35 Ultra will automatically appear in the My Computer window under “Hard Disk Drives.” Note: the drive name and letter in your "My Computer" window may differ 7.
Note: the drive name and letter in your "AutoPlay" window may differ 7. If you installed a brand new hard drive into your StoreJet 35 Ultra, please follow the instructions in the Formatting the Hard Drive section to prepare your disk for use with your Vista® system. Mac® OS 1. Connect the power cable to the Power Adapter and plug it into your home’s power outlet. Then connect the Power Adapter to the StoreJet 35 Ultra’s round-shaped DC power input jack. 2.
® Linux 1. Connect the power cable to the Power Adapter and plug it into your home’s power outlet. Then connect the Power Adapter to the StoreJet 35 Ultra’s round-shaped DC power input jack. 2. Plug the square-shaped end of the USB cable into the StoreJet 35 Ultra. 3. Plug the other end of the USB cable into an available USB port on your desktop. 4. Turn on the StoreJet 35 Ultra’s power switch. Its LED will light up and the cooling fan will start. 5.
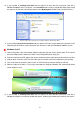
Disconnecting from a Computer︱ WARNING! To prevent data loss, ALWAYS follow these removal procedures. NEVER disconnect or turn off the StoreJet 35 Ultra when its LED is flashing. Windows® 2000, XP and VISTA™ (USB) 1. Select the Removable Hardware icon / on the system tray. 2. The Safely Remove Hardware pop-up window will appear. Select the USB device drive letter that represents your StoreJet 35 Ultra. Removable Hardware tool in XP Removable Hardware tool in Vista 3.
4. In the Policies tab, ensure that the “Enable write caching” option is not checked.
Mac® OS (USB & eSATA) Drag and drop the Disk icon that represents your StoreJet 35 Ultra into the trashcan. Then unplug your StoreJet 35 Ultra from the USB port and turn off its power switch. Linux® Kernel 2.4, or Later (USB) Execute umount /mnt/Storejet to un-mount the device. Then unplug your StoreJet 35 Ultra from the USB port and turn off its power switch.
Formatting the Hard Drive︱ WARNING! Formatting the disk will erase all of the data on your StoreJet 35 Ultra. Please use the USB interface (not eSATA) to format the drive. You must have Administrator Rights in order to format in Windows 2000, XP, or Vista. Windows® 2000/XP 1. Download the StoreJet Format Utility from Transcend’s online Download Center at http://www.transcendusa.com/Support/DLCenter/index.
9. The format process may take a few minutes. When complete, an “O.K.” message will appear in the bottom right hand corner of the window. Windows Vista™ 1. Download the StoreJet Format Utility from Transcend’s online Download Center at http://www.transcendusa.com/Support/DLCenter/index.asp (the software can be located by selecting “Storage Devices -> StoreJet Drives -> any StoreJet product -> any StoreJet model) 2.
6. The User Account Control window will appear. Select “Allow” to continue. 7. The program will automatically detect the StoreJet 35 Ultra drive. 8. Press “Start”.
9. A confirmation window will appear. Press OK to begin formatting the drive. 10. The format process may take a few minutes. When complete, an “O.K.” message will appear in the bottom right hand corner of the window.
11. Click the “Close” button to finish and exit. Mac® OS 1. Plug the StoreJet 35 Ultra into an available USB port on your MAC computer. 2. Unplug all other external storage devices from your computer. This is to prevent accidental format of a different drive. 3. Click the “Initialize” button. 4. In the Disk Utility window, select the new drive from the list on the left. 5. Select the “Erase” tab. 6. Choose the Volume Format you want (Mac OS Extended (journaled) is recommended). 7.
9. Click “Erase” again to confirm. 10. Click the “Close” button to finish and exit. Linux® 1. Plug the StoreJet 35 Ultra into an available USB port on your Linux computer. 2. Unplug all other USB storage devices from your computer. This is to prevent accidental format of a different USB drive. 3. Type fdisk /dev/sda (replace /dev/sda with your actual USB device) 4. Press p 5. Press n 6. Press w 7. Type mkfs.ext3 /dev/sda1 8.
Troubleshooting︱ If a problem occurs with your StoreJet 35 Ultra, please first check the information listed below before taking your StoreJet 35 Ultra in for repair. If you are unable to remedy a problem from the following hints, please consult your dealer, service center, or local Transcend branch office. We also have FAQ and Support services on our website at www.transcendusa.com My computer cannot detect the StoreJet 35 Ultra Please try the following: 1.
StoreJet Format Utility cannot detect the StoreJet 35 Ultra using eSATA Ensure your Windows account has Administrator Privileges. The StoreJet Format Utility only supports USB. Please connect the StoreJet 35 Ultra via USB and click “Refresh.” Why can’t I use StoreJet 35 Ultra between different operating systems? Mac and Linux) (Windows®, Different operating systems typically use different file system formats to offer improved performance or more advanced storage features.
Specifications︱ Size (L x W x H): 197.50mm × 127.50mm × 48.00mm 340g (without hard drive) Weight: Storage Media: 3.5” SATA Hard Disk Drive (not included) Power Supply: AC input: 100V-240V DC input: 12V via Switching Power Adapter eSATA: 3.0Gbits per second USB 2.0: 480Mbits per second Max.
Transcend Limited Warranty︱ “Above and Beyond” is the standard we set ourselves for customer service at Transcend. We consistently position ourselves to be significantly above the industry norm, which is all part of our commitment to Customer Satisfaction. Please do not break or remove the warranty sticker on your Transcend products, as this will void your product warranty. All Transcend information, Inc.