User’s Manual Digital Photo Frame PF830 TS2GPF830B TS2GPF830W Version 1.
Table of Contents Introduction︱ .........................................................................................................................2 Package Contents︱ ...............................................................................................................2 Features︱ ...............................................................................................................................2 System Requirements︱ .................................................................
Introduction︱ Congratulations on purchasing Transcend’s PF830 Digital Photo Frame. Now you can easily display your entire photo collection at home or at the office. The Photo Frame can conveniently playback videos, photos and music from a variety of sources: USB flash drives, memory cards, or the Photo Frame’s own on-board memory. You can operate the Photo Frame by using the menu buttons on the back of the Photo Frame or with its full-featured wireless remote control.
System Requirements︱ System requirements for connecting the Photo Frame to a computer: 100~240V voltage power outlet for the AC adaptor Desktop or notebook computer with a working USB port One of the following Operating Systems: Windows® 2000 Windows® XP Windows Vista® Windows® 7 Mac® OS 10.0 or later Linux® Kernel 2.
Safety Precautions︱ These usage and safety guidelines are IMPORTANT! Please follow them carefully to ensure your own personal safety and help protect your Photo Frame from potential damage. General Use For indoor use only. Avoid using or storing the Photo Frame in an extreme temperature environment. Never allow the Photo Frame to come in contact with water or any other liquids. Do not use this product in environments with strong magnetic fields or excessive vibration.
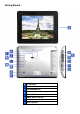
Getting Started︱ A B C D E F G H 8" LCD Panel Mini-B USB Port (PC Connection) SD/SDHC/MMC Slot CF Slot MicroSD/M2 Slot MS/MS Duo/Pro/HG Slot DC Power Input Built-in Speaker 5
I J K L M N O P USB Port (Flash Drives) Menu/Power Button OK Button Navigation buttons Options Button Volume Control Button Security Lock Attachment Stand Attachment Hole Note: Although the Photo Frame supports simultaneous reading from multiple cards, the microSD/M2 slot (E) and the MS/MS Duo/PRO/HG slot (F) cannot be used at the same time. Setting Up the Photo Frame 1. Attach the Tabletop Stand to the back of the Photo Frame by screwing it clockwise into the Stand Attachment Hole shown above. 2.
Switching between Portrait and Landscape mode The Photo Frame can be placed on a table vertically (Portrait mode) or horizontally (Landscape mode). When the Photo Frame is rotated, its intelligent AOS (Automatic Orientation Sensor) will automatically adjust images and the graphical user interface for correct display. The directional buttons will also automatically adjust for easy menu navigation. Using a memory card or USB flash drive 1.
Built-in Speaker The Photo Frame includes a built-in speaker for playing back background music during slideshows, or for listening to MP3 music or watching videos. Navigation Buttons On the back of the Photo Frame, there are eight navigation buttons used for browsing through menus, selecting files, and accessing the Photo Frame’s numerous features.
4. To exit the Quick Menu, simply press or again. Options Menu The Options menu allows access to additional functions that are available for the current mode (Slideshow, Calendar, etc.). 1. Press or 2. Use the / and open its submenu. to show the Options window. / buttons to select an option and press the 3. To select a different option, press the button and use the scroll through the other available options, then press or currently highlighted option’s submenu on the right hand side.
Remote Control Your Photo Frame comes with a compact, easy-to-use remote control. You can fully operate your Photo Frame with either the navigation buttons on the front of the Photo Frame or by using the remote control. Note that when using the remote control you should always aim it directly at the front of your Photo Frame and make sure there are no obstacles in the way.
: Skip to the next or previous available music track or video clip. : Adjust music volume (up / down / mute). : Cycle between music and video repeat modes. : Rotate or zoom-in on photos displayed in Photo View mode. : Change the brightness of the screen. : Enable the sleep timer to automatically shut down the Photo Frame.
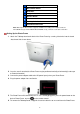
Your Photo Frame is now ready to transfer data just like an external hard drive. A number of Removable Disk* drives with newly assigned drive letters representing the Photo Frame’s card slots (and its onboard memory) will appear in the My Computer window. You can transfer your pictures and music to the Photo Frame by simply dragging-and-dropping files or folders onto these Removable Disk drive letters.
Linux® Kernel 2.4 or later No drivers are required. Plug your Photo Frame into a USB port and mount it. 1. First create a directory for the Photo Frame. Example: mkdir /mnt / Photo Frame 2. Then, mount the Photo Frame. Example: mount –a –t msdos /dev/sda1 /mnt / Photo Frame Proper removal of your Photo Frame (from Linux): Execute umount /mnt/ Photo Frame to un-mount the device. Then unplug your Photo Frame from the USB port. 1.
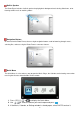
Photo Modes︱ The Photo Frame has three basic modes – Thumbnail, Photo View and Slideshow. The Thumbnail mode lets you browse for specific photos, the Photo View mode is for displaying a single picture at a time, and the Slideshow mode will automatically display all available photos. Press to switch between each mode, or press , or on the remote control. Thumbnail Mode The Thumbnail Mode allows you to browse thumbnails of all photos in the current source (memory card, USB flash drive, etc.).
Options: Add to / Remove from My Favorites ( ): Copy the currently selected photo in the Thumbnail viewer to the Photo Frame’s internal memory (when the viewing source is a memory card or USB flash drive). To remove a photo from the internal memory, select “My Favorites” as the viewing source, navigate to the desired thumbnail to remove, and then choose “Remove from My Favorites.
songs. If there are no music files on the current storage media, no music will be played. Off: Turn off all background music. Select Multiple Photos: This option lets you select multiple photos to copy to the Photo Frame’s internal memory. 20 thumbnails with check boxes will be displayed per page. Use the UP, DOWN, LEFT and RIGHT buttons to move between images and press to check/uncheck individual photo or folder. To move up one level, select the arrow icon in the top left corner.
to or remove from the Photo Frame’s internal memory. Note: the “Remove” option will be shown when the viewing source is set to “My Favorites.” ( ) Select Source: Change the media source to browse thumbnails from. Use the LEFT and RIGHT buttons to select one of the available storage devices and press . Video Playback: To play a video, use the Thumbnail mode to highlight the video file you want to play and press 1. Press or . to pause, and again to resume. 2.
Photo View Mode You can view, zoom-in, or rotate a single photo in Photo View mode. Use the and buttons to view the next or previous photo available. Options: Zoom: Select this item to choose between 1x, 2x and 4x zoom modes in the Zoom submenu. You can also press on the remote to automatically zoom-in on the current photo. Rotate: Select this item and choose between clockwise 90o, 180o and 270o in the Rotate submenu. Pressing will rotate the current photo clockwise 90o each time you press it.
Animation: With this feature, you can add fun animated effects to your pictures. Use the and / buttons to highlight None, Snow, Pumpkins, Hearts, or Fireworks, then press confirm. / to Background Music: Enable or disable background music while viewing photos. On: Turn on mp3 music. The Photo Frame will automatically find and play music files on the same memory device that is being used to display photos. Playback settings (repeat etc.) applied in MUSIC mode will be used.
Slideshow Mode This mode starts slideshow playback of all photos in the selected source. Slideshow mode will play based on the settings in the Options menu. O p t i o n s Options: Background Music: Enable or disable background music while viewing photos. On: Turn on mp3 music. The Photo Frame will automatically find and play music files on the same memory device that is being used to display photos. Playback settings (repeat etc.) applied in MUSIC mode will be used.
Slideshow Interval: Adjust the amount of time each picture stays on the screen. In the Slideshow Interval submenu, press / or / to highlight either: 5 sec, 10 sec, 30 sec, 1 min, 10 min or 30 min. Press to confirm. Slideshow Transition Effects: Change the way the screen transitions between each photo. In the Transition Effects submenu, use the / or / buttons to select the desired effect and press to confirm.
Music Player︱ The Music Player shows song information, the date, and the current time on the bottom of the screen while displaying a photo or slideshow of your choice.
The Music Player functions are familiar and easy - just like any other player: 1. Press to play music and again to pause. 2. Press to stop the music. 3. Adjust the music volume by using the Volume Control or by pressing or on the remote. 4. Press to go back to the previous track and 5. Press on the remote to quickly switch between Music Repeat Modes. 6. Press ( to play the next song available. ) to open the Playlist and select folders or songs to play.
Options: This menu shows list of options available in the Music mode. Some of these options are available on the remote or by using the menu buttons on the front of the Photo Frame. 1. Press and use the 2. Press to access the highlighted function or open its sub-menu. / or / buttons to highlight the desired menu option. Playlist ( ): Choose “Playlist” from the Options menu or press ( ) to open the Playlist. The Playlist lets you browse for individual songs in specific folders.
Add to / Remove from My Favorites ( ): Copy the current highlighted music file from your storage media (Memory card or USB flash drive) to Photo Frame’s internal memory. To delete songs from the internal memory, change the media source to “My Favorites” and select Remove from My Favorites from the Options menu. Set as Music Alarm: Set the selected song as your alarm clock sound. To select the Music Alarm or other alarm sounds, go to “Settings > Alarm > Alarm Sound.
Calendar︱ With Calendar feature, your Photo Frame becomes an attractive desktop calendar and clock that lets you set important date reminders and display your favorite photos, too. The Calendar feature displays a monthly calendar and digital clock at the bottom of the screen while displaying a photo or slideshow of your choice. The Calendar can be opened or closed any time by pressing the and selecting the Calendar icon.
Options: 27
Important Dates: You can earmark your important dates on the calendar screen. Follow the steps below to highlight important dates on the calendar: 1. Select “Important Dates” from the Options menu. 2. Four mark types are available and are represented by different colors: None, Birthday, Party, and Date. Choose one and press . 3. Press value. 4. Press / to switch between year, month and day, and press / to adjust the to confirm and mark that day.
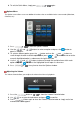
off at certain times of the day. The Settings menu can be opened or closed any time by pressing the button on the remote or by pressing and selecting the Settings icon. O p t i o n s O p t i o n 1. Select sthe “Settings” icon from the Quick Menu window or press on the remote. 2. Use the and buttons to scroll through the available Settings categories. 3. Press to access the options within each category, or press 4. Use the / 5. Press to access the highlighted function or open its sub-menu.
Fullscreen: Press or to enable or disable. If disabled, Photo Frame will preserve the original dimensions of the image on the screen. If enabled, Photo Frame will enlarge the photo to fit the screen, while preserving its original aspect ratio. Depending on its dimensions, some parts of the photo may not be displayed in fullscreen mode.
Fullscreen Mode Photo Frame Orientation Disabled Enabled Disabled Enabled Landscape (A) Portrait (B) Alarm The alarm function lets you use your Photo Frame like an alarm clock – you can even wake up to your favorite MP3 song in the morning. 1. Select Alarm from the Settings menu, and use the / or / buttons to highlight alarm on/off, alarm time, alarm sound, alarm volume, alarm mode or sleep timer. 2. Press to modify the selected item. Alarm On/Off: Enable (on) or disable (off) the alarm.
Disable. You can also enable the sleep timer by pressing on the remote. When the specified time is about to expire, a “Press [SLEEP] button on remote to disable” message will appear. NOTE: To set Photo Frame to turn on or off automatically on a daily basis, please use the “Auto-ON/OFF” feature in: Settings > Date / Time > Auto ON/OFF 3. After making adjustments, press to save.
Auto Off at: Set a daily auto power-off time. Press or or to select hour or minute and to adjust the value. Auto On/Off timer: Press 3. After making adjustments, press or to enable or disable the auto power on/off function. to save. Startup Mode This option lets you set the default mode (Slideshow, Photo View or Video) that you want the Photo Frame to start using each time it is powered on. 1. Select Startup mode from the Settings menu 2. Use the / 3. Press to confirm the new startup mode.
Restore Defaults This function is available if you want to reset your Photo Frame’s settings. Note: All settings that have been changed will return to the factory defaults. 1. Select Restore defaults from the Settings menu. 2. Use the 3. Press or buttons to highlight “Yes.” to confirm. 4. After the process is finished, the Settings menu will be displayed again.
Note: NEVER remove the power cord or any storage devices while the firmware is being upgraded. If firmware upgrade fails and the Photo Frame will not turn on, please Photo Frame contact Transcend customer support.
your Photo Frame in for repair. If you are unable to remedy a problem from the following hints, please consult your dealer, service center, or local Transcend branch office. We also have FAQ and Support services on our websites. For any Hardware issues please consult the Photo Frame User’s Manual. I cannot turn my Transcend Photo Frame on Your remote control’s battery may be low. Try pressing the power button located on the back of the Photo Frame.
Panel: 8” 4:3 TFT LCD, 800x600 pixels Speaker: Single 0.5W speaker USB Interface: 1 x standard A-type, 1 x mini B-type Internal Storage: 2GB NAND Flash Data Retention: Up to 10 years Navigation: 8 rear-mounted buttons and remote control Remote Control: Infrared, NEC protocol Dimensions: 212mm x 172mm x 39mm Power Supply: Input: 100V~ 240V 0.3A, Output: 5V DC 2.0A Operating Temperature 0ºC (32ºF) ~ 40ºC (104ºF) Image Formats: DSC JPEG (up to 9000 x 6750), Motion JPEG.
Recycling the Product (WEEE): Your product is designed and manufactured with high quality materials and components, which can be recycled and reused. When you see the crossed-out wheel bin symbol attached to a product, it means the product is covered by the European Directive 2002/96/EC: Never dispose of your product with other household waste. Please inform yourself about the local rules on the separate collection of electrical and electronic products.
Transcend Limited Warranty︱ “Above and Beyond” is the standard we set ourselves for customer service at Transcend. We consistently position ourselves to be significantly above the industry norm, which is all part of our commitment to Customer Satisfaction. All Transcend information, Inc. (Transcend) products are warranted and tested to be free from defects in material and workmanship and to conform to the published specifications.