™ StoreJet 25P User’s Manual
Table of Contents Introduction︱ ......................................................................................1 Package Contents︱............................................................................1 Features︱ ............................................................................................3 System Requirements︱ .....................................................................3 Safety Precautions︱...........................................................................
Introduction︱ Congratulations on purchasing Transcend’s StoreJet™ 25P. This lightweight, ultra-portable, high-speed USB storage device is the perfect data management system for uploading, downloading, storing and transferring your vital data and information. With its huge storage capacity and fast 480Mbps USB 2.0 data transfer rates, the compact StoreJet 25 is ideal for carrying your files, folders, documents, photos, music and videos to and from desktop or notebook computers.
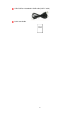
1 Mini USB to 2 Standard-A USB cable (USB Y cable) Quick Start Guide 2
Features︱ Racing-inspired lightweight slim design with checkered aluminum front panel Protective soft travel pouch Slide-open case for easy hard drive installation and removal High-speed USB 2.0 compliant and backwards compatible with USB 1.1 Easy Plug and Play operation – no drivers required Completely USB powered.
Safety Precautions︱ These usage and safety guidelines are IMPORTANT! Please follow them carefully. Please ensure that you connect the USB cable to the StoreJet 25 and your computer correctly (small end Æ StoreJet 25, large end Æ PC) General Use • Carefully unpack the contents of the StoreJet 25 package. • During operation, avoid exposing your StoreJet 25 to extreme temperatures above 55℃, or below 5℃. • Do not drop your StoreJet 25.
The spare USB connector can provide additional power for the StoreJet 25 when needed • Please use the Mini USB to USB A-Type cable that came with the StoreJet 25 to connect it to a computer, and always ensure that the cable you are using is in good condition. NEVER use a cable that is frayed or damaged. • Ensure nothing is resting on the USB cable and that the cable is not located where it can be tripped over or stepped on.
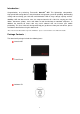
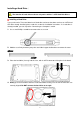
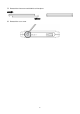
Product Overview︱ Figure 1: StoreJet 25P Case Screw Mini USB Port 6
Installing a Hard Drive︱ The StoreJet 25 hard drive enclosure only works with 2.5” SATA Hard Disk Drives. Installing a Hard Drive If you purchased a Transcend StoreJet 25 hard drive enclosure that does not have an SATA hard disk drive already installed, please read this section for installation instructions. If a hard drive is already installed, you can skip to the “Connecting to a Computer” section. 1. Use a small Phillips screwdriver to remove the case screw 2.
5. Reattach the front cover and slide it back into place 6. Reattach the case screw.
Connecting to a Computer︱ If you want to use the StoreJet 25 as an external hard drive to upload/download data to and from your computer, you will need to connect it to a USB port on the computer using the provided USB Y-cable. Figure 2: Mini USB to Standard-A USB cable (USB Y-cable) 1. Plug the small end of the USB Y-cable into the Mini USB port on the StoreJet 25. 2. Plug the large end of the cable into an available USB port on your desktop, or notebook computer.
3. When the StoreJet 25 is successfully connected to a computer, the StoreJet’s Power LED will light up, a new Local Disk drive with a newly-assigned drive letter will appear in the My Computer window, and a Removable Hardware icon will appear on the Windows System Tray. The StoreJet 25’s internal hard drive comes pre-formatted for FAT32. Figure 4: *F: is an example drive letter, the letter in your "My Computer" window may differ 4.
Disconnecting from a Computer︱ NEVER disconnect the StoreJet from a Computer when its LED is flashing. Windows® 2000, XP and Windows Vista™ 1. Select the Hardware icon on the system tray. 2. The Safely Remove Hardware pop-up window will appear. Select it to continue. Figure 5: Safely Remove Hardware 3. A window will appear stating, “The ‘USB Mass Storage Device’ device can now be safely removed from the system.
Figure 7: Drag StoreJet 25 drive icon into the Trashcan ® Linux Kernel 2.4 or Later Execute umount /mnt/Storejet to un-mount the device. Then unplug your StoreJet 25 from the USB port.
Formatting the Hard Drive︱ WARNING! Formatting the disk will erase all of the data on your StoreJet 25. You must have Administrator Rights to format in Windows 2000, XP, or Vista. Windows® 2000/XP 1. Plug the StoreJet 25 into an available USB port on a Windows® 2000/XP computer. 2. Unplug all other USB storage devices from your computer. This is to prevent accidental format of a different USB drive. 3. Insert the included Software CD into your computer’s CD-ROM drive. 4. Open “StoreJetFormatter.
Figure 9: Press “Start” 7. The format process may take a few minutes. When complete, an “O.K.” message will appear in the bottom right hand corner of the window. Figure 10: Format Complete 8. Click the “Close” button to finish and exit. Windows Vista™ 1. Plug the StoreJet 25 into an available USB port on your Windows Vista™ computer. 2. Unplug all other USB storage devices from your computer. This is to prevent accidental format of a different USB drive. 3.
Figure 11: Run as administrator 6. The User Account Control window will appear. Select “Allow” to continue. Figure 12: Allow Transcend’s StoreJet Format Utility to run in Vista 7. The program will automatically detect the StoreJet 25 drive.
Figure 13: The Utility will automatically detect the StoreJet 25 drive 8. Press “Start”. Figure 14: Press “Start” 9. The format process may take a few minutes. When complete, an “O.K.” message will appear in the bottom right-hand corner of the window.
Figure 15: Format Complete 10. Click the “Close” button to finish and exit. Mac® OS 1. Plug the StoreJet 25 into an available USB port on your MAC computer. 2. Unplug all other external storage devices from your computer. This is to prevent accidental format of a different drive. 3. Click the “Initialize” button. Figure 16: “Unreadable drive” pop-up window 4. In the Disk Utility window, select the new drive from the list on the left. 5. Select the “Erase” tab. 6.
Figure 17: Select a Volume Format (file system) 7. Input a name for your new drive (otherwise, your drive will be named “Untitled”) 8. Click the “Erase” button in the bottom right corner of the window Figure 18: Name your drive (optional) 9. Click “Erase” again to confirm.
Figure 19: “Erase Disk” confirmation window 10. Click the “Close” button to finish and exit. Linux® 1. Plug the StoreJet 25 Ultra into an available USB port on your Linux computer. 2. Unplug all other USB storage devices from your computer. This is to prevent accidental format of a different USB drive. 3. Type fdisk /dev/sda (replace /dev/sda with your actual USB device) 4. Press p 5. Press n 6. Press w 7. Type mkfs.ext3 /dev/sda1 8.
Troubleshooting︱ If a problem occurs with your StoreJet 25, please first check the information listed below before taking your StoreJet 25 in for repair. If you are unable to solve a problem from the following hints, please consult your dealer, service center, or local Transcend branch office. We also have FAQ and Support services on our website. The Software CD does not auto-run in Windows® Go to the Device Manager in the Control Panel and enable the Auto-Insert function of the CD-ROM drive.
The StoreJet 25 does not Power-ON Check the following: 1. Ensure that the StoreJet 25 is properly connected to the USB port(s) on your computer. 2. Ensure that the USB port is working properly. If not, try using an alternate USB port. I cannot detect the StoreJet 25 on my Mac® ® If you installed a drive into the StoreJet 25P that was previously used in a Windows 2000, XP, or ® Vista™ computer, it is most likely formatted with NTFS, which is not compatible with Mac OS.
StoreJet™ 25P Specifications︱ Size (L x W x H) 127.4mm × 81.25mm × 14.5mm Weight (with hard drive) 158g Storage Media 2.5-inch SATA Hard Disk Drive Power Supply 5V DC supplied from the USB port(s) Max.
Transcend Limited Warranty︱ “Above and Beyond” is the standard we set ourselves for customer service at Transcend. We consistently position ourselves to be significantly above the industry norm, which is all part of our commitment to Customer Satisfaction. Please do not break or remove the warranty sticker on your Transcend products, as this will void your product warranty. All Transcend information, Inc.
*The Transcend logo is a registered trademark of Transcend Information, Inc. *All logos and marks are trademarks of their respective companies.