User’s Manual Digital Photo Frame PF705 TS-PF705B TS-PF705W (Version 1.
Table of Contents Introduction︱ ︱ .........................................................................................................................2 Package Contents︱ ︱ ...............................................................................................................2 Features︱ ︱ ...............................................................................................................................2 ︱ ...............................................................................
Introduction︱ ︱ Congratulations on purchasing Transcend’s PF705 Digital Photo Frame. Now you can easily display your entire photo collection at home or at the office. The Photo Frame can conveniently display digital photos stored on any USB flash drive or memory card. With its colorful animated user interface, the Photo Frame is easy to operate and fun to use. You can also connect the Photo Frame to a PC via the USB port for direct access to any memory cards that are plugged into it.
Safety Precautions︱ ︱ These usage and safety guidelines are IMPORTANT! Please follow them carefully to ensure your own personal safety and help protect your Photo Frame from potential damage. General Use • For indoor use only. • Avoid using or storing the Photo Frame in an extreme temperature environment. • Never allow the Photo Frame to come in contact with water or any other liquids. • Do not use this product in environments with strong magnetic fields or excessive vibration.
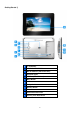
Getting Started︱ ︱ A B C D E F G H I J K L 7” LCD Panel SD/SDHC/ MMC/ MS Slot Mini-B USB Port (PC Connection) DC Power Input USB Port (Flash Drives) Menu Button OK Button Navigation buttons Options Button Power Button Stand Attachment Hole Security Lock Attachment 4
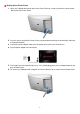
Setting Up the Photo Frame 1. Attach the Tabletop Stand to the back of the Photo Frame by screwing it clockwise into the Stand Attachment Hole shown above. 2. Once the stand is attached, the Photo Frame may be positioned vertically or horizontally (Landscape or Portrait orientation) 3. Connect the power adapter cable to the DC power input jack on your Photo Frame. 4. Plug the power adapter into a wall outlet. 5. The Photo Frame will automatically turn on.
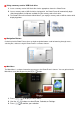
Using a memory card or USB flash drive 1. Insert a memory card or USB flash drive into its appropriate slot on the Photo Frame. 2. Once a memory card or USB flash drive is plugged in, the Photo Frame will automatically begin slideshow playback of all photos available on your memory card or flash drive. 3. The Photo Frame will revert to the Main Menu if you unplug a memory card or USB flash drive while displaying photos.
Options Menu The Options menu allows access to additional functions that are available for the current mode. 1. Press to show the Options window. 2. Use the / and open its submenu. / buttons to select an option and press the button to 3. To select a different option, press the button and use the and buttons to scroll through the other available options, then press or to move the cursor to the currently highlighted option’s submenu on the right hand side. 4. Use the / and option and press 5.
Connecting to a Computer︱ ︱ To transfer pictures between a memory card connected to the Photo Frame and your computer, connect the Photo Frame to a USB port on your computer using the provided USB cable. 1. Turn on the Photo Frame. 2. Plug the small end of the USB cable into the Mini-B USB port located on the left side of the Photo Frame. 3. Plug the large end of the cable into an available USB port on your desktop or notebook computer.
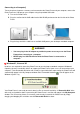
*Note: E: and F: are example drive letters - the letters in your “My Computer” window may differ Proper removal of your Photo Frame (from Windows): 1. Click once on the Removable Hardware icon in the system tray. 2. The Safely Remove Hardware pop-up window will appear. Select it to continue. 3. A window will appear stating, “The ‘USB Mass Storage Device’ device can now be safely removed from the system.” Unplug your Photo Frame from the USB port after this message appears. Mac® OS 10.
1. WARNING! To prevent data loss, always follow the proper removal procedures when disconnecting the Photo Frame from your computer 2. When Photo Frame is connected to a computer, it can only be used for transferring files. You will not be able to use any of the Photo Frame’s features at this time. Please disconnect your Photo Frame from the computer to resume normal viewing or listening. 3.
Photo Modes︱ ︱ The Photo Frame has three basic modes – Thumbnail, Photo View and Slideshow. The Thumbnail mode lets you browse for specific photos, the Photo View mode is for displaying a single picture at a time, and the Slideshow mode will automatically display all available photos. Press to switch between each mode. Thumbnail Mode The Thumbnail Mode allows you to browse thumbnails of all photos in the current source (memory card, USB flash drive, etc.). 8 thumbnails per page will be displayed.
Options: Sort By : Select sort by date or filename • Date: Sort by create date of the file • Name: Sort by file name Photo Repeat Mode: Adjusts the order photos are displayed when pressing • Normal: Display all available photos sequentially. • Random: Display all available photos randomly. • Normal in Folder: Display all photos in the current folder sequentially. • Random in Folder: Display all photos in the current folder randomly. and .
Options for Selecting Multiple Photos: • Select All: Select all items in current media source. • Deselect All: Deselect all items in current media source. • Select All On Page: Select all items on current page. • Deselect All On Page: Deselect all items on current page. • Select Inverse: Select all un-selected items, and deselect all selected items. • Slideshow of Selected Photos: Start a slideshow with currently selected photos.
Photo View Mode You can view, zoom-in, or rotate a single photo in Photo View mode. Use the and buttons to view the next or previous photo available. Options: Zoom: Select this item to enlarge the displayed image to twice its normal size (2x). To increase zoom to 4x, 8x, or to return to 1x normal viewing size, press the button. Rotate: Select this item and choose between clockwise 90o, 180o and 270o in the Rotate submenu.
Calendar: Display or hide the on-screen calendar Select Source: Change the media source to browse photos from. Use the to select one of the available storage devices and press .
Slideshow Mode This mode starts slideshow playback of all photos in the selected source. Slideshow mode will play based on the settings in the Options menu. Options: Photo Repeat Mode: Adjusts the order photos are displayed when pressing • Normal: Display all available photos sequentially. • Random: Display all available photos randomly. • Normal in Folder: Display all photos in the current folder sequentially. • Random in Folder: Display all photos in the current folder randomly. and .
Themes: This option lets you select various themes to complement your pictures while viewing in Slideshow or Photo View. Use the / or / buttons to highlight None, Xmas, Halloween, Clock, Valentine’s Day, New Year, Taiwan, Japan or Europe, then press to confirm. Calendar: Display or hide the on-screen calendar Select Source: Change the media source to play slideshows from. Use the to select one of the available storage devices and press .
Calendar︱ ︱ With Calendar mode, your Photo Frame becomes an attractive desktop calendar and clock that lets you set important date reminders and display your favorite photos, too. The Calendar mode displays a monthly calendar and digital clock at the bottom of the screen while displaying a photo or slideshow of your choice. The Calendar can be opened by selecting the Calendar option from the Main Menu. Options: Important Dates: You can earmark your important dates on the calendar screen.
First Day of the Week: Set the calendar to display either “Sunday” or “Monday” as the first day of the week.
Settings︱ ︱ The Settings menu includes advanced features that let you adjust the photo frame’s display, set the time & date, change languages, and even configure the photo frame to automatically turn on and off at certain times of the day. The Settings menu can be opened by selecting the Settings function from the Main Menu. 1. Select the “Settings” function from the Main Menu 2. Use the 3. Press 4. Use the 5. Press and buttons to scroll through the available Settings categories.
• Brightness: press • Contrast: Press • Fullscreen: Press / to fine-tune the brightness of the screen. / to make adjustments to the screen’s contrast. or to enable or disable. If disabled, Photo Frame will preserve the original dimensions of the image on the screen. If enabled, Photo Frame will enlarge the photo to fit the screen, while preserving its original aspect ratio. Depending on its dimensions, some parts of the photo may not be displayed in fullscreen mode.
NOTE: The Photo Frame always preserves the original aspect ratio of all images based on each picture file’s orientation information (EXIF), and NEVER stretches them to fill the entire screen. An easy, distortion-free way to remove the black bars from the top/bottom or sides of an image is to use the Fullscreen option mentioned above, or the Zoom function.
Date / Time This option lets you adjust the current date & time and set your Photo Frame to automatically turn on and off every day at a specific time. The Auto-ON/OFF timer is a convenient way to save power at night. 1. Select Date/Time from the Settings menu, and use the / / / buttons to select between current date, current time, 12H/24H, auto-on, auto-off or auto-on/off timer. 2. Press • to modify the selected item.
the “Auto-ON/OFF” feature in: Settings > Date / Time > Auto ON/OFF. 3. After making adjustments, press to save. Startup Mode This option lets you set the default mode (Slideshow, Photo View or Main Menu) that you want the Photo Frame to start using each time it is powered on. 1. 2. 3. Select Startup mode from the Settings menu / Use the Press buttons to select between Slideshow, Photo View or Main menu. to confirm the new startup mode.
Restore Defaults This function is available if you want to reset your Photo Frame’s settings. Note: All settings that have been changed will return to the factory defaults. 1. 2. 3. 4. Select Restore defaults from the Settings menu. Use the or buttons to highlight “Yes.” Press to confirm. After the process is finished, the Settings menu will be displayed again.
Troubleshooting︱ ︱ If a problem occurs with your Photo Frame please first check the information listed below before sending your Photo Frame in for repair. If you are unable to remedy a problem from the following hints, please consult your dealer, service center, or local Transcend branch office. We also have FAQ and Support services on our websites. For any Hardware issues please consult the Photo Frame User’s Manual.
Why does the time and date reset after unplugging the AC adapter? If you unplug the Photo Frame for a long time, its internal backup battery will eventually drain. Typically, the Photo Frame can keep your time and date for about 2~3 days after unplugging the AC power adapter.
Specifications︱ ︱ Panel: 7” 16:9 TFT LCD, 480x234 pixels USB Interface: 1x standard A-Type, 1x mini B-Type Navigation: 8 rear-mounted buttons Dimensions: 205mm × 143mm × 29mm Power Supply: Input: 100V~ 240V 0.3A, Output: 5V DC 2.
Recycling & Environmental Considerations︱ ︱ Recycling the Product (WEEE): Your product is designed and manufactured with high quality materials and components, which can be recycled and reused. When you see the crossed-out wheel bin symbol attached to a product, it means the product is covered by the European Directive 2002/96/EC: “Never dispose of your product with other household waste. Please inform yourself about the local rules on the separate collection of electrical and electronic products.
Transcend Limited Warranty︱ ︱ “Above and Beyond” is the standard we set ourselves for customer service at Transcend. We consistently position ourselves to be significantly above the industry norm, which is all part of our commitment to Customer Satisfaction. All Transcend information, Inc. (Transcend) products are warranted and tested to be free from defects in material and workmanship and to conform to the published specifications.