USB 128MB–512MB JetFlash™ User’s Manual
Table of Contents Introduction Package Contents .................................................................................... Features .................................................................................................... System Requirements ............................................................................. Before Use ................................................................................................
MP3 Function To Download or Upload MP3/WMA files .............................................. 10 To Play MP3 Music................................................................................. 11 AB Repeat Function .................................................................. 11 Voice Recording Function To Record Voice..................................................................................... 11 To Play the Recorded Files ...............................................................
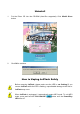
Introduction Thank you very much for purchasing Transcend’s JetFlash™. This small device is more than a USB Flash Drive. It combines a USB Flash Drive with MP3, AB repeat, and voice recording functions. With a USB connector, it can expedite exchanging huge amounts of data between any desktop or laptop computers with a USB port. With the MP3 function, you can upload or download music files to or from a PC and use JetFlash as an MP3 player.
recorder; • Power Saving Function: Auto-powers off after two minutes without use. • LEDs indicate the usage status of JetFlash. System Requirements Desktop or notebook computer with USB port One of following operating systems: • Windows 98SE • Windows Me • Windows 2000 • Windows XP • Mac OS 9.0 or later • Linux kernel 2.4 or later Before Use 1. Keep JetFlash away from heat, direct sunlight, and moisture. Do not bend, flex, or drop JetFlash. 2. Make sure the HOLD 3.
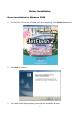
Driver Installation Driver Installation for Windows 98SE 1. Put the Driver CD into the CD-ROM (Auto-Run supported). Click Win98 Driver button. 2. Click Next to continue. 3. The Install Shield Wizard guides you through the installation process.
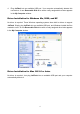
4. Plug JetFlash into an available USB port. Your computer automatically detects this new device. A new Removable Disk drive with a newly assigned drive letter appears in the My Computer window. Driver Installation for Windows Me, 2000, and XP No driver is required. These Windows operating systems have built-in drivers to support JetFlash. Simply plug JetFlash into an available USB port, and Windows installs the files needed to use it.
Driver Installation for Linux Kernel 2.4 or Later No driver is required. Just plug JetFlash into the USB port and mount it. Example: 1. 2. Create directory of /mnt/JetFlash first: mkdir /mnt/JetFlash mount JetFlash: mount –a –t msdos /dev/sda1 /mnt/JetFlash Data Storage After installing the driver, simply plug JetFlash into an available USB port and you can use it like a hard drive or other data storage device.
Uninstall 1. Put the Driver CD into the CD-ROM (Auto-Run supported). Click Win98 Driver button. 2. Click OK to continue. How to Unplug JetFlash Safely Before removing JetFlash, please make sure the LED is not flashing! If you remove JetFlash while the LED is flashing, unpredictable damage to the files or JetFlash may occur. When JetFlash is unplugged, it automatically enters MP3 mode. To exit MP3 mode, press and hold the PLAY/PAUSE button until the Power/Play LED turns off.
To Remove JetFlash in Windows 98SE Unplug JetFlash from your system directly when data are not transferring. To Remove JetFlash in Windows Me, 2000, and XP 1. Click the icon on the system tray. 2. The Safely remove USB Mass Storage Device pop-up menu will appear. Click to continue. 3. A message box appears: The ‘USB Mass Storage Device’ device can now be safely removed from the system. To Remove JetFlash in Mac OS Drag and drop the Disk icon corresponding to JetFlash into the trashcan.
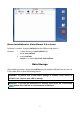
Product Overview REC Button PLAY/PAUSE Button Record LED Power/Play LED Repeat LED USB Connector Cover HOLD Switch Microphone Earphone Jack Track Control Wheel Volume Control Wheel Basic Operation Enter MP3 Mode 1. Disconnect JetFlash from your computer. 2. Press and hold the PLAY/PAUSE button for a few seconds to power on (enter MP3 mode). The Power/Play LED turns green. To exit from MP3 mode, press and hold the PLAY/PAUSE seconds till the LED turns off. button for a few Enter Record Mode 1.
Play a Track Press the PLAY/PAUSE button after entering MP3 or Record mode. The Power/Play LED blinks green and there is track playback. If there is no track in your JetFlash, the Power/Play LED turns green. Pause a Track Press the PLAY/PAUSE button when there is track playback. The Power/Play LED turns green and the track is paused. To resume track playback, press the PLAY/PAUSE button again. Advance to Next Track Roll the Track Control Wheel toward NEXT . The track advances to the next one.
Repeat All Tracks Press the Track Control Wheel when the Repeat LED is on, or press the Track Control Wheel twice when the Repeat LED is off. The Repeat LED blinks orange. To resume normal playback, press the Track Control Wheel again. Repeat a Portion of One Track (AB Repeat) 1. Press the Volume Control Wheel to mark the beginning of the portion you wish to repeat. The Repeat LED blinks orange. 2. Press the Volume Control Wheel again to mark the end of the portion you wish to repeat.
To Play MP3 Music 1. Make sure you have downloaded MP3 or WMA files to the root directory of your 2. JetFlash. Disconnect JetFlash from your computer. 3. 4. 5. . Connect the earphone with the earphone jack Set HOLD switch to “OFF” position. Press and hold the PLAY/PAUSE button for a few seconds to power on (enter MP3 mode). The Power/Play LED turns green. 6. Press the PLAY/PAUSE button again. The Power/Play LED blinks green and the MP3/WMA files are played back, in alphabetical order. 7. 8.
4. Press and hold the REC 5. 6. 7. Record LED turns red. Press the REC button. The Record LED blinks red and voice recording starts. Press the REC button to stop voice recording when you wish to stop. Press the REC button to start voice recording when you wish to start again. button for a few seconds to enter Record mode. The The recorded files (VXXX.WAV format) are saved on the folder “Voice”, in an ascending order. With sufficient power: 128MB memory can store up to 9 hours of recorded voice.
LED Indication Record LED Power/Play LED Repeat LED (Red) (Green) (Orange) off off off Power off off fast blink off Data transfer off on off Power on (in MP3 mode) off normal blink off Play MP3 music off normal blink on Repeat a track off normal blink normal blink off normal blink fast blink off normal blink slow blink on on off In Record mode normal blink off off Record voice on normal blink off Play the recorded file(s) on normal blink on Repeat a recorded
button until the Recovery procedures are Do not release the PLAY/PAUSE completed. 4. Found New Hardware and New Hardware Found messages appear. (Only the first time you recover the JetFlash.) 5. Click the Recovery button on the JetFlash splash screen. 6. MSCN Format status bar message appears.
button to screen again. If this still doesn’t work, press and hold PLAY/PAUSE re-plug JetFlash first. Then, click the Recovery button on the JetFlash splash screen again. 7. New Hardware Found messages appear. (Only the first time you run the Recovery program.) 8. Click the Recovery button on the JetFlash windows splash screen again. 9. MSCN Format dialog box appears.
remains unchecked. Click Start to initiate the low-level format. 10. Complete message appears. Click Close to complete the Recovery procedures. 11. Release the PLAY/PAUSE status for your usage. button.
To Recover JetFlash in Windows Me, 2000, and XP Skip steps 1-3 if the Utility program has already been installed. 1. Put the Driver CD into the CD-ROM (Auto-Run supported) and click the Utility button on the JetFlash splash screen. 2. SigmaTel MSCN Audio Player Setup window appears. Click Next to continue. 3. The InstallShield Wizard guides you through the Utility installation. 4. Remove the battery from JetFlash.
5. Press and hold the PLAY/PAUSE USB port. button, then plug JetFlash into an available Do not release the PLAY/PAUSE completed. button until the Recovery procedures are 6. Found New Hardware messages appear. (Only the first time you recover the JetFlash.) If using Windows Me or 2000, go directly to step 9. 7. Wait a while until Found New Hardware Wizard windows appears. Click Next to continue. (Only appears the first time you recover the JetFlash.
8. Found New Hardware Wizard window appears. Click Finish to continue. (Only appears the first time you recover the JetFlash.) 9. Click the Recovery button on the JetFlash splash screen. 10. MSCN Format status bar message appears. If above message does not appear, click the Recovery button on the JetFlash splash screen again. If this still doesn’t work, press and hold PLAY/PAUSE button to re-plug JetFlash first. Then, click the Recovery button on the JetFlash splash screen again. 11.
If using Windows Me or 2000, go directly to step 15. 12. Found New Hardware Wizard window appears. Click Next to continue. (Only appears the first time you run the Recovery program.) 13. Found New Hardware Wizard window appears. Click Next to continue. (Only appears the first time you run the Recovery program.
14. Completing the Found New Hardware Wizard message appears. Click Finish to continue. (Only appears the first time you run the Recovery program.) 15. MSCN Format dialog box appears. Click Start in the Media Recovery tab to initiate the low-level format.
16. Complete message box appears. Click Close to complete the Recovery procedures. 17. Release the PLAY/PAUSE status for your usage. button.
Troubleshooting Q1: Why doesn’t the driver CD Auto-Run after it is inserted into the CD-ROM drive in Windows? A1: This problem usually occurs because the Auto-Insert function of the CD-ROM drive is disabled. Please enter Device Manager in Control Panel and enable the Auto-Insert function of the CD-ROM drive. Alternatively, you can execute the JetFlash.EXE in the driver CD manually.
Q7: Why do the three LEDs just blink a moment and extinguish when press the PLAY/PAUSE button to turn on JetFlash? A7: Please press and hold the PLAY/PAUSE button a second or two longer, until the three LEDs blink once and the Power/Play LED turns green. If the problem persists, please check to see whether the battery power is used up. If it is, replace the battery with a new one. Q8: Why can’t I turn on JetFlash and start playing MP3 music or recording voice? A8: Please check following: 1.
Q13: Why does JetFlash turn off automatically after entering MP3 mode or Record mode? A13: JetFlash features a power-save function. If your JetFlash is idle for two minutes, power-save is triggered and the power turns off automatically. Q14: Why is JetFlash automatically removed from the operating system when I use it as a USB Flash Drive? A14: This problem occurs when you press the PLAY/PAUSE button while JetFlash is connected with a USB port. Please unplug JetFlash from the USB port then re-plug it.
Specifications • Size: 97 mm × 31 mm × 18 mm • Weight: • Data retention: • Shock resistance: • Erase cycles: • Signal-to-Noise Ratio: • Output frequency: • Estimated battery life: • MP3 format: MP3 and WMA • Record format: ADPCM (WAV) • Compress rate: 32Kbps–320Kbps • Speed: Read 7.2 Mbit/sec, Write 5.
JetFlash Limited Warranty “Above and beyond” is the standard we set ourselves for customer service at Transcend. We consistently position ourselves to be significantly above the industry norm. It’s all part of our commitment to Customer Satisfaction. All Transcend Information, Inc. (Transcend) products are warranted and tested to be free from defects in material and workmanship and to conform to the published specifications.