
User's Manual

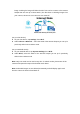
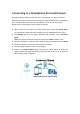
Table Of Contents
- User Manual
- Wi-Fi SD
- Introduction
- Package Contents
- Features
- System Requirements
- Installing the Wi-Fi SD App
- Connecting to the Wi-Fi SD Card using iOS and Android Devices
- Connecting to a Smartphone Personal Hotspot
- Using the Wi-Fi SD App on iOS Devices
- Using the Wi-Fi SD App on Android Devices
- Settings
- Connecting to the Wi-Fi SD Card using Other Devices
- Restore Defaults (Return to Original Settings)
- Upgrading Firmware
- Troubleshooting
- Specifications
- Get more help
- Transcend Limited Warranty
(On your Android device)
4. On your Android device, tap System Settings, then Wi-Fi.
5. Under Wi-Fi, select Wi-Fi SD. (After deleting the Direct Share image, please wait
around 25 seconds for the network to appear. Default Wi-Fi security key:
‘12345678’. To change the default SSID and setup Wi-Fi security key, please see
the Settings section for detailed instructions.)
Internet Mode
(Connect with iOS/Android device(s) and Internet hotspot)
Internet mode allows you to browse photos and videos stored on the Wi-Fi SD card
on your iPhone or iPad while connected to an Internet hotspot. In this mode, your
device has Internet access, allowing you to share photos through the Internet.
First time setup:
Before you can use the Wi-Fi SD card in Internet mode, you must be within range of
an Internet hotspot to enter the network details.
1. While connected to the Wi-Fi SD card in Direct Share mode (see previous section
for instructions), launch the Wi-Fi SD App from your iOS/Android home screen.
2. Tap Settings and enter the admin username and password, then tap Internet
Mode.
Note: The default username and password are both admin (all lower case)
3. Enter the SSID and password of the Internet hotspot and tap Done.
4. Power the camera off and on to save changes to settings.
Note: Although the Wi-Fi SD App can only save the details of one Internet hotspot, it
can be changed in the Settings menu at any time.
General use:
(On your camera)
1. Insert the Wi-Fi SD card into your camera. (For directions on inserting an SD card
into your camera, please see your camera’s user manual.)
2. Power-on the camera and press the display button to view camera images. (For
directions on viewing images on your camera, please see your camera’s user
manual.)
3. Scroll to the Internet Mode image and press the delete button to delete the