User’s Manual Dashcam DrivePro™ 10 2020/03 Version 1.
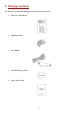
Table of Contents 1. System Requirements.......................................................................................................................2 2. Package Contents............................................................................................................................. 3 3. Getting Started................................................................................................................................... 4 3-1 Overview...................................
1. System Requirements System requirements for connecting the DrivePro to a desktop or a laptop with a working USB port: Windows® 7 Windows® 8 Windows® 10 Mac® OS X 10.8.2 or later Linux® Kernel 2.6.38 or later System requirements for using the DrivePro Toolbox: Windows® 7 Windows® 8 Windows® 8.1 Windows® 10 Mac® OS 10.11 or later System requirements for using the DrivePro app: Android 6.0 or later iOS 11.
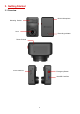
2.
3.
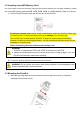
3-2 Inserting a microSD Memory Card You must insert a microSD memory card into the DrivePro before you can start recording. Please use a microSD memory card with 8GB, 16GB, 32GB, 64GB, or 128GB capacity (Class 10 or above). 1. Insert a microSD memory card into the card slot of the DrivePro. Format your memory card. Always format a new memory card in the DrivePro before using it for the first time. To format a memory card, go to Settings in the DrivePro app.
2. Thoroughly clean and dry the area of the windshield you wish to mount the DrivePro. 3. Peel off the protective film from the adhesive mount, and firmly attach the DrivePro to the windshield or the rear-view mirror. 4. Turn the adjustment knob anticlockwise to loosen, and then adjust the DrivePro’s position. 5. After the DrivePro is in the best position, turn the adjustment knob clockwise to make sure that the DrivePro is securely locked in place.
3-4 Connecting to Power Note: Insert a microSD memory card before connecting the DrivePro to your car’s lighter socket. 1. Connect the small end of the car adapter to the USB connector of the DrivePro. 2. Plug the other end of the car adapter in your car’s lighter socket. 3. After the car engine is switched on, the DrivePro will automatically turn on and start recording. 3-5 Function Buttons Mode Emergency Recording Emergency Recording / Reset Button Emergency Recording.
3-6 LED Indicator Chart Recording: LED ● Wi-Fi On Status Definition Flashing Recording with Wi-Fi Flashing Quickly Emergency Recording with Wi-Fi Solid Standby with Wi-Fi* Flashing ● Off Recording without Wi-Fi Flashing Quickly Emergency Recording without Wi-Fi Solid Standby without Wi-Fi* Note: Wi-Fi connection is only available when the DrivePro is connected to power. *The DrivePro will stop recording when a card error occurs or when you tap Data / Settings using the DrivePro app.
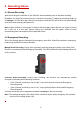
4. Recording Videos 4-1 Normal Recording After the car engine is switched on, the DrivePro will automatically turn on and start recording. By default, one video file is saved for every 3 minutes of recording. To adjust the recording length, go to Settings in the DrivePro app. After the car engine is switched off, the DrivePro will automatically save the current recording and power off. Note: Lighter sockets of some types of vehicles will still supply power after the car engine is turned off.
5. Using the DrivePro App Developed specifically for iOS and Android devices, the free-to-download DrivePro app allows you to wirelessly live stream real-time video footages while recording, adjust DrivePro settings, and play videos directly from your mobile devices. 5-1 Downloading and Installing the App 1. Download and install the “DrivePro” application from App Store or from Google Play. 2. The icon will be displayed on the home screen of your smart device. 5-2 Connecting to the DrivePro 1.
5-3 Playing Videos on a Smart Device iOS 1. To browse saved clips, tap My Storage. 2. You can play back videos recorded in normal or emergency mode. 3. Tap to download or delete a video. Note: The camera stops recording when you tap My Storage or Settings in the app, the front LED turns solid blue. The camera will resume recording when you quit the app. Android 1. To browse saved clips, tap My Storage. 2. You can play back videos recorded in normal or emergency mode. 3.
5-4 App Settings In Settings, you can modify video and device configurations. VIDEO Resolution: Set the resolution/quality for video recording. Available options: FHD+60fps (default) / FHD+30fps / HD+60fps / HD+30fps (Note: Available options are displayed depending on your model.) Exposure: Adjust exposure composition value to lighten or darken the preview screen. Available options: +2.0 / +1.5 / +1.0 / +0.5 / 0.0 (default) / -0.5 / -1.0 / -1.5 / -2.
Date Format: Set the date and time format. You can select 24-hour or 12-hour time format. Available options: YYYY/MM/DD / MM/DD/YYYY / DD/MM/YYYY 24-Hour Time: Select the 24-hour or 12-hour time format. DEVICE G-Sensor: Adjust the sensitivity of the G-Sensor. Available options: Disable / Low (default) / Medium / High Delay Power Off: Schedule the DrivePro to shut down at a certain time.
Version: Tap to upgrade the firmware to the latest version. WARNING: NEVER remove the power cable or the microSD memory card while the firmware is being upgraded. 1. The DrivePro™ will shut down and the red LED light will flash while the firmware is being upgraded. After the upgrade is complete, the DrivePro™ will restart automatically. 2. If the DrivePro™ cannot be turned on due to firmware upgrade failure, please contact Transcend customer service for technical support. 6.
7. Transferring Files to a Computer To transfer files between the DrivePro’s memory card and your computer: Option 1: Take the microSD memory card out of the DrivePro, and insert to a compatible card reader to transfer files to your computer. Option 2: 1. Insert the microSD memory card into the DrivePro. 2. Plug the small end of a USB cable into the USB port located on the right-hand side of the DrivePro. 3. Plug the large end of the cable into an available USB port on your desktop or laptop.
Proper removal of your DrivePro from Windows: 1. Click once on the Removable Hardware icon in the system tray. 2. A Safely Remove Hardware window will pop up. Click to continue. 3. Unplug your DrivePro from the USB port. Mac® OS X 10.8.2 or later No drivers are required. Plug your DrivePro into an available USB port directly, and your computer will automatically detect it.
8. Safety Cautions These usage and safety guidelines are IMPORTANT! Please follow them carefully to ensure your own personal safety, and help protect your DrivePro from potential damages. General Use For in-car use only. For your safety, do not operate the DrivePro, or use the DrivePro App while driving. Avoid placing the DrivePro in an extreme temperature environment. Avoid splashing water or any other liquids on the DrivePro and accessories.
9. Troubleshooting If a problem occurs to your DrivePro, please first check the instructions listed below before sending your DrivePro for repair. If you cannot find any ideal solution to your question below, please consult your dealer, service center, or local Transcend branch office for further help. You can also visit Transcend website for FAQ and Technical Support services. For any Hardware issues, please refer to the DrivePro User’s Manual.
10. Specifications Connect Interface: USB 2.0 Storage Capacity: microSD, 8GB / 16GB / 32GB / 64GB /128GB (Class 10 or above) Dimensions: 58.3 mm (L) × 36 mm (W)× 22.8 mm (H) 2.3” (L) x 1.42” (W) x 0.9” (H) Weight: 40g 1.41 oz Battery Li-Polymer Power Supply for Hardwire Power Cable Input DC 10V~28V / 1.35A Power Supply for Car Lighter Adapter Input DC 10V~28V / 1.5A Power Supply for DrivePro Output DC 5V / 2A Output DC 4.6V~5.
11. Recycling and Environmental Protection Recycling the Product (WEEE): Your product is designed and manufactured with high quality materials and components, which can be recycled and reused. When you see the crossed-out wheel bin symbol attached to a product, it means that the product is covered by the European Directive 2002/96/EC: Never dispose of your product with other household waste. Please inform yourself about the local rules on the separate collection of electrical and electronic products.
12. EU Compliance Statement Transcend Information hereby declares that all CE marked Transcend products incorporating radio equipment functionality are in compliance with Directive 2014/53/EU. The full text of the EU declaration of conformity is available at the following internet address: www.transcend-info.com/eu_compliance Dashcam / Body Camera series Frequency: Maximum transmit power: 2400-2483.5MHz < 100mW DrivePro Body 60 Frequency: Maximum transmit power: 2400-2483.
13. Federal Communications Commission (FCC) Statement This device complies with Part 15 FCC Rules. Operation is subject to the following two conditions: (1) This device may not cause harmful interference. (2) This device must accept any interference received including interference that may cause undesired operation. This Equipment has been tested and found to comply with the limits for a Class B digital device, pursuant to Part 15 of the FCC rules.
14. Two-year Limited Warranty This product is covered by a Two-year Limited Warranty. Should your product fail under normal use within two years from the original purchase date, Transcend will provide warranty service pursuant to the terms of the Transcend Warranty Policy. Proof of the original purchase date is required for warranty service. Transcend will inspect the product and in its sole discretion repair or replace it with a refurbished product or functional equivalent.
15. GNU General Public License (GPL) Disclosure Firmware incorporated into this product and/or software used for this product may include third party copyrighted software licensed under the GPL (hereinafter referred to as “GPL Software”).
5. Copying. Customer may not copy the Licensed Software except that one copy of any separate software component of the Licensed Software may be made to the extent that such copying is necessary for Customer's own backup purposes. 6. Open Source. The Licensed Software may contain open source components licensed to Transcend pursuant to the license terms specified as below, (a) GNU General Public License (GPL), the terms of which is currently available at http://www.gnu.org/licenses/gpl.
10. Miscellaneous. (a) This Agreement constitutes the entire agreement between Transcend and Customer concerning the subject matter hereof, and it may only be modified by a written amendment signed by an authorized executive of Transcend. (b) Except to the extent applicable law, if any, provides otherwise, this Agreement will be governed by the law of the Republic of China, excluding its conflict of law provisions.