User’s Manual USB 3.0 Portable Solid State Drive SSD18C3 (Version 1.
Table of Contents Introduction..........................................................................................1 Package Contents................................................................................1 Features................................................................................................2 System Requirements .........................................................................2 Safety Precautions ........................................................................
Introduction Congratulations on purchasing Transcend’s SSD18C3. This rugged, ultra-fast portable USB storage device is the perfect data management system for uploading, downloading, storing and transferring your data. With its shock-resistant design, huge storage capacity and real-world transfer speeds up to 10X faster than USB 2.0 (in USB 3.0 mode), the compact SSD18C3 is ideal for carrying your files, folders, documents, photos, music and videos.
Warranty Card Features SuperSpeed USB 3.0 and USB 2.0 connection options Faster and more durable than USB 2.0 portable hard drives Shock/slip-resistant silicone outer shell Connection bandwidth up to 5Gbits per second Up to 30% quicker file transfers with optional driver installation Extra-large storage capacity Sleek ultra portable design USB powered – no external adapter necessary One Touch Auto-Backup button Dual-color LED indicator (power, data transfer, & USB 2.0/3.
Safety Precautions These usage and safety guidelines are IMPORTANT! Please follow them carefully. General Use • Carefully unpack the contents of the SSD18C3 package. • During operation, avoid exposing your SSD18C3 to extreme temperatures above 70℃, or below 0℃. • Do not drop your SSD18C3. • Do not allow your SSD18C3 to come in contact with water or any other liquids. • Do not use a damp/wet cloth to wipe or clean the exterior case.
Both ends of the USB 3.0 Y-cable should be connected to provide ample power to the SSD18C3 • Use only the USB 3.0 Y-cable that came with the SSD18C3 to connect it to a computer, and always ensure that the cable you are using is in good condition. NEVER use a cable that is frayed or damaged. • Ensure nothing is resting on the USB cable and that the cable is not located where it can be tripped over or stepped on.
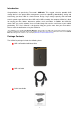
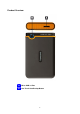
Product Overview A Micro USB 3.
Connecting to a Computer The SSD18C3 can be connected to your computer using either USB 2.0 or USB 3.0. To get the best performance results from your SSD, we recommend using the USB 3.0 interface (currently not supported on Mac computers). Power Connector Micro USB 3.0 Connector USB 2.0 / 3.0 Connector USB 3.0 Cable SSD18C3 Micro USB port USB 2.0 Port USB 3.0 Port 1. Plug the micro USB end (1) of the USB cable into the SSD. 2. Plug BOTH large ends (2) and (3) of the USB cable into an available USB 2.
icon will appear on the Windows System Tray. The SSD18C3 comes pre-formatted to FAT32, which is compatible with most computer systems, including Windows, Mac, Linux, and more. • Computers running Windows and Mac OS will automatically detect and install the SSD18C3. To use USB 3.0, please ensure your computer has all necessary USB 3.0 drivers installed, and make sure you plug the USB Cable into the correct port on your computer (USB 3.0 ports are usually color-coded to differentiate them from USB 2.
Note: (D:) and (G:) above are example drive letters; the letter in your "My Computer" window may differ Note: “New Volume” is an example drive. The drive name on your Mac computer may differ 4. Once connected, you can use the SSD18C3 as an external hard drive to transfer data to and from your computer. Simply drag and drop files or folders onto the Local Disk, Volume, or drive letter that represents the SSD18C3.
One Touch Backup To enable the One Touch auto-backup button, you must first install the preloaded Backup Manager software (To install, run the EXE file located in the root directory of your SSD). Once you have installed Backup Manager, you can use the SSD18C3’s One Touch auto-backup button to instantly backup and synchronize your data (see the Backup Manager Software User’s Manual for details).
Disconnecting from a Computer NEVER disconnect the SSD from a Computer when its LED is flashing. Windows 1. Select the Hardware icon on the system tray. 2. The Safely Remove Hardware pop-up window will appear. Select it to continue. 3. A window will appear stating, “The ‘USB Mass Storage Device’ device can now be safely removed from the system.” WARNING! To prevent data loss, always use this procedure to remove the SSD from Windows®.
Linux® Execute umount /mnt/Storejet to un-mount the device. Then unplug your SSD18C3 from the USB port. Formatting the Solid State Drive WARNING! Formatting the disk will erase all of the data on your SSD18C3. You must have Administrator Rights to format in Windows. Windows® XP/7/Vista 1. Plug the SSD18C3 into an available USB port on a Windows® XP/7/Vista computer. 2. Unplug all other USB storage devices from your computer. This is to prevent accidental format of a different USB drive. 3.
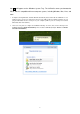
5. A warning message will appear. Click “OK” to begin formatting the SSD. Mac® OS 1. Plug the SSD18C3 into an available USB port on your MAC computer. 2. Unplug all other external storage devices from your computer. This is to prevent accidental format of a different drive. 3. If a message windows like the one below appears, Click the “Initialize” button. If no message appears, open “Disk Utility” under “Applications > Utilities “ 4.
7. Input a name for your new drive (otherwise, your drive will be named “Untitled”) 8. Click the “Erase” button in the bottom right corner of the window 9. Click “Erase” again to confirm.
10. Click the “Close” button to finish and exit. Linux® 1. Plug the SSD18C3 into an available USB port on your Linux computer. 2. Unplug all other USB storage devices from your computer. This is to prevent accidental format of a different USB drive. 3. Type fdisk /dev/sda (replace /dev/sda with your actual USB device) 4. Press p 5. Press n 6. Press w 7. Type mkfs.ext3 /dev/sda1 8. Go to /etc/fstab and add: /dev/sda1 /mnt/usbdrive auto user,noauto 0 0 9. Type mkdir /mnt/usbdrive 10.
Troubleshooting If a problem occurs with your SSD18C3, please first check the information listed below before taking your SSD18C3 in for repair. If you are unable to remedy a problem after trying the following suggestions, please consult your dealer, service center, or local Transcend branch office. We also have FAQ and Support services on our website at www.transcend.com.tw. My operating system cannot detect the SSD18C3 Check the following: 1.
1. Is there enough available disk space? 2. Is the file larger than 4GB? If so, please see below: The SSD18C3 default file system is FAT32, which allows it to be recognized on most types of computers, game consoles and media playback devices. However, the FAT32 file system does not support large files that exceed 4GB in size. If you plan to store large files that are larger than 4GB, you will need to convert the drive to a different file system such as NTFS.
Specifications Size (L x W x H) 98.7mm × 65.7mm × 17.45mm Weight 70g Storage Media Nand Flash Power Supply 5V DC supplied from the USB port(s) USB 3.0: Up to 5Gb/s Connection Speed USB 2.
Three-year Limited Warranty This product is covered by a Three-year Limited Warranty. Should your product fail under normal use within three years from the original purchase date, Transcend will provide warranty service pursuant to the terms of the Transcend Warranty Policy. Proof of the original purchase date is required for warranty service. Transcend will inspect the product and in its sole discretion repair or replace it with a refurbished product or functional equivalent.