User Manual SSD Scope Software (Version 3.1) Transcend solid state drive products provide a more enjoyable, silent and extreme computing experience. Your solid state drive comes with Transcend SSD Scope – a useful software application that can help maintain a healthy working SSD by keeping it upto-date, preventing functional degradation, and predicting possible future issues. The SSD Scope software suite offers many useful features, including Drive Information, S.M.A.R.T.
Table of Contents 1. Hardware Requirements ........................................................................................................................................... 3 2. System Requirements ............................................................................................................................................... 3 3. Getting Started............................................................................................................................................
1. Hardware Requirements Transcend Solid State Drive series including: SSD340 / SSD360S SSD370 / SSD370S SSD630 / SSD630I SSD520 / SSD520I MTS400 / MTS600 / MTS800 MSA340 / MSA370 ESD400K CFX300 / CFX600 / CFX500 / CFX520 / CFX700 2. System Requirements Microsoft Windows® 7 (32/64 bit) Microsoft Windows® 8 / 8.1 (32/64 bit) Microsoft Windows® 10 (32/64 bit) Note: - You must have Administrator privileges to run the SSD Scope. - Microsoft .Net framework 4.5.2 is required. 3.
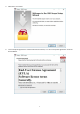
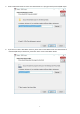
3. Click “Next” to continue. 4. Tick “I accept the agreement” of Transcend EULA to continue, or “I do not accept the agreement” to cancel the installation.
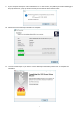
. Select a destination folder to install. The default folder is “C:\Program Files\Transcend\SSD Scope” 6. If you want to create a Start Menu shortcut, please select a Start Menu folder. The default folder is “Transcend\SSD Scope.” Otherwise, please tick “Don't create a Start Menu folder.
7. Tick “Create a desktop icon” if you want to create a shortcut on desktop. 8. The setup information is listed. Click “Install” to begin the installation process.
9. If your computer already has “.NET Framework 4.5.2” or later version, only SSD Scope will be installed (go to Step 10). Otherwise, a pop-up window will ask you to download .NET Framework first. 10. Please wait for the SSD Scope installation to complete. 11. Tick “Launch SSD Scope” if you want to run the SSD Scope immediately. Click“Finish” to complete the installation.
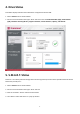
4. Drive Status Drive Status displays standard drive information of supported Transcend SSD. 1. Select “STATUS” tab on the left sidebar. 2. Choose a Transcend SSD on the upper “Drive” text box to view the Product Number (P/N), Serial Number (S/N), Firmware Version (F/W Ver.), Support Interface, Current Interface, Capacity, and Lifetime. 5. S.M.A.R.T. Status S.M.A.R.T. is an industry standard storage device monitoring technique used to detect possible hard drive failures before they actually occur. 1.
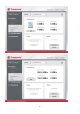
6. Performance Testing SSD Scope offers a free tool for users to check both the sequential and random read/write speeds of your SSD. 1. Select “TOOL” tab on the left sidebar. 2. Choose a Transcend SSD on the upper “Drive” text box. 3. Click “Start” under Performance block to begin testing. If you want to cancel the testing during execution, simply press the “Stop” button. 4. When testing is complete, the read/write speeds of your selected SSD will be displayed.
7. Diagnostic Scan This function performs an overall health evaluation of your Transcend SSD. 1. Select “TOOL” tab on the left sidebar. 2. Choose a Transcend SSD on the upper “Drive” text box. 3. Click “Quick Scan” or “Full Scan” under Scan block to begin diagnostic scan. If you want to cancel the scan during execution, press the “Stop” button.
8. Secure Erase NOTE: - Executing Secure Erase will permanently remove ALL data stored on ALL disk partitions of the SSD. Erasing a single disk partition is not possible. - Secure Erase is not supported by Windows 8 or later. - To prevent compatibility issues when using Secure Erase on a SATA III SSD, we recommend connecting the SSD to a native Intel SATA III port. 1. Select “TOOL” tab on the left sidebar. 2. Choose the Transcend SSD on the upper “Drive” text box. 3.
4. Confirm whether you want to erase this SSD or not. Once you’ve confirmed this action, the secure erase will begin.
5. After clicking “ok,” a warning message of the SSD being in a frozen state may appear. If this happens, please quickly remove the SATA power cable from the SSD and reconnect it. Click “ok” to proceed. 6. It may take some time to execute the secure erase depending on the capacity of your SSD. 7. When the secure erase is complete, a successful notification will appear. Close all the running applications and click “ok” to restart your PC.
9. System Clone System Clone a.k.a disk imaging is designed for cloning the entire hard drive (HDD) of your desktop or laptop to a new Transcend solid state drive (SSD), including operating system (OS), programs and data. After the cloning process is completed, simply swap the two drives and reboot your desktop or laptop. Windows OS will boot up from the new SSD.
If your new SSD has smaller capacity than your current hard drive: Example A: New SSD = 128GB, current HDD = 160GB, OS Partition (C:) = 20GB. In this configuration, System Clone will only clone the OS partition. You must manually back up other partitions in the HDD. Example B: New SSD = 128GB, current HDD = 160GB, OS Partition (C:) = 150GB with occupied 140GB System Clone does not support this configuration.
Please follow the steps below to begin System Clone: Note: the current storage device will remain connected to your computer until the System Clone process is complete. STEP 1. Connect New SSD to Your Computer Connect with your desktop 1. 2. 3. 4. 5. 6. 7. 8. Shut down your computer and disconnect the power source. Remove the system chassis cover by referring to the system manufacturer’s instructions. Place the SSD on the 3.5“ Mounting Bracket.
5. Click “Start” to begin the clone process. During the clone process, the percentage of completion and time remaining will be displayed. Cloning disk will take some time.
STEP 3. Swap Your Drives After Transcend SSD System Clone has successfully cloned your data onto the new SSD, please shut down your computer, take out the current storage device and replace with the new SSD. 1. 2. 3. Make sure your computer is powered off. Remove the original hard drive from your desktop or laptop, and install the new SSD. Replace any removed covers and boot up your computer. 10. Firmware Update 1. Select “FW UPDATE” tab on the left sidebar. 2.
11. Settings Users can adjust the following settings depending on personal preferences.
12. Troubleshooting Q: SSD Scope cannot detect my storage device. A: Your device might not be properly connected to your computer. Please reconnect the device to make sure it is securely connected to the appropriate port. Q: SSD Scope has no response when I double click its icon. A: You might not have Administrator privileges on the computer you are using. To run SSD Scope on Windows 7, please click “Allow” when prompted for Administrator privileges. Q: I can’t update the firmware.
14. End-User License Agreement (EULA) Software license terms and conditions 1. 2. 3. 4. 5. 6. a. b. c. d. e. f. Generally. Transcend Information, Inc.
7. Disclaimer. TRANSCEND MAKES NO WARRANTY AND REPRESENTATIONS ABOUT THE SUITABILITY, RELIABILITY, AVAILABILITY, TIMELINESS, LACK OF VIRUSES OR OTHER HARMFUL COMPONENTS AND ACCURACY OF THE INFORMATION, LICENSED SOFTWARE, PRODUCTS, SERVICES AND RELATED GRAPHICS CONTAINED WITHIN THE LICENSED SOFTWARE FOR ANY PURPOSE. ALL SUCH INFORMATION, LICENSED SOFTWARE, PRODUCTS, SERVICES AND RELATED GRAPHICS ARE PROVIDED “AS IS” WITHOUT WARRANTY OF ANY KIND.