
Installation Instructions


RV Toll Pass
TransCore Proprietary
7
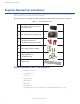
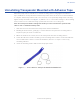
3. Connect the power cable to the transponder (Figure 6). Ensure that the cable is connected
securely.
4. Once the optimal mounting location is determined, prepare the mounting surface, making sure
that the area is free of dust, dirt, and debris.
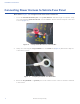
5. Peel the backing o of the transponder to expose the adhesive. Apply the transponder using
moderate pressure.
NOTE: Installation is semi-permanent and the transponder cannot be repositioned once it
is in place.
Installing Transponder on the Windshield
Note: For transponder mounting or location questions, contact TransCore Technical
Support.
The RV Toll Pass transponder may be mounted on the interior windshield, with the longest side
parallel to the bottom of the windshield. Other tags must be kept at least 3 inches away from
the transponder. The area on the dashboard beneath the transponder must be kept clear of
paperwork and metallic items.
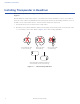
Determine the proper location for the transponder
One-piece windshield
If the vehicle has a one-piece windshield, the transponder should be centered on the windshield, 4
inches away from the top of the windshield (Figure 7.)
Two-piece windshield
If the vehicle has a two piece windshield, the transponder should be mounted on the passenger
side, 3 inches away from the center dividing bar and 4 inches below the top of the windshield
(Figure 8).
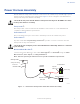
1. Run the power cable behind the dashboard assembly and vehicle panels as needed in order
to conceal the power cable. Refer to Figure 5 on page 6.
Figure 6 – Connect the Power Cable to the Transponder