MIL-SM8002TG 9 Port 10/100/1000BASE-T Two Combo 1000BASE-X SFP Ports Advanced Managed Switch Quick Installation Guide Rev.
Content Introduction............................................................................................................. 1 Package Contents .............................................................................................................1 Hardware Description............................................................................................. 2 Physical Dimension ...........................................................................................................
Introduction The product is a multi-port switch that can be used to build high-performance switched indoor or protected outdoor networks. It provides wire-speed, Gigabit Ethernet switching function that allows high-performance, low-cost connection. The Switch features a store-and-forward switching and it can automatically learn and store source address in an 8K-entry MAC address table. Package Contents Unpack the contents of the switch and verify them against the checklist below.
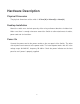
Hardware Description Physical Dimension The physical dimensions of the switch is 217mm(W) x 140mm(D) x 43mm(H) Desktop Installation Mount the switch on a desired space by either using wallmount brackets of rubber feet. Make sure there is enough clearance around the Switch to allow attachment of cables, power cord and air circulation. Power On Connect the power cord to the power socket on the rear panel of the Switch. The other side of power cord connects to the power outlet.
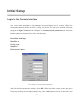
Initial Setup Login in the Console Interface Use serial cable provided in the package to pre-configure the IP settings.
name and Password (use Enter key to switch), then press Enter key and the Main Menu of console management appears. Please see below figure for login screen. Console login interface IP/Subnet/Gateway Setup MIL-SM8002TG is shipped with a default IP of 192.168.1.77. In order to set up a customer specific IP/Subnet/Gateway Use Main menu – Type: “menu” – Select System Configuration – IP Configuration In the IP configuration window please choose the following: 1.
assigned the IP address from the local DHCP server. 2. IP Address: assign the switch IP address. The default IP is 192.168.16.1. 3. Subnet Mask: assign the switch IP subnet mask. 4. Gateway: assign the switch gateway. The default value is 192.168.16.254. 5. DNS1: Optionally set up Domain Name Server 6. DNS2: Optionally set up a backup for DNS1. When the DNS1 cannot function, the DNS2 can replace DNS1 immediately. 7. Select action to save the configuration.