
Installation Guide


NOTE: When the sink is installed as an undermount it is to be installed with 1/8” countertop overhang. The template
provided with the sink illustrates the appropriate countertop cutout for an under-
mount installation - do not use this template for top mount installations.
Sink installation recommended for professional installers only.
1. Position template on countertop. Find the center of the sink template and
align it with the center mark that you have drawn on the countertop. Position the template front to rear, so that sink will
not interfere with the cabinet.
NOTE: Alternate method - Create your own template. Paper and/or cardboard
templates are supplied only as a guide. Using the actual sink ensures a more
accurate cutout.
2. Trace a line around the template. Cut along the inside of this line to provide
opening.
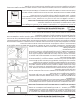
3. Attach the undermount clips.
Position bowl so that reveal is equidistant. Then on underside of countertop,
drill holes for the undermount clips. Use a drill bit with stop block to avoid drilling
through the top. For 1/2” countertop material, drill 3/8” deep holes.
Fasten the undermount clips to countertop loosely. Follow the locations on the
template that comes with the sink. Drill the holes 1” back from the cutout edge.
NOTE: The fastener screws may be too long for some installations. If this is the
case, make a brace out of wood or solid surfacing, butt it up against the sink,
and, on site, screw it into the cabinet wall. Measure the thickness of the brace
and the cabinet wall so the screw does not go through to the other side of the
cabinet.
4. Install the sink.
Clean the bottom of the countertop and the top ange (or lip) of the sink with
denatured alcohol. Then apply a bead of high quality silicone adhesive to the
top edge of the bowl ange and position the bowl in the countertop. Press sili-
cone onto countertop.
Tighten fasteners until undermount clips are snug against sink. Check align-
ment of sink to countertop opening. Tighten down fasteners evenly. Be careful not to overtighten.
NOTE: do not fully tighten one clip at a time. Partially tighten a clip, then partially tighten the clip across from it. After
each clip is partially tightened, repeat the process, fully tightening each clip. This ensures a secure installation and
avoids damage to the sink.
Remove excess sealant from the inside lip of the bowl using appropriate cleaner on a clean rag.
The installation method (“I”) complements the beauty of your countertop. The thin “Micro”
edge gives the sink the look of a ushmounted sink.
Sink installation recommended for professional installers only.
1. Using the cutout template included with the sink cut out the countertop for the sink with the prop- e r
tool for the countertop material. NOTE: Alternate method - you can use the actual sink which
ensures a more accurate cutout.
Apply silicone sealant around the edge of the sink cutout. Always seal the edges of the cutout
using an appropriate sealer recommended by countertop manufacturer.
2. Place the sink into the cutout. Apply gentle and even pressure to the frame. Work the sink downward until the sink is
as close to the countertop surface as possible.
INSTALLATION INSTRUCTIONS -
(“U”) UNDERMOUNT STAINLESS STEEL SINKS
INSTALLATION INSTRUCTIONS -
(“I”) INSET MOUNT STAINLESS STEEL SINKS (Virtual Flushmount)