
Installation Guide


9
TRANSOLID
®
800-766-2452 www.transolid.com
Installation Procedure
Panel Installation
WARNING
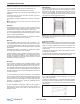
Fumes Hazard
The fumes from the silicone and solvents used by the
installer can be harmful if used in an unventilated room.
Always work in a well-ventilated area. To keep the area
well-ventilated, open windows and use exhaust fans. If ad-
equate ventilation is not achievable or practical, use res-
piratory protective equipment.
1. Clean the backs of each panel with denatured alcohol or an-
other non oil-based cleaning solvent.
IMPORTANT NOTICE
Do not use oli-based cleaners, such as mineral spirits, to cleana
the panels. The oil in the cleaner will prevent the panel from
adhering properly to the wall.
2. Apply the silicone in 1-1/4” diameter dots every 8 to 10 inches
apart over the surface of the unnished side of the panel. Follow
the silicone manufacturer’s instructions and note all ventilation
and installation precautions.
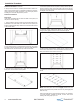
3. Install back panel (1) rst. Then, install left-hand panel (2).
Finally, install right-hand panel (3).
4. Firmly press the surface of each panel against the wall. It is
important to apply hand pressure to the entire surface of the
panel to bond it to the wall surface.
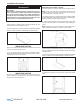
Temporary Bracing
Install temporary bracing to hold the three panels in place until
the silicone is completely set (usually 24 hours). This will allow
proper curing of the silicone.
IMPORTANT NOTICE
To ensure contact between the panels and walls until the sili-
cone sets, install temporary bracing after completing installa-
tion. The bracing should be constructed from lengths of 2x4’s.
Failure to brace in the manner described could keep the pan-
els from adhering, resulting in personal injury, as well as water
damage or other damage to oors, walls, or other portions of
your building or home.
IMPORTANT NOTICE
To prevent scratches or other damage, make sure there are no
nails or other foreign objects in the surface of the bracing that is
placed against the wall panel.
If the horizontal braces are fastened to the vertical braces using
nails or screws, make sure the fasteners do not penetrate the
surface of the panel. Also to prevent possible damage to the
walls, do not apply excessive pressure to the braces.
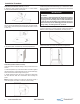
1. Place two or three braces against the back wall. Place two
braces on panels that are 48” or less and three braces on pan-
els greater than 48” wide.
2. Place two braces against each left and right wall.
3. Install (wedge) three horizontal braces (six total) against the
left and right wall braces.