Use and Care Manual — PE =1ak5e] ke T CG-3025-WC White Laundry Cabinet with Eng.Stone Top& Under mount SS Sink High ARC Stainless Steel Faucet Transpolar, PO. Box 30, Warren, OH 44482 | 800-766-2452 www.transolid.
Table of Contents Safety Information . Warranty . Pr-Installation Tools/Materials Required. .. Package Contents Installation Faucet Sentimentalization. Strainer Installation . Cabinet Feet Installation. DNOemRRONN READ AND SAVE THESE INSTRUCTIONS 1. Inspect your unk before proceeding. Once you unpack your unit, check for chips, scratches, cracks, dents or scuff marks. If any damage Is noticed, do not Install. 2. Use this unit only in the manner intended by the manufacturer.
TRANSOLID® LIMITED LIFETIME WARRANTY All TRANSOLID® Laundry cabinet feature a LIMITED LIFETIME WARRANTY to be free of all manufacturing defects under normal use.
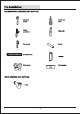
TOOLS/MATERIALS REQUIRED (NOT SUPPLIED) Adjustable wrench Phillips screwdriver ® Pipe wrench P 2.
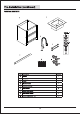
PACKAGE CONTENTS ascription A | Cabinet 1 B | Utility Sink 1 C | Faucet 1 D | Strainer Basket 1 E | Strainer Assembly 1 F | Door Handles 2 G | Stone back splash 1 H | Door Handle Screws 4 | | Cabinet Adjustable Feet 4
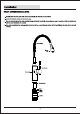
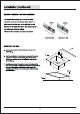
FAUCET ASSEMBLY/INSTALLATION 1. Carefully take out all the parts of the faucet assembly {C). The faucet Is per-assembled. 2. Install the threaded section onto the faucet body. 3. Place the faucet body and the reign carefully through the hole in the sink (B). A second person may be required to hold the hod in place until the faucet installation is complete. 4. From underneath, Install the washer,gasket and lock nut to the exposed threaded section of the faucet. Tighten the lock nut by hand until iris snug.
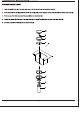
oe IRN TR Tm STRAINER INSTALLATION 1. Place the gasket (P) on top of the other drain hole In the sink (B), followed by the strainer bowl (0). 2, From underneath the sink the double llp seal (0) with grooves facing up on the drain holes, followed by the waste bowl (R). 3. From the top of the drain hole,screw the screw (N) Into the waste bowl (R). 4, Position the gasket (5) at the base of the waste bowl (R) and screw the fitting (T) to the base of the waste bowl (R). 5.
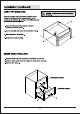
CABINET FEET INSTALLATION A thorough inspection must be made before installation and any damages or missing parts must be promptly reported. Do not proceed with the installation. Do not dispose of packaging before you are satisfied with your new utility sink. 1. Unpack the unit and place the sink (B) on a blanket or cardboard to protect the surface. 2. Tum the cabinet (4) upside down onto the protective surface. 3. Attach cabinet fest (1) to the base. 4. Gently place the cabinet upright.
DRAWER REMOVAL AND REPLACEMENT 1.To remove the drawer, pull it out to its fullest extension. On each of the drawer slides there is a black lever. Push the lever on the left slide up and the lever on the right slide down. The drawer should now slide away from the cabinet. 2.Reverse this procedure to replace the drawer. MOUNTING THE SINK 1. Carefully place a bead of sealant all around the top of the cabinet (A). 2.
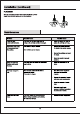
PLACEMENT Move the assembled unit to its final location.Final hook up of the supply lines and drain system can now be completed. Problem Possible Cause ble Cause There are leaks ‘The screw nut has come loose and the oO Tighten the screw nut. Clean or underneath the handle. o-ring an the cartridge Is dirty or damaged. replace the cartridge or o-ring. The aerator leaks or has an inconsistent water flow patter. The aerator is dirty or misfitted. The cartridge may be clogged.
UTILITY SINK Your sink is manufactured with the highest grade stainless steel and will provide you many years of enjoyment with the proper care. Do Do not After use, always rinse your sink with tap water to dilute and remove deposits. Towel dry after use whenever possible to prevent water spots. Should water spots occur, clean with a mild solution of vinegar and water followed by a thorough rinse. Use liquid soap, a general household cleaner, or a weak solution of vinegar and ‘water for regular cleaning.