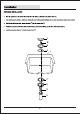
P-trap Installation Rack Strainer Installation Rack Installation
Washing Stand
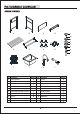
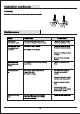
A C B D L M N O P Q E G F H R S I J K A Left Side Panel K Faucet B Right Side Panel L Strainer Gasket C Front Panel M Screw D Back Panel N Strainer Bowl E Round Insert Bar 5 O Gasket F Square Base Bar with connector 2 P Double Lip Seal G Adjustable Metal Feet Q Waste Bowl H Screw R Flat Gasket I Hand-Tighten Thumb Screws 10 S Fitting J Utility Sink 1 T P-Trap T
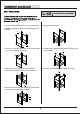
O N J R P J M R Q S Q L Q N L M N O P Q R S J
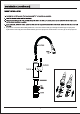
K J 5. If you want to connect the faucet with garden hose , remove the aerator shell (1), aerator(2) and washer(3) from spray head by the aerator wrench (5). Then reinstall the washer (3) into the spray head, and thread the connector (4) onto the spray head.
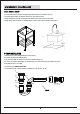
washing stand 1.Turn the left panel and right panel side onto protective surface. 6.Gently put the rack upright. 2.Attached the adjustable feet (G) on the left panel(A)and right panel(B). G A B 3.Connect one square base bar (F) with right and left panel with connecters and tighten the screws(H ). 7.Screw the hand-tighten thumb screws (I) into the holes on the rack and tighten. I I F H 4.Place the 4 round insert bar (E) into the bottom holes.
1. Security the rack into screw hole by black panel(screws are not provided) if needed. 2. Carefully place a bead of sealant around the top of the rack if needed. 3. Ease the sink into the rack, ensuring that it is placed evenly and centered on the rack. 4. Wipe off any excess sealant, use masking tape to hold the sink in place until the sealant dries. J P-TRAP INSTALLATION 1. Meansure and cut the wall tube(B1)to length required. 2. Position nut (A1) on the wall tube (B1). 3.