
Installation Guide


Transolid, Div. • 400 Dietz Road • Warren, OH 44483 • (800) 766-2452 • www.transolid.com
Vanity Top Installation Instructions
Solid Surface Custom Series, ITB, TITB, Décor
Thank you for purchasing a Transolid
®
Vanity Top. Please read the instructions carefully
prior to installing the top. These are basic instructions for installation in a step-by-step
sequence that will work in most types of installations. If you have an installation that is not
covered here, please contact Transolid for additional information.
Tools and Supplies Needed for Installation
• Silicone Caulk • Shims / Blocks
1. Unpack the vanity top (ITB) and inspect it for any damage, report
any problems to your place of purchase.
2. Make sure the vanity top sits securely on the cabinet, with a solid
point of contact at least every 12-16 inches around the perimeter
of the cabinet. Transolid recommends using shims/solid blocks in
areas where there is not a solid point of contact or where the
vanity top is not level on the cabinet. Solid blocks can be of wood
or other solid material.
3. If your vanity top did not come with the faucet holes already
drilled, you will need to drill them at this time. See Instructions
for Faucet Hole Drilling.
4. Install the faucet and the drain assembly according to the
manufacturer’s instructions.
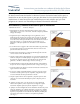
5. Wipe off the top of the vanity cabinet with a damp cloth to remove
any dirt. Apply a generous (1/2”) bead of silicone around the top
edges of the vanity cabinet, or where the vanity top makes contact.
See Figure 1.
6. Carefully lower the vanity top onto the vanity cabinet, making sure
that the shims/blocks stay in place. See Figure 2.
7. Attach the drain pipe to the drain assembly. Attach the water
supply lines to the faucet.
8. If back and/or sides splashes are to be installed, do so at the this
time. Test t the Splashes (back and then sides), and determine
which side will face out and which side will face the wall.
9. Wipe the bottom of the splash and the top of the vanity with a
damp cloth to remove any dust or dirt.
10. Apply a thin (1/4”) bead of silicone along the bottom edge of the
splash and several thin beads along the back (wall) side of the
splash. Set the splash into place.
11. Apply a thin bead of silicone around all of the joints between the
splashes and vanity top. Use silicone or paintable caulk for the
other joints between the splash or top and walls. Paintable caulk
is recommended for joints in contact with painted surface.
See Figure 3.