ENGLISH ITALIANO DEUTSCH User's Manual Manuel de l'utilisateur Manual del Usuario Bedienungsanleitung Manuale d'uso FRANÇAIS Smart Home Camera ESPAÑOL iSmart - CAM Please read carefully before using this equipment.
Watch the things that matter to you anytime and anywhere / Regardez à tout moment et partout les choses qui comptent pour vous / Vigile en todo momento y en cualquier lugar las cosas que le importan / Betrachten Sie jederzeit und überall das, was Ihnen wichtig ist / Guardate sempre e ovunque ciò che vi interessa Internet iSmart-CAM Wi-Fi Router / Routeur Wi-Fi / Enrutador Wi-Fi / WLAN-Router / Router Wi-Fi Smartphone,Tablet / Smartphone, tablette / Teléfono inteligente y tableta / Smartphone, Tablet / S
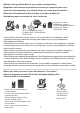
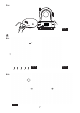
Figures and Quick Guide / Figures et Guide d'utilisation rapide / Figuras y guía rápida / Abbildungen und Schnellanleitung / Figure e Guida rapida Product Layout / Description du produit / Esquema del producto / Produktübersicht / Struttura del prodotto Camera / Caméra / Cámara / Kamera / Telecamera 1 2 6 3 4 7 8 5 EN 1.Light sensor 2.Microphone 3.Camera lens 4.Infrared LEDs 5.Speaker 6.Antenna 7.Micro SD Card slot 8.Power adapter socket 9.Reset button 10.Power/Status LED FR 1.Capteur de lumière 2.
Quick Setup /Contenu de la boîte / Contenido del paquete / Lieferumfang / Contenuto della confezione 1 Download “iSmart-CAM” app/ Télécharger l'application « iSmart-CAM »/ Descargue la aplicación “iSmart-CAM”/ „iSmart-CAM“-App herunterladen/ Download dell'app “iSmart-CAM” 2 Smartphone/Tablet Wi-Fi setting, select “iSmart-CAM_XX : XX : XX…” Password is “12345678” / Réglages Wi-Fi du smartphone ou de la tablette,Sélectionnez « iSmart-CAM_XX : XX : XX… » Le mot de passe est « 12345678 » / Configuración de W
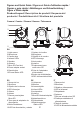
4 Select Wi-Fi router / Sélectionner le routeur Wi-Fi / Seleccione el enrutador Wi-Fi / WLAN-Router wählen / Seleziona il router Wi-Fi Package Contents /Contenu de la boîte / Contenido del paquete / Lieferumfang / Contenuto della confezione One Camera / Une caméra / Una cámara / Eine Kamera / Una videocamera One Adapter / Un adaptateur / Un adaptador / Ein Netzteil / Un adattatore Two Cable Clips / Deux clips de câble / Dos abrazaderas de cables / Zwei Kabelklemmen / Due fermacavi This User's Manual / Ce
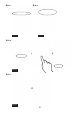
1 1 .2 Fig. 1 1 .4 1 .3 Fig. 2 Fig. 3 2 2 .2 Fig.
2 .3 Fig. 5 3 3 .1 Fig. 6 Fig. 7 3 .2 Fig.
3 .4 Fig. 9 4 Viewing Live Video 4 .1 1 2 3 Fig. 10 8 7 6 5 Fig. 11 4 4 .2 Fig.
4 .2. 1 4 .2. 2 Fig. 13 Fig. 14 4 .2. 6 Fig. 15 4 .2. 7 Fig.
4 .2. 12 a b c d f e Fig.
Camera Installation Connect your smartphone or tablet to the camera 1 .1 Turn on the Wi-Fi of your smartphone or tablet. 1 .2 Select “iSmart-CAM_XX : XX : XX…” under Wi-Fi Networks and enter the password. The default password is “12345678”. See Fig. 1. Note: If you cannot find “iSmart-CAM_XXXXXX” under Wi-Fi Networks and the LED on the camera is not blinking, please follow step 3.4 of this user manual to reset the camera. 1 .3 Launch the iSmart-CAM app on your smartphone or tablet.
3 Add camera to other smartphones or tablets 3 .1 Add camera in LAN (Your mobile phone and camera are connected to the same Wi-Fi router.) 1. Download the iSmart-CAM app. 2. Turn on the Wi-Fi of your smartphone or tablet and then tap the screen to select which Wi-Fi router your camera has been connected to. 3. Launch the iSmart-CAM app on your smartphone or tablet. 4. Tap the “Add Camera” icon to add a camera. See Fig. 6. 5.
3 .4 Reset the camera to factory default (See Fig. 9.) When the camera has been on for at least 1 minute, press the reset button (using a small object or a pin) for 5 to 10 seconds. The camera will beep 3 times and take about 1 minute to reset. The LED will start to blink a dark orange color. Note 1: If you do not hear a beeping sound, reset has failed. Please turn the camera back on and press the rest button again.
4 .2. 1 Change Name: Change the camera name. See Fig. 13. 4 .2. 2 Change Password: Change the camera password. The default camera password is “admin”. See Fig. 14. To protect your privacy, we strongly recommend you change the camera password on a regular basis. 4 .2. 3 Delete: Delete camera from Camera List. 4 .2. 4 Event Viewer: View event logs. 4 .2. 5 Wireless Setup: Not applicable for this model. 4 .2. 6 Motion Detection (See Fig. 15.): a. Enable/Disable motion detection. b.
4 .2. 8 Record: Tap the icon to enable HD 720p recording, tap it again to disable recording. Note 1: Recording is only possible when a micro SD card is inserted into the camera. 2: The system supports micro SD cards with a maximum capacity of 32GB. 3: A 1GB memory card is able to record about 2 hour of VGA video or 1 hour of HD video. New images will overwrite old images when the card is full. 4: If motion detection is not activated, the camera will record continuously.
e. Frame Rate: The frequency at which camera produces unique called frames. The higher the frame rate, the smoother the video will appear, but that requires more processing power and system bandwidth. Frame rate varies according to network conditions, mobile phone performance, image resolution and object situation. f. Power Frequency: The frequency of your power supply. You can set as 50Hz or 60Hz.
Troubleshooting Users cannot connect the camera to a smartphone/tablet through Wi-Fi router or 3G/4G mobile network • • • • Make sure the power plug is pushed all the way in. Make sure the camera is turned on and power/status LED is green. Make sure the camera and the Wi-Fi router are within range of each other. Make sure the smartphone/tablet is connected to the Internet through a Wi-Fi or 3G/4G mobile network.
FCC Statement This device complies with Part 15 of the FCC Rules. Operation is subject to the following two conditions: (1) this device may not cause harmful interference, and (2) this device must accept any interference received, including interference that may cause undesired operation. Caution To comply with FCC RF exposure compliance requirements, a separation distance of at least 20 cm must be maintained between the antenna of this device and all persons.
Following the safety tips To prevent deaths and injuries associated with camera cords, make sure the camera and AC adapter cords are always out of reach of the baby by least 3 feet (1 meter). Note: This is important even if your baby is not yet standing or mobile. 3 feet (1 metre) adapter cable Never use extension cords with AC adapters. Only use the AC adapters provided.