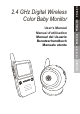
ENGLISH ESPAÑOL FRANÇAIS DEUTSCH User's Manual Manuel d'utilisation Manual del Usuario Benutzerhandbuch Manuale utente ITALIANO 2.
Figures and Quick Guide / Figures et guide rapide / Figuras y Guía Rápido / Abbildungen und Schnellanleitung / Figure e guida rapida Product Layout / Figures des produits / Vista General del Producto / Produktübersicht / Profilo del prodotto Monitor / Moniteur 2 1 11 3 9 4 5 6 15 7 Fig. 1 12 10 13 14 8 Camera / Caméra / Cámara / Kamera / Videocamera 1 6 9 2 7 3 10 11 4 12 8 5 13 Fig.
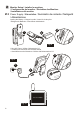
Setup/Installation/Instalación/Einrichtung/Configurazione 1 Camera Setup / Installer la caméra / Configuración de la cámara / Einrichten der Kamera / Installazione della videocamera 1.1 Power Supply / Alimentation / Suministro de corriente / Netzgerät / Alimentazione Loading the Batteries / Charger les piles / Inserción de las pilas / Einlegen der Batterien / Inserimento delle batterie 2 3 1 Fig.
1.2 Fine Tuning / Réglages / Ajuste preciso / Feinabstimmung / Messa a punto Fig. 5 1.3 Fixing the Camera / Befestigung der Kamera / Fijación de la cámara / Befestigung der Kamera / Fissaggio della videocamera Fig. 6 1.4 Night light / Nachtlicht / Luz nocturna / Nachtlicht / Luce notturna Fig.
2 2.1 Monitor Setup / Installer le moniteur / Configuración del monitor / Einrichten des Monitors / Installazione del monitor Power Supply / Alimentation / Suministro de corriente / Netzgerät / Alimentazione Loading the Battery / Charger les piles / Inserción de las pilas / Einlegen der Batterien / Inserimento delle batterie 3 1 2 Fig. 8 Using AC Power / Utiliser l'alimentation CA / Conexión del suministro de corriente alterna / Anschließen an den Netzstrom / Utilizzo dell'alimentazione CA 3 Fig.
2.2 Brightness Setting / Réglage de la luminosité / Ajuste del brillo / Helligkeitseinstellung / Impostazione luminosità Fig. 11 2.3 VOX (voice-operated transmission) Function / VOX (sprachgesteuerte Übertragung) Funktion / Función VOX (transmisión activada por voz) / VOX (sprachgesteuerte Übertragung) Funktion / Funzione VOX (trasmissione a comando vocale) VOX Fig. 12 2.4 Music Function / Musikfunktion / Función de música / Musikfunktion / Funzione musicale VOX Fig.
MELODY:01 MELODY:02 MELODY:REPEAT ALL MELODY:03 Fig.
ENGLISH Package Content One Camera One Monitor Two Power Adapters Battery for Monitor ( 3.7V 1000mAH Li-ion ) This User's Manual Product Layout Monitor (Fig. 1) 1. 2. 3. 4. 5. 6. 7. 8. 9. 10. 11. 12. 13. 14. 15.
Setup 1 Camera Setup 1.1 Power Supply The camera uses either 4 AAA-Size batteries (alkaline battery recommended) or the household AC power current. Loading the Batteries 1.Open the battery compartment cover on the bottom of the camera. See Fig. 3. 2.Insert 4 AAA-size batteries (follow the plus (+) and minus (-) signs inside the battery compartment). See Fig. 3. 3.Close the battery compartment cover, and make sure it is locked securely. Note 1: Do not mix old batteries with new ones.
1.5 Night vision The camera has nine high-intensity LEDs for picking up clear images in the dark. When the built-in photo sensor detects low ambient light levels, the LEDs will automatically activate. 2 Monitor Setup 2.1 Power Supply The monitor uses 3.7V 1000mAH (Li-ion) battery or the household AC power current. Loading the Battery 1.Open the battery compartment cover on the rear of the monitor. See Fig. 8. 2.Insert the battery with the metal facing the battery compartment. See Fig 8. 3.
2.3 VOX ( voice-operated transmission) function 1.Press the "VOX" button on the side of the monitor. This will turn off the screen but the "VOX" LED will remain ON (blue). See Fig 12. 2.When the sound from the camera reaches the set level, the screen will turn on automatically. It will turn off again after 30 seconds. 2.4 Music Function You can play the music with the camera (three pieces of music) . 1.Press the play button , the camera will play music . See Fig 13. 2.
Do not store in hot areas. High temperatures can shorten the life of electronic devices and warp or melt certain plastics. Do not store in very cold areas. When the system warms up (to its normal temperature), moisture can form inside the case, which may damage electronic circuit boards. Do not attempt to open the case. Non-expert handling of the device may damage the system. Avoid dropping or strong shocks. Operate this product using only with the power supply included or provided as an accessory.
Warning: Changes or modifications to this unit not expressly approved by the party responsible for compliance could void the user authority to operate the equipment To comply with FCC RF exposure compliance requirements, a separation distance of at least 20 cm must be maintained between the antenna of this device and all persons This Transmitter must not be co-located or operating in conjunction with any other antenna or transmitter
Contenu de l'emballage FRANÇAIS Une caméra Un Moniteur Deux blocs d'alimentation Pile pour l'écran (3.7V 1000mAH Li - ion) Ce manuel de l'utilisateur Disposition du produit Moniteur (Fig. 1) 1. Ecran LCD 2. Antenne 3. Boutons de sélection de la Musique 4. VOX : Bouton de Transmission Vocale 5. Voyant d'alimentation 6. LED indicateur de connexion 7. LEDs indicateurs de Volume 8. haut-parleur 9. LEDs indicateurs VOX (Transmission Vocale) 10. LEDs indicateurs de Musique 11.
Configuration 1 Configuration de la caméra 1.1 Alimentation La caméra utilise soit 4 piles de taille AA (piles alcaline recommandées) ou le courant résidentiel CA normal. Charger les piles 1. Ouvrez le compartiment des piles à l'arrière de la caméra. Voir la fig. 3. 2. Insérez 4 piles AAA (suivez les signes positif (+) et négatif (-) du schéma dans le compartiment des piles). Voir la fig. 3. 3. Refermez le compartiment des piles, et assurez-vous qu'il est bien verrouillé.
1.5 Nocturne vision La caméra possède neuf LED de haute intensité pour capturer des images claires dans le noir. Quand le capteur de lumière intégré détecte une lumière ambiante, les LED s'activeront automatiquement. 2 Configuration de l'écran 2.1 Alimentation L'écran utilise une pile de 3.7V 1000mAH (Li-ion) ou le courant électrique CA résidentiel. Charger les pile 1. Ouvrez le compartiment des piles à l'arrière du moniteur. Voir la fig. 8. 2.
2.3 Fonction VOX (Transmission Vocale) 1. Appuyez sur le bouton « VOX » situé sur le côté de l'écran. Ceci éteindra l'écran mais la LED « VOX » reste allumée (Bleue). Voir la fig. 12. 2. Quand le son de la caméra atteint le niveau prédéfini, l'écran s'allumera automatiquement. Il s'éteindra à nouveau après 30 secondes. 2.4 Fonction Musique Vous pouvez lire de la musique avec la caméra (3 morceaux). 1. Appuyez sur le bouton Lecture , la caméra jouera la musique. Voir la fig. 13. 2.
Soin et entretien Gardez tous les accessoires et pièces hors de la portée des enfants. Des traces de doigts ou de la poussière sur la surface de la lentille peuvent affecter l'exécution de la caméra. Evitez de toucher la surface de la lentille avec les doigts. Si la lentille devient sale, utilisez un soufflet pour retirer la poussière, ou un chiffon doux et sec pour essuyer la lentille. Gardez la caméra sèche.
Contenido del paquete Una cámara Un monitor Dos adaptadores de corriente Batería para monitor (3,7 V 1.000 mAH Li-ion) Este manual del usuario Aspecto del producto Monitor (Fig.
Ajuste 1 Ajuste de la cámara 1.1 Suministro de corriente La cámara utiliza 4 pilas de tamaño AAA (se recomienda utilizar pilas alcalinas) o un adaptador de corriente alterna doméstico. Inserción de las pilas 1. Abra la cubierta del compartimiento de las pilas, en la parte trasera de la cámara. Consulte la Fig. 3. 2. Inserte 4 pilas de tamaño AAA (guíese por los signos positivo (+) y negativo (-) que verá en el diagrama que hay dentro del compartimiento de las pilas). Consulte la Fig. 3. 3.
1.5 Visión nocturna La cámara tiene nueve indicadores LED de alta intensidad para captar imágenes en la oscuridad. Cuando el sensor de luz incorporado detecta niveles de luz ambiente bajos, se activan automáticamente los LED. 2 Ajuste del monitor 2.1 Suministro de corriente El monitor utiliza una batería de 3,7 V de 1.000 mAH o un adaptador de corriente alterna doméstico. Inserción de las pilas 1. Abra la cubierta del compartimiento de las pilas, en la parte trasera del monitor. Consulte la Fig. 8. 2.
2.2 Ajuste del brillov Pulse el botón & Consulte la Fig. 11. de selección del brillo para ajustar el brillo. 2.3 Función VOX (transmisión activada por voz) 1. Al pulsar el botón “VOX” en el lateral del monitor, esto desactivará la pantalla, pero el indicador LED “VOX” LED permanecerá en ON (azuil). Consulte la Fig. 12. 2. Cuando el sonido del lugar de la cámara alcance el nivel configurado, la pantalla se encenderá automáticamente y se apagará de nuevo a los 30 segundos. 2.
Si el indicador LED de corriente está encendido pero se detecta sólo una entrada de señal de voz, el monitor puede estar en el modo activado por la voz. Presione el botón Auto para encender la pantalla. Cuidados y mantenimiento Mantenga todas las piezas y accesorios fuera del alcance de los niños pequeños. Las huellas dactilares o la suciedad en la superficie del objetivo pueden afectar negativamente al rendimiento de la cámara. Evite tocar la superficie del objetivo con los dedos.
Packungsinhalt Eine Kamera Ein Monitor Zwei Netzgeräte Batterie für den Monitor (3,7V 1000mAH Li-on) Ein Bedienungsanleitung Produkt-Layout Monitor (Abb. 1) LCD-Schirm Antenne Musikauswahltasten VOX: Sprachgesteuerte Übertragungstaste Betriebsanzeige Verbindungsanzeige-LED Lautstärkeanzeige-LEDs Lautsprecher VOX: Sprachgesteuerte Übertragung-Anzeige-LEDs Musikanzeige-LEDs Helligkeitsjustierungstasten Stromversorgung/Lautstärkeregler Netzgerätestecker Batteriefach Halterung DEUTSCH 1. 2. 3. 4. 5. 6. 7. 8.
Einrichtung 1 Kamera Einrichtung 1.1 Netzgerät Die Kamera kann mit Batteriestrom (4 x AAA, Alkalibatterie empfohlen) oder normalem Netzstrom versorgt werden. Einlegen der Batterien 1. Öffnen Sie das Batteriefach auf der Rückseite der Kamera. Siehe Abb. 3 2. Legen Sie 4 Batterien Typ AAA ein (beachten Sie die Positiv- (+) und Negativzeichen (-) in der ANzeige im Batteriefach). Siehe Abb. 3. 3. Schließen Sie die Abdeckung des Batteriefachs fest zu. Hinweis 1:Mischen Sie nie alte Batterien mit neuen.
1.5 Nachtsicht Die Kamera besitzt 9 hochintensive LEDs, um selbst im Dunklen deutliche Bilder aufzunehmen. Wenn der eingebaute Fotosensor das Licht in der Umgebung als schwach feststellt, werden die LEDs automatisch aktiviert. 2 Monitoreinrichtung 2.1 Netzgerät Der Monitor verwendet eine 3,7V 1000mAH (Li-on) Batterie oder normale Netzversorgung. Einlegen der Betrieb 1. Öffnen Sie das Batteriefach auf der Rückseite der Monitors. Siehe Abb. 8 2.
2.2 Helligkeitseinrichtung Drücken Sie die Helligkeitsauswahltaste Siehe Abb. 11. & um die Helligkeit zu justieren. 2.3 VOX (sprachgesteuerte Übertragung) Funktion 1. Drücken Sie die “VOX”-Taste aud der Seite des Monitors. Das wird den Bildschirm ausschalten, aber die “VOX”-LED wird AN bleiben (blau). Siehe Abb. 12. 2. Wenn der Sound von der Kamera den eingestellten Pegel erreicht, schaltet sich der Bildschirm automatisch ein. Er schaltet sich nach 30 Sekunden wieder aus. 2.
Vergewissern Sie sich, sich die Kamera und und Monitor innerhalb des jeweiligen Empfangsbereichs befinden (bei klarer Sichtlinie liegt der Bereich bei ca. 100 Metern (300 Fuß). Wenn die Betriebsanzeige leuchtet, jedoch nur der Voice-Signaleingang erkannt wird, kann der Monitor sich im Voice-Aktivierungsmodus befinden. Drücken Sie die Auto-Taste, um den Bildschirm einzuschalten. Pflege und Wartung Achten Sie darauf, dass kleine Kinder keinen Zugriff auf alle Geräteteile und Zubehörteile haben.
Contenuto della confezione Una videocamera Un monitor Due adattatori Batteria per monitor (agli ioni di litio, da 3,7V 1000mAH) Il presente manuale d'uso Struttura del prodotto Monitor (Fig.
Configurazione 1 Configurazione videocamera 1.1 Alimentazione Per l'alimentazione della videocamera si possono utilizzare 4 batterie AAA (si consigliano batterie alcaline) o l'alimentazione elettrica CA di rete. Inserimento delle batterie 1. Aprite il coperchio del compartimento batterie sul retro della videocamera. Vedere fig. 3 2. Inserire 4 batterie AAA (rispettare la polarità indicata dai simboli (+) e (-) sul vano batteria). Vedere la Fig. 3. 3.
1.5 Visione notturna La videocamera ha nove LED ad alta-intensità per rilevare immagini chiare riprese al buio. Quando il sensore ottico incorporato rileva un livello di luce ambientale basso, i LED saranno attivati automaticamente. 2 Configurazione del monitor 2.1 Alimentazione Il Monitor utilizza una batteria da 3,7V 1000mAH agli ioni di litio oppure l'alimentazione di rete CA. Inserimento delle batteria 1. Aprire il coperchio dello vano batterie sul retro del Monitor. Vedere Fig. 8 2.
2.2 Impostazioni di luminosità Premere il tasto di selezione della luminosità Vedere la Fig. 11. & per regolare la luminosità. 2.3 Funzione VOX (trasmissione a comando vocale) 1. Premere il tasto “VOX” sul lato del monitor. Tale tasto spegno lo schermo ma il LED “VOX” rimane acceso (luce blu). Vedere la Fig 12. 2. Quando il suono dalla videocamera raggiunge il livello impostato, lo schermo si accende automaticamente, per spegnersi di nuovo dopo 30 secondi. 2.
Cura e manutenzione Tenere tutti i componenti e gli accessori lontani dalla portata dei bambini. Impronta di dita o sporcizia sulla superficie dell'obiettivo potrebbero influire negativamente sulla prestazione della videocamera. Evitare di toccare la superficie dell'obiettivo con le dita. Rimuovere eventuale sporcizia o polvere dall'obiettivo utilizzando un aspiratore o strofinando con un panno morbido e asciutto. Mantenere la videocamera in luogo asciutto.
0807 408-000516-00