Digital 7'' LCD Audio / Video Baby Monitor User's Manual
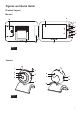
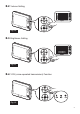
Figures and Quick Guide Product Layout Monitor 18 2 1 3 5 4 11 12 13 14 16 15 19 20 6 7 9 10 8 17 Fig. 1 Camera 1 5 2 3 4 6 8 9 11 12 7 10 Fig.
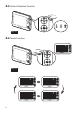
Setup 1 Camera Setup 1.1 Power Supply Loading the Batteries Fig. 3 Using AC Power Fig.
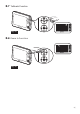
1.2 Fine Tuning Fig. 5 1.3 Night light Fig.
2 Monitor Setup 2.1 Power Supply Loading the Battery 3 1 2 Fig. 7 Using AC Power 3 1 2 Fig. 8 OUT OF RANGE Fig.
2.2 Volume Setting Fig. 10 2.3 Brightness Setting Fig. 11 2.4 VOX (voice-operated transmission) Function Fig.
2.5 Motion Detection Function Fig. 13 2.6 Music Function 1 Fig.
2.7 Talkback Function Fig. 15 2.8 Zoom In Function Fig.
3 Menu Options Fig. 17 3.1 Camera Selection Fig. 18 3.2 Temperature Setting Fig.
3.3 Motion Detection Sensitivity Fig. 20 3.4 VOX Sensitivity Fig. 21 3.5 ADD/DEL Camera Fig.
3.6 Restore Default Fig. 23 4 Screen Display 4.1 Single Mode Fig. 24 4.2 Quad Mode Fig.
ENGLISH Package Content One Camera One Monitor Two Power Adapters Battery for Monitor ( 3.7V 1050mAH Li-ion ) This User's Manual Product Layout Monitor (Fig. 1) 1. 2. 3. 4. 5. 6. 7. 8. 9. 10. 11. 12. 13. 14. 15. 16. 17. 18. 19. 20.
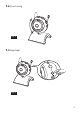
Setup 1 Camera Setup 1.1 Power Supply The camera uses either 4 AAA-Size batteries (alkaline battery recommended) or the household AC power current. Loading the Batteries 1. Open the battery compartment cover on the rear of the camera. See Fig. 3. 2. Insert 4 AAA-size batteries (follow the plus (+) and minus (-) signs inside the battery compartment). See Fig. 3. 3. Close the battery compartment cover, and make sure it is locked securely. Note 1: Do not mix old batteries with new ones.
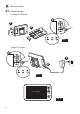
1.5 Room temperature measurement Temperature sensor can measure room temperature on camera side and the room temperature indicator will be displayed on the screen of the monitor unit. 2 2.1 Monitor Setup Power Supply The monitor uses 3.7V 1050mAH (Li-ion) battery or the household AC power current. Loading the Battery 1. Open the battery compartment cover on the rear of the monitor. See Fig. 7. 2. Insert the battery with the metal facing the battery compartment. See Fig 7. 3.
2.4 VOX ( Voice-activation transmission) function on the monitor unit. This will turn off the screen 1. Press the VOX button but the VOX LED will remain ON (green). See Fig. 12. 2. When the sound from the camera reaches the set level (See Fig. 21), the screen will turn on automatically. It will turn off again after 30 seconds. 2.5 Motion Detection Function 1. Press the motion detection button on the monitor unit, and then the motion detection LED will remain ON (green). See Fig. 13. 2.
3.1 Camera Selection In this submenu you can switch between multiple cameras. You also can select "Split screen" item to display the video of all 4 cameras simultaneously in quad mode. See Fig. 18. 3.2 Temperature Setting 1. In this submenu you can choose the temperature unit between degrees Celsius or degrees Fahrenheit. See Fig. 19. 2. You can set the temperature range of the temperature alert.
4 Monitor Setup You can select single mode or quad mode in camera selection function of submenu. See Fig. 18. 4.1 Single Mode 1. Each of the indicator icons will be displayed on the position of the screen. See Fig. 24. (1) Camera number indicator (2) Signal strength indicator (3) Zoom in indicator (4) Temperature alert on/off indicator (5) Room temperature indicator (6) Music indicator (7) Talkback indicator (8) Battery indicator (9) Volume indicator (10) Brightness indicator 2.
Troubleshooting You don't getting any signal at all Ÿ Make sure the camera and the monitor are turned on. Ÿ Make sure the power plugs are pushed all the way in. Ÿ If the camera/monitor is powered by batteries, replace all batteries with new ones. If the signal is poor, or there is interference Ÿ If there is a microwave oven in use in the path between the camera and monitor, remove the microwave oven or turn it off.
FCC Statement This equipment has been tested and found to comply with the limits for a Class B digital device, pursuant to Part 15 of the FCC Rules. These limits are designed to provide reasonable protection against harmful interference in a residential installation. This equipment generates, uses and can radiate radio frequency energy and, if not installed and used in accordance with the instructions, may cause harmful interference to radio communications.
Following the safety tips To prevent deaths and injuries associated with baby monitor cords : Ÿ Make sure the baby unit and AC adapter cords are always out of reach of the baby at least 3 feet (1 meter) away. Note : It's important even if your baby is not yet standing or mobile. Ÿ Use a wireless baby monitor to avoid risk of strangulation. Ÿ Never use extension cords with AC adapters. Only use the AC adapters provided.
408-000706-00 TTD-4291 2013 . 1.