
User's Manual
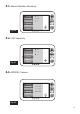
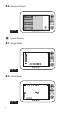
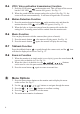
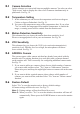
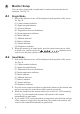
Table Of Contents

2
Setup
Power Supply
The camera uses either 4 AAA-Size batteries (alkaline battery recommended)
or the household AC power current.
Loading the Batteries
1. Open the battery compartment cover on the rear of the camera. See Fig. 3.
2. Insert 4 AAA-size batteries (follow the plus (+) and minus (-) signs inside
the battery compartment). See Fig. 3.
3. Close the battery compartment cover, and make sure it is locked securely.
Note 1: Do not mix old batteries with new ones.
Note 2: Remove the batteries from the camera if you do not plan to use it for
a prolonged period of time.
4. Slide the POWER switch to the ON position. The LED on the camera
will light up ( green light). See Fig. 3.
Note : When the battery is low, the LED light will start blinking.
Using AC Power
1. Plug one end of the provided power adapter into a wall outlet and the other
end into the bottom of the camera. See Fig. 4.
Note : Use the adapter labeled OUTPUT: 6V DC with the camera.
2. Slide the ON/OFF switch to the ON position. The LED on the camera should
light up (green light). See Fig. 4.
Fine Tuning
Place the camera in a convenient location, point the lens towards the observation
area and adjust the angle by rotating the lens head. See Fig. 5.
Night light
Press the night light button, the night light LEDs will remain ON. See Fig. 6.
Night vision
The camera has nine high-intensity LEDs for picking up clear images in the
dark. When the built-in photo sensor detects low ambient light levels, the LEDs
will automatically activate.
Camera Setup
1.1
1
1.2
1.3
1.4
X 代表10, IV 代表4, XIV 代表14, XV 代表15.I=1 II=2 III=3 IV=4 V=5 VI=6 VII=7 VIII=8 IX=9 X=10
Ⅰ,Ⅱ,Ⅲ,Ⅳ,Ⅴ,Ⅵ,Ⅶ,Ⅷ,Ⅸ,Ⅹ,ⅩⅠ,ⅩⅡ,ⅩⅢ,ⅩⅣ,ⅩⅤ,ⅩⅥ,ⅩⅦ,ⅩⅧ,ⅩⅨ,ⅩⅩ.