
User's Manual
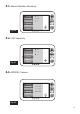
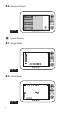
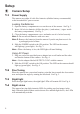
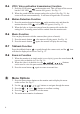
Table Of Contents

3
Temperature sensor can measure room temperature on camera side and the room
temperature indicator will be displayed on the screen of the monitor unit.
Room temperature measurement
1.5
Power Supply
current.
Loading the Battery
1. Open the battery compartment cover on the rear of the monitor. See Fig. 7.
2. Insert the battery with the metal facing the battery compartment. See Fig 7.
3. Close the battery compartment cover, and make sure it is locked securely.
4. Press the POWER button to turn on the monitor . See Fig 7.
Note 1: When power is sufficient, the light is green ; When battery is low,
the red LED light will start blinking.
Note 2: Remove the battery from the monitor if you do not plan to use it for a
prolonged period of time.
Note 3: Press the POWER button and keep it around 3 seconds to turn off
the monitor.
Using AC Power
1. Plug one end of the provided power adapter into a wall outlet and the other end
into the bottom of the monitor. See Fig. 8.
Note : Use the adapter labeled OUTPUT: 6V DC with the monitor.
2. Press the POWER button to turn on the monitor . See Fig 8.
Note 1: When charging starts, and "Power" LED will appear blue .
If charging is finished (fully charged), the "Power" LED will turn green.
Note 2: "OUT OF RANGE" would be displayed on the LCD screen if the
monitor is exceeds the range (unlink).is exceeds the range (unlink).
See Fig. 9.
Note 3: Press the POWER button and keep it around 3 seconds to turn off
the monitor.
Volume Setting
Press the volume selection button & to adjust volume level. See Fig. 10.
Brightness Setting
Press the Brightness selection button & to adjust brightness. See Fig. 11.
Monitor Setup
The monitor uses 3.7V 1050mAH (Li-ion) battery or the household AC power
2.1
2
2.2
2.3
X 代表10, IV 代表4, XIV 代表14, XV 代表15.I=1 II=2 III=3 IV=4 V=5 VI=6 VII=7 VIII=8 IX=9 X=10
Ⅰ,Ⅱ,Ⅲ,Ⅳ,Ⅴ,Ⅵ,Ⅶ,Ⅷ,Ⅸ,Ⅹ,ⅩⅠ,ⅩⅡ,ⅩⅢ,ⅩⅣ,ⅩⅤ,ⅩⅥ,ⅩⅦ,ⅩⅧ,ⅩⅨ,ⅩⅩ.