Quality Refrigeration OWNER’S MANUAL Instructions for the installation, operation and maintenance of all Traulsen: R & A Series Reach-In & Roll-In Refrigerators R & A Series Pass-Thru & Roll-Thru Refrigerators R & A Series Reach-In & Roll-In Freezers R & A Series Reach-In Refrigerator/Freezers R & A Series Reach-In & Roll-In Hot Food Cabinets R & A Series Pass-Thru & Roll-Thru Hot Food Cabinets This Traulsen unit is built to our highest quality standards.
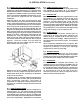
TABLE OF CONTENTS I. THE SERIAL TAG II. RECEIPT INSPECTION III. INSTALLATION a-Location b-Packaging c-Installing Legs or Casters d-Shelf Pins e-Roll-In Model Installation f-Attaching Double Depth Units Together g-Installing The Condensate Evaporator h-Remote Installation i-Cord & Plug j-Power Supply k-Wiring Diagram l-Clearance IV. OPERATION a-Refrigerators b-Freezers c-Hot Food Cabinets V.
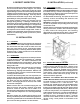
II. RECEIPT INSPECTION III. INSTALLATION (continued) All Traulsen products are factory tested for performance and are free from defects when shipped. The utmost care has been taken in crating this product to protect against damage in transit. All interior fittings have been carefully secured and the legs or casters are boxed and strapped inside to prevent damage. Door keys will be attached to the handle with a nylon strip. The handle is protected by an easily removable nylon netting. III.
III. INSTALLATION (continued) III. e - ROLL-IN MODEL INSTALLATION (cont’d): facilitate rolling in racks. It is shipped wrapped in brown paper and secured to the rack guides inside the cabinet. To secure it in place, remove the two thumb screws in the breaker strip near the bottom door opening. Next, loosen the thumb screws located along the floor at the threshold. Place the ramp(s) on top of the loosened thumb screws and secure tabs on each end to breaker strips with thumb screws previously removed.
III. INSTALLATION (continued) III. h - REMOTE INSTALLATION (cont’d): must be done in accordance with good practice and local regulations. See section “III. g” for information concerning condensate removal for remote models. III. g - INSTALLING THE CONDENSATE EVAP (cont’d): NOTE: Some models, such as single section dualtemperature refrigerator/freezers, are supplied with a bottom-mounted electric condensate evaporator.
IV. OPERATION IV. a - REFRIGERATORS: Both refrigerators and freezers do not require manual defrosting. During normal operation, a refrigerator continuosly circulates above freezing cabinet air through the coil. A compressor “OFF” cycle occurs every hour to melt any frost which may accumulate on the coil during the compressor “ON” cycle. The control will read “dEF” when this occurs. With standard holding refrigerators, high relative humidity is also maintained to prevent dehydration of stored product. IV.
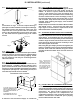
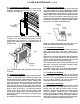
V. CARE & MAINTENANCE (cont’d) V. a - CLEANING THE CONDENSER: Once the screws are removed, the panel can be pivoted upwards allowing full access to the front facing condenser (see figure 9). V. c - REPLACING THE GASKETS: To remove the gasket to be replaced, grasp it firmly by one corner and pull it out. Before attempting to install a new gasket, both the unit and the gasket itself must be at room temperature. Insert the four corners first by using a rubber mallet (or hammer with a block of wood).
V. CARE & MAINTENANCE (cont’d) VI. OTHER V. g - REPLACING THE LIGHT BULB: All Traulsen R & A Series models are supplied with incandecent lighting unless optional fluorescent lighting was ordered (except for sliding glass door models for which fluorescent lights are supplied standard). VI.
VII. The INTELA-TRAUL® Control System Your new Traulsen Refrigerator, Freezer or Hot Food cabinet is equipped with a state-of-theart electronic microprocessor INTELA-TRAUL® control, which precisely regulates operation and provides alarms when problems occur. It is supplied from the factory completely ready for use and requires no adjustment (except Hot Food units which are set in the “OFF” position, see page for 20 for more info), but without the audible alarms activated.
VII. INTELA-TRAUL® (continued) VII. a - ALARM EXPLANATIONS: *NOTE: Explanation of alarms assume the audible alarm style is set at a 3-second burst or a continuous audible alarm. References to the audible alarm do not apply if the audible alarm style is set to OFF (Refer to page 19 for setting the audible alarm style). High Cabinet Air Temperature: The audible alarm* will sound and the display will read HI CAb when the temperature inside the cabinet rises above a pre-programmed limit.
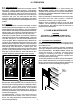
VII. INTELA-TRAUL® (continued) VII. c - CONTROL PANEL: LED FOR ° F LED FOR °C INTELA-TRAUL °F 3-DIGIT (RED) LED DISPLAY °C SET DOOR OPEN ICON W / LED ) )) ALARM CANCEL BUTTON IRDA - INFRA RED DATA AQUISITION DEFROST ICON W / LED FREEZER VII.
VII. INTELA-TRAUL® (continued) VII. e - NOTES TO THE USER: You only have 20-30 seconds between button pushes. If you take longer than 30 seconds, the controller will revert back to displaying the cabinet temperature. If you enter the wrong security code, the controller will revert back to displaying the cabinet temperature. You can exit the parameters at any time by pressing the alarm cancel button or by waiting 20-30 seconds. VII.
VII. INTELA-TRAUL® (continued) VII. g - CUSTOMER SERVICE PARAMETERS: Listed below are the available parameters in the order they appear, using the down arrow key on the controller. You can use either the up or down arrow keys to scroll through the options.
VII. INTELA-TRAUL® (continued) VII. i - ADJUSTING THE THERMOSTAT SET POINT LOW: This parameter sets the low point of the desired cabinet temperature range. Typically, freezers will range from -6° F to -4° F (-21° C to -20° C) and refrigerators will range from 32° F to 34° F ( 0° C to 1° C) for this parameter setting. This parameter is preset at the factory and does not have to be adjusted unless the customer chooses to do so. Note: Set Point Low and Set Point High cannot be set to the same temperature.
VII. INTELA-TRAUL® (continued) VII. k - SETTING THE 24-HOUR CLOCK: The internal timeclock must be set in order for the data storage memory to correctly log events and to allow any defrost lockout to occur at the correct time of day. If the clock is not set, the control assumes the time is 12 a.m. at the time power is supplied to the unit. The hours on a 24-hour time clock read the following way: H01 = 1:00 a.m. H02 = 2:00 a.m. H03 = 3:00 a.m. H04 = 4:00 a.m. H05 = 5:00 a.m. H06 = 6:00 a.m. H07 = 7:00 a.m.
VII. INTELA-TRAUL® (continued) VII. l - SETTING THE DATE: The date must be set in order for the data storage memory to correctly log events. Follow the instructions to enter the customer access code on page 11. When the control displays Set Point High, press the down arrow key until the control display reads the set button SET . The display will show Press the arrow keys Thermostat Date. Press (year). The right two numbers will be flashing. to set the year.
VII. INTELA-TRAUL® (continued) VII. n - STARTING A MANUAL DEFROST CYCLE: This parameter allows a service technician to start a defrost cycle at any time. This parameter will override any lockout settings. Follow the instructions to enter the customer access code on page 11. When the control displays Thermostat Set High, press the down arrow key display reads until the control Start Manual Defrost. Press the set button SET . The display will show (NO). Press either arrow key (YES).
VII. INTELA-TRAUL® (continued) VII. o - SETTING THE DEFROST LOCKOUTS: The defrost lockout parameters allow the customer to prevent the unit from going into a defrost cycle for two hours during a set timeframe. Customers can set up to four defrost lockout parameters. They are all programmed the same way. The parameters will be set for the time the lockout is to start. The controller automatically calculates 2 hours from that setting.
VII. INTELA-TRAUL® (continued) VII. p - ADJUSTING THE DOOR PERIMETER HEATERS: This parameter allows the customer to turn ON and OFF the anti-condensate door perimeter heaters. This parameter is set to the highest setting (100) at the factory so that the door heaters stay on continuously. If you choose to have the door heaters cycle on and off, lower this parameter to approximately 30. If condensation forms around the doors, increase the parameter until condensation stops.
VII. INTELA-TRAUL® (continued) VII. r - SETTING THE AUDIBLE ALARM STYLE: This parameter will allow the customer to turn on/off the audible alarm feature on the INTELA-TRAUL® control. The audible alarm is preset from the factory to OFF. The customer can choose between an audible alarm that sounds for 3 seconds then automatically turns off, or a continuous audible alarm that must be manually acknowledged. Regardless of this feature’s setting, visual alarm text will display when conditions warrant.
VII. INTELA-TRAUL® (continued) VII. t - HOT FOOD UNITS, ADJUSTING THE THERMOSTAT & TURNING THE UNIT OFF/ON: This parameter sets the desired cabinet temperature. Please note that hot food units are delivered from the factory set to the OFF position. Follow the instructions to enter the customer access code on page 11. When the control reads Thermostat Set Point High, press the set button SET . Use the arrow keys to adjust the temperature to your desired setting.
VIII. TROUBLE SHOOTING GUIDE FIND YOUR PROBLEM HERE REMEDY 1. Condensing unit fails to start. a. b. Check if cord & plug has been disconnected. Check INTELA-TRAUL® temperature setting. 2. Condensing unit operates for prolonged periods or continuously. a. b. c. Are doors closing properly? Dirty condenser or filter. Clean properly. Evaporator coil iced. Needs to defrost. See instructions for setting a manual defrost cycle on page 16. Shortage of refrigerant, call service. d. 3.
XI.
XII. STAINLESS STEEL OVERVIEW XII. a - INTRODUCTION: All Traulsen R & A Series Refrigerator, Freezer, DualTemp and Heated Cabinet models are constructed with a high quality 430 series, 20 gauge stainless steel exterior finish (front, sides and doors). The interior finish on these same R-Series models are constructed using 300 series stainless steel (anodized aluminum is used for A-Series). XII. c - UNDERSTANDING THE CAUSES OF CORROSION: should be cleaned up promptly to avoid possible stains and corrosion.
XIII. CARE OF STAINLESS STEEL (cont’d) XIV. CORROSION REMEDIES XIII. c - CLEANING SUMMARY - DO’S & DONT’S: To summarize the proper cleaning of Traulsen refrigeration products, always follow the below guidelines. XIV. a - DEALING WITH RUST AFTER THE FACT (cont’d): STEP THREE - Apply a preservative polish, such as “Sheila Shine,” to the affected area (see section II. e). DO use only cleaning products designed for stainless steel, or cleaning products which do not contain chlorides.
XV. WARRANTY INFORMATION STANDARD DOMESTIC WARRANTY TRAULSEN warrants new equipment to the original purchaser, when installed within the United States against defective material and workmanship for one (1) year from the date of original installation. Under this warranty, TRAULSEN will repair or replace, at its option, including service and labor, all parts found to be defective and subject to this warranty. The compressor part is warranted for an additional four (4) years.
XVI.
HOURS OF OPERATION: Monday thru Friday 7:30 am - 4:30 pm CST Traulsen 4401 Blue Mound Road Fort Worth, TX 76106 Phone: (800) 825-8220 Fax-Svce: (817) 740-6757 Website: www.traulsen.