Quality Refrigeration OWNER’S MANUAL Instructions for the installation, operation, and maintenance of Blast Chiller Models: RBC50 (50 lb. capacity undercounter model) RBC100 (100 lb. capacity reach-in model) RBC200 (200 lb. capacity roll-in model) RBC200RT (200 lb. capacity roll-thru model) RBC400 (400 lb. capacity roll-in model) RBC400RT (400 lb. capacity roll-thru model) This Traulsen unit is built to our highest quality standards.
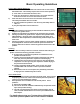
I. INTRODUCTION Thank you for your decision to purchase a Traulsen Blast Chiller. This important piece of food safety equipment is built to our highest standards and will provide you with years of dependable service. However, it is important to note that although this product is designed to chill product from 135°F down to below 41°F within FDA/HACCP guidelines, several operational factors, such as product temperature, density, loading, etc. will all effect actual chilling performance.
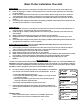
Blast Chiller Installation Checklist Model RBC50 1) Insure proper clearances, no obstruction to either front louver for at least 24” from cabinet face. 2) Install all eight legs or casters, insuring that the unit is level for proper operation (see section III d. for more details). 3) Install the control panel (see section III n. for more details). Before doing so be sure to perform a visual inspection of the control to insure that no connections have come loose during shipment.
Blast Chiller Quick Start Checklist Starting a Chill Cycle - All Models 1) Load product into the blast chiller. Both full and partial loads are OK, but for best results evenly distribute product throughout the interior tray slides or roll-in rack. 2) Insert a food probe into the top, bottom and middle level pans. The probe should be located in the center of the food pan, at about the halfway point of the product depth. 3) Close the door. 4) Press the EZ Start button.
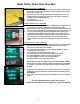
Basic Operating Guidelines Chilling Within HACCP Guidelines 1) The current FDA Food Code allows much more time for safe chilling than 90-minutes. This actually requires two critical control points of: a) From 135°F to 70°F within two hours, then... b) From 70°F to below 41°F within four hours, for a total chill time from 135°F to below 41°F of no more than six hours. 2) Total chill times can exceed six hours in duration and still be safe.
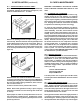
III. INSTALLATION (continued) II. RECEIPT INSPECTION III. d - INSTALLING LEGS OR CASTERS (cont’d): box(es), it should contain either four (4) legs or casters (RBC50 x 8 or RBC100 x 4 and four bolts for each caster). All Traulsen products are factory tested for performance and are free from defects when shipped. The utmost care has been taken in crating this product to protect against damage in transit.
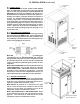
III. INSTALLATION (continued) 6” Clearance In Rear III. f - CORD & PLUG: All Traulsen Blast Chill models (except model RBC100 which is supplied with a cord set but no plug) are supplied with a cord & plug attached (for models RBC200 and RBC200RT, the cord and plug supplied is for the self-contained maintenance compressor only, the 4HP remote condensing unit requires a separate electrical connection of its own). It is shipped coiled at the top of the cabinet, secured by a nylon strip.
III. INSTALLATION (continued) III. j - REMOTE CONDENSING UNIT REQUIREMENTS: This section applies only to models RBC200/200RT and RBC400/400RT. A remote condensing unit, operating on R-404A refrigerant, is required for Blast Chill operation on these models. The remote condensing unit should be capable of providing 18,700 BTU/hr @ -10°F evaporator temperature in a 90°F ambient environment. III.
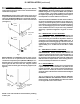
III. INSTALLATION (continued) III. n - INSTALLING RBC50 CONTROL PANEL: Model RBC50 is shipped with the control panel detached, and laid flat, taped to the cabinet top (see figure 9). This must be installed before use. To install: IV. CARE & MAINTENANCE WARNING: DISCONNECT ELECTRICAL POWER SUPPLY BEFORE CLEANING ANY PARTS OF THE UNIT. IV. a - CLEANING THE CONDENSER: The most important thing you can do to insure a long, reliable service life for your Traulsen is to regularly clean the condenser coil.
IV. CARE & MAINTENANCE (cont’d) V. OTHER IV. c - INSTALLING PRINTER PAPER (cont’d): extends about 1/4" in front of the printer. Then return the feed door to its original position. If the feed door is not closed, the printer will not operate. Labels are loaded in the same manner. The label printer is located to the right of the record printer as you look at the unit. After turning the unit on, the label printer will automatically orient itself for the next label. V.
VI. THE SMARTCHILL® CONTROL VI. a - THE SMARTCHILL CONTROL - OVERVIEW: This unit is equipped with our exclusive SmartChill® microprocessor control (Traulsen Blast Chill units manufactured prior to 6/03 were equipped with the DIGITRAUL II control, please refer to owner's manual part number 375-60180-00 for more information). MAIN MENU SmartChill RBC100 VERSION X.XX AIR 41 °F BY TEMP BY PROD BY TIME EZ START 08:05:01 VI.
VII. OPERATING THE BLAST CHILL CONTROL - STARTING A CHILL CYCLE MAIN MENU BY TEMP BY TIME 08:05:01 AIR 35 °F BY PROD MORE VII. a - STARTING A CHILL CYCLE - BY TEMP: Use of the chilling mode BY TEMPERATURE means that product will be constantly chilled until the food probe(s) temperature reaches the preset target temperature, at which time the cycle is complete and operation reverts to normal refrigerated holding mode. Main Menu Display The main menu should be displayed on the control.
VII. OPERATING THE BLAST CHILL CONTROL - STARTING A CHILL CYCLE VII. a - STARTING A CHILL CYCLE - BY TEMP (cont’d): STEP SIX: Select the “done” probe(s) by pressing the button(s) to the left or right of where that number probe(s) is displayed. Remove all product associated with the “done” probe(s) from the chiller. If all probes have completed their respective batches, the display changes to the HOLDING screen menu.
VII. OPERATING THE BLAST CHILL CONTROL - STARTING A CHILL CYCLE MAIN MENU BY TEMP BY TIME 08:05:01 AIR 35 °F BY PROD MORE VII. b - STARTING A CHILL CYCLE - BY TIME: Use of the chilling mode BY TIME means that product will be constantly chilled until the set chill time, as determined by the operator, has elapsed, at which time the cycle is complete and operation reverts to normal refrigerated holding mode. Main Menu Display The main menu should be displayed on the control.
VII. OPERATING THE BLAST CHILL CONTROL - STARTING A CHILL CYCLE VII. c - STARTING A CHILL CYCLE - BY PRODUCT: Use of the chilling mode BY PRODUCT allows the operator to select from a listing of chill parameters for various previously programmed products. These products will then be chilled either BY TEMPERATURE or BY TIME, depending upon their individual settings. When the chill cycle is completed operation reverts to normal refrigerated holding mode. The main menu should be displayed on the control.
VII. OPERATING THE BLAST CHILL CONTROL - STARTING A CHILL CYCLE VII. d - THE CHILL BY PRODUCT FEATURE - PRODUCT LIST: Any product from the PRODUCT LIST can be chilled using the BY PROD mode, once it has been enabled in Setup Products (page 22). Only CHICKEN PARTS and SOUP VEGETABLE are initially enabled as preset at the factory. NOTE: All products are initially set in the BY TEMP - CHILL mode with a Target Temperature of 37°F and Holding Temperature of 37°F.
VII. OPERATING THE BLAST CHILL CONTROL - HOLD MODE & DEFROST VII. e - REFRIGERATED HOLD MODE: At the completion of a chill cycle, regardless of the mode used, the Traulsen blast chiller reverts to normal refrigerated holding mode of 37°F. Hold mode can also be manually selected at any time (i.e. interrupting the chill cycle) by using the HOLD MODE feature. When in the holding mode both the mainteance and blast chill compressors will operate during cooling portions of the cycle.
VII. OPERATING THE BLAST CHILL CONTROL - PRINTING VII. g - PRINTING BATCH/CHILL CYCLE DATA: Once a chill cycle is complete, data can be printed. MAIN MENU BY TEMP BY TIME 08:05:01 AIR 35 °F BY PROD MORE MAIN MENU HOLD PROD DEFROST BACK PRINT: CYCLE Press to select DATA. ← 4/03 08:40 → Press to change to a previous date. RECORD For multi-batching, press to select probe. PRB#1 MAIN MENU PRINT Press to return to MAIN MENU. 08:06:01 PRINT SETUP Press to change to a future date.
VII. OPERATING THE BLAST CHILL CONTROL - SET UP PRODUCTS VII. h- SET-UP PRODUCTS: Pages 15 and 16 describe the chill BY PRODUCT mode, where the operator can choose from a preprogrammed list of product chill parameters. As shipped from the factory, only two products on the list are enabled and ready from immediate use (chicken parts and vegetable soup). To enable any of the other food products which appear on the list please follow the below procedure.
VII. OPERATING THE BLAST CHILL CONTROL - SET UP USERS MAIN MENU BY TEMP BY TIME 08:05:01 AIR 35 °F BY PROD MAIN MENU BY TEMP BY TIME 08:05:01 AIR 35 °F BY PROD MAIN MENU HOLD PROD DEFROST BACK 08:06:01 PRINT SETUP SETUP PRODUCTS USERS MAIN MENU MORE VII. h - SET-UP USERS: The SmartChill® control offers the convenience of having individual operators have their own unique BY PRODUCT and SYSPAR settings already programmed, facilitating the changing chilling needs of different production shifts.
VII. OPERATING THE BLAST CHILL CONTROL - SYSPAR VII. i - ACCESSING SYS PAR SETTING LEVEL: SYS PAR represents the supervisor level of access to the SmartChill® controller, allowing on-site adjustment to the factory preset operating parameters. To enter the SYSPAR access level please follow the below procedure. STEP ONE: From the MAIN MENU, select MORE by pressing the button to the right of where this is shown on the display. The menu shown will then change to display additional menu options.
VII. OPERATING THE BLAST CHILL CONTROL - SYSPAR VII. j - SYSPAR - SETTING THE VARIOUS CONTROL FEATURES: By accessing SYSPAR (system parameters), the operator can adjust many control features to better suit their operational needs, such as: Clock Settings, Probes, Temperature Scale (F or C), Alarm Settings and Chill Parameters. It also provides for an easy return to the original factory default settings with a RESET feature.
VIII. SMARTCHILLTM COMMUNICATIONS VIII. a - INTRODUCTION: All Traulsen SmartChill® equipped blast chiller models are supplied from the factory capable of on-line communications. However, an optional software/hardware kit is required to make this compatible with your PC. Use of this provides many user advantages, such as: • • • • Retrieving Batch/Chill Cycle Data Viewing Users and Their Status Exporting Data To A Spreadsheet Adding Additional Products To The BY PRODUCT Mode VIII.
IX. GLOSSARY Alarms: Sets buzzer intervals after Door is Open or when to be notified that the Compressor needs to be Cleaned. By Temp: Chill cycle that terminates when the probes reach the Target Temperature. By Time: Chill cycle that terminates after a set amount of time has lapsed. By Prod: Chill cycle that terminates after a particular product’s specified chill parameters are met (the parameters can be set either By Temp or By Time with specific cut-offs for a particular product.
X.
XI. SUMMARY OF ERROR MESSAGES SYSTEM/CONTROL ERROR CURRENT PROBE IS BAD CHECK FOOD PROBES PLUGGED IN EXIT CHILLING AIR: 10 °F 41 °F 3 2 37 °F STOP/RESET XI. a - FOOD PROBE ERROR DURING CHILL CYCLE BY TEMP: In the event of a food probe error during a BY TEMP chill cycle, the control automatically switches to a BY TIME chill cycle. The timer will begin to countdown from 90 minutes, at which time the chill cycle will be complete. XI.
XII. WARRANTY INFORMATION STANDARD DOMESTIC WARRANTY TRAULSEN warrants new equipment to the original purchaser, when installed within the United States against defective material and workmanship for one (1) year from the date of original installation. Under this warranty, TRAULSEN will repair or replace, at its option, including service and labor, all parts found to be defective and subject to this warranty. The compressor part (selfcontained only) is warranted for an additional four (4) years.
XIII. MECHANICAL TROUBLE SHOOTING GUIDE 1. Condensing unit fails to start when programming a new batch. a. Check power supply to condensing unit. b. Batch was not programmed properly. Select chill method, press START, and if required select probes. c. System problem. Call for service. 2. Batch requires too much time to chill product down to 40° F. Chill Cycle Batch Over 6-Hours will ALARM and a printout will note the chill cycle has exceeded maximum safe time. a. b. c. d. 3.